
Installation Sheet


PERLICK RESIDENTIAL COLUMN REFRIGERATION INSTALLATION INSTRUCTIONS
4 | perlick.com/residential
PRIOR TO INSTALLATION
PRIOR TO INSTALLATION
Before beginning installaon, carefully
inspect the cabinet for hidden damage. If damage is discovered,
immediately le a claim with the transportaon company.
Perlick is not responsible for damage in transit.
When moving the unit, be sure to protect
nished ooring with appropriate material to avoid damage
from moving the appliance.
If the unit has been laid on its back or sides,
place unit upright and allow minimum of 24 hours before
connecng the unit. Failure to do so can aect the funcon and
performance of the appliance.
This appliance should be installed in dry,
venlated indoor locaon. The ambient temperature of the
locaon must be between 55°F (13°C) and 100°F (43°C) for
opmal performance.
This product must be installed on a level
oor for safety and opmal performance. The base must be
at to ensure an-p brackets properly funcon and that
the refrigeraon system is level. Any walls and surrounding
furniture/xtures need to be securely aached to the oor, wall
studs or concrete prior to installaon of the column.
To ensure proper performance, the air
intake (toe kick) must not be blocked. Perlick refrigeraon is
front-breathing — covering the intake will cause the system to
overheat and fail.
In addion, the appliance must not be in direct exposure of
constant sunlight or excessive heat. If it must be installed next
to a heat source, such as a cooking appliance or radiant heat,
you must install an insulang plate between the column and
heat source.
When fully stocked, Perlick column refrigeraon is very heavy.
To ensure the safety and prevent home damage, the load-
bearing capacity of your oor must be 846 lbs (384 kg).
CAUTION
CAUTION
CAUTION
CAUTION
CAUTION
CAUTION
INSTALLATION TOOLS AND MATERIALS
▪ Screwdrivers (standard and #2 Phillips)
▪ Power drill
▪ Drill bits
▪ 13mm socket or wrench set
▪ 2’ and 4’ levels
▪ Material to protect ooring and surrounding cabinetry
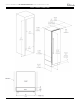
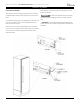
OPENING DIMENSIONS - SINGLE UNIT
The depth of each Perlick column is 24” (610). Allow for
panel thickness when planning the nished opening depth. A
minimum of a 4” (102) nished return is required on all sides
of the opening. See page 5 for niche and product dimension
drawings.
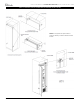
It is important that the side walls of the niche are plumb prior
to installaon. The minimum thickness of both the side walls
and the top wall must be 5/8” (16). A thickness of 3/4” (19) is
recommended for toe kick panels.
Framed cabinets will require addional nished ller material
behind the face frame for a proper installaon. Refer to the
illustraon on page 5.
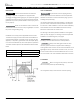
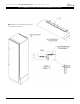
OPENING DIMENSIONS - TWO UNITS
When installing two units side-by-side, a Perlick Dual Installaon
Kit (part number CR-ACC-D1) is required. You must plan for
both units plus dual installaon kit when planning the cut-out
dimensions. Thecutoutwidthfordualinstallaonsis48-1/2”
For more informaon, see instrucons that accompany the CR-
ACC-D1.