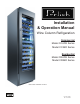
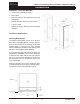
Installation & Operation Manual Wine Column Refrigeration Commercial Model CC24W Series Model CC24D Series Residential Model CR24W Series Model CR24D Series Model CC24W-1-4R/CR24W-1-4R Shown Form No. Z2487 Rev. 11.24.
Wine Column Refrigeration Installation & Operation Manual TABLE OF CONTENTS General Information.................................................................................................................................. 2 Opening/Niche Dimensions...................................................................................................................... 5 Placement and Alignment of Appliance..................................................................................................
Wine Column Refrigeration Installation & Operation Manual SAFETY Indicates a hazard MAY PLEASE READ all instructions completely before attempting to install or operate the unit. Take particular note of the DANGER, WARNING an CAUTION information in the manual. The information is important for the safe and efficient installation, operation and care of your Perlick unit. WARNING cause serious injury or death if precautions are not followed.
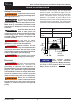
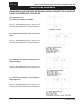
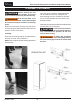
24" Wine Column Refrigeration Installation & Operation Manual PRIOR TO INSTALLATION Safety Precautions Installation must comply with all applicable electrical codes. The electrical supply must be located within the shaded area of the illustration below. A separate circuit, servicing only this appliance, is required. A ground fault circuit interrupter (GFCI) is not recommended and may cause interruption of operation. The outlet should be placed in the hatched area dimensioned below.
Wine Column Refrigeration Installation & Operation Manual INSTALLATION Installation Tools and Materials • Screwdrivers (standard Phillips.) • Power Drill • Drill bits (masonry bits required for concrete installation) • Standard socket, wrench and 1/2” socket • 2’ and 4’ levels • Material to protect flooring and surrounding cabinetry FACE For Built-In Applications Opening Dimensions The depth of each Perlick column is 24” (610) to door face (not including the 3/4” overlay).
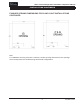
Wine Column Refrigeration Installation & Operation Manual INSTALLATION CONTINUED ADJACENT WALL OR STRUCTURE MINIMUM CLEARANCE REQUIREMENTS WHEN BUILDING INTO STRUCTURE OR NEXT TO ADJACENT WALLS REFERENCE THIS DRAWING FOR MINIMUM REQUIRED CLEARANCES TO AVOID INTERFERANCE WHEN OPENING THE DOOR(S). THE ADJACENT STRUCTURE CLEARANCES INDICATED ARE BASED ON A STANDARD PERLICK HANDLE INSTALLED ON THE DOOR OVERLAY. MINIMUM SPACING REQUIRED BETWEEN ADJACENT CABINETS TO AVOID DOOR SWING INTERFERENCE.
Wine Column Refrigeration Installation & Operation Manual INSTALLATION CONTINUED MINIMUM SPACING REQUIRED BETWEEN ADJACENT CABINETS TO AVOID DOOR SWING INTERFERENCE CONTINUED. Opening Dimensions (C) 2 Cabinets HANDLE TO HINGE. Refer to (C) Opening diagram (page 8) for finished opening dimensions and outlet locations. (D) 3 Cabinets with Hinges either all left or all right. Refer to (D) Opening diagram (page 8) for finished opening dimensions and outlet locations.
Wine Column Refrigeration Installation & Operation Manual INSTALLATION CONTINUED MINIMUM SPACING REQUIRED BETWEEN ADJACENT CABINETS TO AVOID DOOR SWING INTERFERENCE CONTINUED. (G) 3 Cabinets with Hinges Right-Left-Left or LeftRight-Right. Refer to (G) Opening diagram (page 9) for finished opening dimensions and outlet locations. FINISHED OPENING DIMENSIONS FOR 2 AND 3 UNIT INSTALLATIONS.
Wine Column Refrigeration Installation & Operation Manual INSTALLATION CONTINUED FINISHED OPENING DIMENSIONS FOR 2 AND 3 UNIT INSTALLATIONS CONTINUED. Note: For installations involving more than 3 cabinets, combine opening dimensions for the openings which correspond to the combined Hinge and Handle configurations.
Wine Column Refrigeration Installation & Operation Manual PLACEMENT & ALIGNMENT Before moving the unit into position, secure the door closed and protect any finished flooring. CAUTION Once the unit is in position, height adjustment can be made from the front. Using the hex driver leveling tool, turn clockwise to raise the unit or counterclockwise to lower. Refer to the illustration below. If the unit has been on its WARNING back, it must stand upright for a minimum of 24 hours before connecting power.
Wine Column Refrigeration Installation & Operation Manual ANTI-TIP BRACKET Always wear safety glasses and use other necessary protective devices or apparel when installing or working with anchors. Anchors are not recommended for use in lightweight masonry material such as block or brick, or for use in new concrete which has not had sufficient time to cure. The use of core drills is not recommended to drill holes for anchors. The anti-tip bracket and supporting hardware is included with your unit.
Wine Column Refrigeration Installation & Operation Manual Anti-Tip Application for Freestanding Applications NOTE: Cabinet must be leveled before securing to wall with anti-tip bracket.
Wine Column Refrigeration Installation & Operation Manual INSTALLING DOOR OVERLAY PANELS Typical panel dimensions are based on 84” (2134) finished height with 1/8” (3) reveals. Template must be adjusted for panels exceeding typical dimensions. 2 3 1 16 8 " 1 24" 3 14" 3 14 8 " 3 98" .136 5 78" C Use provided #10 x 1/2” screws to attach clips to overlay. Overlay then slides onto door face. Attach overlay to door adjustment brackets using remaining #10 x 1/2” screws.
Wine Column Refrigeration Installation & Operation Manual INSTALLING DOOR OVERLAY PANELS CONTINUED Custom Overlay Panels A custom door panel and handle hardware must be installed. The thickness of the custom panel can vary. A minimum 5/8” (16) thick panel is required, but the thickness can be increased provided it does not exceed the maximum panel weight of 65 lbs (29). 3/4” panel is recommended. Please note that the combined door and overlay weight cannot exceed 120 lbs (54).
Wine Column Refrigeration Installation & Operation Manual DOOR OVERLAY PANEL ADJUSTMENT Close the door to make adjustments to align panels and reveals. For up-and-down adjustments, turn the height adjustment screws in the top bracket in and out. Adjust the screws as needed to achieve an even reveal on each side of the door overlay.
Wine Column Refrigeration Installation & Operation Manual DOOR TRIM INSTALLATION Once overlay is adjusted, mount the door trim bracket onto the door adjustment bracket using the provided screws. DOOR TRIM DOOR TRIM DETAIL J SCALE 1 : 6 DOOR TRIM ON DOOR PANEL FRAME 2 OVERLAY TEMPATE CONDENSOR DIVIDER PANEL FRAME 1 GASKET INSTALLATION STEPS DOOR TRIM ON DOOR PANEL 1. 2. 3. INSTALL FRAME 1 TO OVERLAY. INSTALL GASKET ONTO FRAME 2. MOUNT FRAME 2 ONTO FRAME 1.
Wine Column Refrigeration Installation & Operation Manual COMPLETION - GRILL INSTALLATION Install the grill by snapping into latch catches.
Wine Column Refrigeration Installation & Operation Manual INSTALLING AIR FILTERS Carbon Air Filter The carbon air filters should be placed on the perforated panel located in the top-rear of the cabinet. NOTE: The top wine rack will need to be removed to access the filter. 1. Remove the filter from the plastic bag before installing into the unit. Do not open or puncture the tyvek bag. CARBON AIR FILTER (BETA UNITS) 2. To lower the carbon air filter panel, pull firmly.
Wine Column Refrigeration Installation & Operation Manual WINE COLUMN DIGITAL CONTROL OPERATION WINE COLUMN DIGITAL CONTROL OPERATION 8 The following instructions are for the PerlIQ™ digital controller in Perlick column wine reserves (models CC24W and CC24D).
Wine Column Refrigeration Installation & Operation Manual Storing White Wine Cellaring Wine Perlick wine columns are preset with expertrecommended temperature settings for white wine. To set a zone in dual zone models to this preset, touch the temperature zone selection icon (2) to illuminate the zone you’d like to set to white wine temperature, then choose the white wine temperature setting icon (3) to set. For single zone models, simply choose the white wine temperature setting icon (3).
Wine Column Refrigeration Installation & Operation Manual Changing from Fahrenheit to Celsius scale Quick Cool (Shopping) Mode The controller is factory set to Fahrenheit scale, but can easily be changed to read Celsius in the settings menu. The wine column can be set to Quick Cool (shopping) mode to lower the temperature after loading a large quantity of product to quickly bring them to the preferred temperature. Press the settings menu (15) icon on the far right.
Wine Column Refrigeration Installation & Operation Manual STAINLESS STEEL CARE AND CLEANING Perlick’s stainless steel surfaces are food grade, 304 stainless steel. Stainless steel is a “passive” metal because it contains other metals like Chromium, Nickel and Manganese that stablize the atoms. Chromium provides an invisible film that covers the steel surface, acting as a shield agent against corrosion. As long as the film is intact and not contaminated, the metal is passive and stainless.
Wine Column Refrigeration Installation & Operation Manual WINE STORAGE Wine Shelving ▪ Prior to making shelf adjustments, clear the shelf of product. Shelf must be empty prior to changing its position. 2 3 1 3 To Install Wine Shelves To Remove Wine Shelves PILASTER PILASTER C C FIXED FIXEDSLIDER SLIDERWITH WITHBRACKET BRACKET SHELF 1. PULL OPEN THE SHELF 2 PULL OPEN THE SLIDER LEVER 3. REMOVE THE SHELF FROM SLIDER MOVABLE SLIDER PILASTER 2 DETAIL N DETAIL N SCALE 1 : 2 SCALE 1 : 2 1 3 B 4.
Wine Column Refrigeration Installation & Operation Manual AIR FILTRATION SYSTEM We recommended changing the air filters every 6 months for optimum performance. Filters can be purchased through your local authorized Perlick dealer. Carbon Air Filter CARBON AIR FILTER (BETA UNITS) The carbon air filters should be placed on the perforated panel located in the The Carbon aircabinet. filter removes odor, bacteria and mold top-rear of the spores fromthe thefilter air.
Wine Column Refrigeration Installation & Operation Manual WARRANTY The terms and conditions set forth below together with those appearing on the face of the Acknowledgement (the “Order”) constitute the complete and exclusive agreement between Perlick Corporation and the Buyer pertaining to the goods and/or services identified in the Order. If there is a discrepancy or conflict between any exhibit or supplement to the Order and these terms and conditions, these terms and conditions shall control.
Wine Column Refrigeration Installation & Operation Manual ONE YEAR LABOR WARRANTY When a return is authorized, a credit may be allowed pending an examination of the returned goods. The amount of the restocking charge will depend on the condition of the equipment. The minimum restocking charge for glass washers, bottle coolers, frosters, direct draws, cooler series back bars and accessory parts is 20%. The minimum restocking charge for custom series cabinets is 50%.
Wine Column Refrigeration Installation & Operation Manual 27 Printed in USA
Form No. Z2487 Rev. 11.24.2020 8300 West Good Hope Road • Milwaukee, WI 53223 • Toll Free 800.558.5592 • Fax 414.353.7069 • www.perlick.