
Installation Instructions

PERLICK RESIDENTIAL COLUMN REFRIGERATION INSTALLATION INSTRUCTIONS
2 | perlick.com/residential
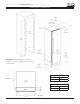
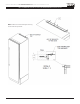
PRODUCT IDENTIFICATION PLATE
Your product informaon can be found on the product’s
idencaon plate. The idencaon plate for CR24 and CR30
column refrigeraon models is located on the sidewall behind
the toe kick plate. To access the indencaon plate, simply
remove the toe kick plate (grill). The idencaon plate will be
adhered to the right sidewall.
INTRODUCTION
Congratulaons on your purchase of a Perlick Collecon column
refrigeraon appliance. This manual has been prepared to assist
you in the installaon of your column refrigerator, freezer and
wine reserve.
We dedicate considerable me to ensure that our products
provide the highest level of customer sasfacon. We thank
you for selecng Perlick products for your home and assure you
of our connuing interest in your sasfacon.
WARRANTY REGISTRATION
To register your Perlick product, visit our website at
www.perlick.com/RegisterMyPerlick and ll out the form.
Once completed, click on the ‘Submit Warranty Registraon’. Be
sure to register your product immediately upon installaon to
receive the warranty from installaon date instead of shipment
date. If le blank, the date will revert back to shipment date.
CONTENTS
3 Safety Consideraons
4 Prior to Installaon
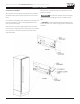
4 Opening Dimensions (Single and Dual)
5 Niche/Product Dimensions, Installing adjacent to wall
6 Electrical
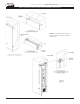
6 An-p Bracket
6 Installing 90° Hinge Pin
7 Leveling/Alignment
10 Door/Side Panel Informaon
16 Door Panel Installaon/Adjustment
18 Air Flow Divider
18 Door Trim Installaon
19 Compleon - Grill Installaon
20 Toe Kick Clearance
21 Installing Filters