
User Guide


© 2009
8
24” ADA-Compliant Series Operation / Installation Manual
3. Countersink screw heads so screw heads are flush with
backside of panel. Attach handle to overlay panel.
Overlay Installation
CAUTION
Proper wood working tools should be used to avoid damage
or errors in workmanship.
1. With the unit secured in position, open the door and
make sure panel pre-drilled holes align with door frame
holes.
2. Loosely attach four corners of the overlay panel to the
door using #10 x 1” wood screws, installed through the
door frame from the rear.
3. Check for overall wood overlay panel fit, position and func-
tion. Make minor adjustments as necessary. When panel
is properly aligned, tighten mounting screws securely.
Install the rest of the mounting screws and tighten
securely.
CAUTION
Do not overtighten wood overlay attachment screws as this
may damage factory supplied door frame.
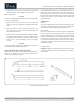
WOODEN WINE RACK TRIM FINISHING
All wine racks come with an unfinished solid hardwood face,
which can be removed and replaced with other wood to
match the surrounding cabinetry.
The included unfinished faces can be finished and sealed. In
many cases, stains and/or finishes have odors that may be
objectionable in an enclosed area. To remove the front wood
face from the wine shelf, simply pull out the wine shelf and
remove the fasteners. Finish as desired and re-install with
original fasteners.
OPERATION
General
The unit is equipped with a state-of-the-art refrigeration sys-
tem and is a frost-free model. The evaporator coil automati-
cally defrosts on demand at predetermined intervals.
Interior Light
The unit is equipped with an interior light that illuminates
when the door is opened. A manual switch is located next to
light for displaying the product through a glass door. Always
ensure the manual switch is in the off position before closing
a solid wood or stainless steel door. If manual switch is left on
for an extended period of time, it may increase the cabinet
temperature, especially at the top, and cause the refrigeration
system to run longer.
Loading Product
IMPORTANT: Before storing perishables, allow unit to run for
a minimum of 24 hours to allow temperature stabilization
after start-up.
Figure 9. Wooden Wine Rack Trim