
Tap Installation Instructions
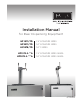

PERLICK RESIDENTIAL INSTALLATION MANUAL FOR BEER DISPENSING EQUIPMENT
4 | perlick.com/residential
INSTALLATION OF DISPENSING EQUIPMENT
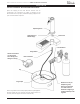
Open the tapping kit box and become familiar with its
components. If the dispensing head is going to be mounted on
a counter top directly above the refrigerated cabinet, have the
counter top pre-drilled using the supplied template on page 11.
Make sure that the access hole in the refrigerated cabinet is in
line with the counter top holes. Remove any obstrucons from
the access hole of the refrigerator.
Follow instrucons on pages 4 through 10 to properly install
the tapping equipment on your perlick unit, or watch our Beer
Dispenser Tapping Installaon video. Informaon on how to
access this video can be found to the right.
Scan the QR code with your
mobile device to watch the video
instantly.
Use the following web link to view the video through
your browser window: hp://youtu.be/NCKP6x2zZmo
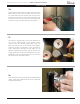
NOTE: Wash tapping devices thoroughly.
Flush beer and faucet lines, as well as the
tapping device (keg coupler) with fresh
water.
IF YOU ARE INSTALLING A DRAFT ARM - SKIP TO PAGE 6. THE FOLLOWING INSTRUCTIONS
ARE ADDITIONAL PREPARATION STEPS FOR THE ADARA DISPENSING HEAD ONLY
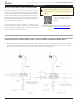
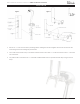
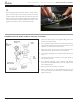
1. Mark the air tube for correct length dependent upon your installaon scenario. If installing directly on top of the refrigerated
cabinet, make a mark 5 inches from the boom of the tower (Figure 1). If installing directly on top of a countertop, add the
depth of the countertop to the original 5 inches and mark at that new dimension (Figure 2).
Figure 1. Figure 2.
INSTALLATION