
Installation Instructions

PERLICK RESIDENTIAL UNDERCOUNTER INSTALLATION MANUAL
Perlick customer service (800)558-5592 | 11
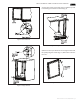
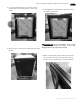
12) Place the lower V-block into the lower cabinet hinge
with the notch parallel to the cabinet (Fig. 15).
13) Lift the door assembly and insert the top pin into the
bearing. Move door toward cabinet and align the V-blocks
(Fig. 16).
14) Insert and tighten the lower hinge pin to complete
the assembly.
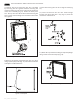
HANDLE INSTALLATION
The handle mounting on the wood
overlay should be mounted on the
overlay only (not the actual door) to avoid damage to
the factory door.
CAUTION
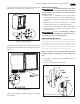
DOOR LOCK INSTALLATION
NOTE: Full size lock installation wood overlay panel templates
are available on the Perlick website. Visit www.perlick.com/
Residential, click on Service & Support, and then choose
Wood Overlay Templates from the menu. Lock templates are
available for all HP, HC, HA and HH series models. Take care in
choosing the correct template for your specic model.
When installing to a wood overlay, perform the lock
installation before mounting the wood overlay to the
door!
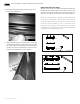
1. See Figure 17 below. Attach mounting bracket to
wood overlay.
2. Insert lock body and attach with nut.
r
Proper woodworking materials
and equipment should be used to
avoid damage or errors in workmanship.
CAUTION
1. Handle must be attached to the overlay before
mounting the overlay onto the door. Mark the rear
of the wood overlay panel with handle fastening
locations.
2. Drill through the wood overlay panel at marked
locations, taking care not to damage the panel.
3. Countersink screw heads so that screw heads are ush
with the back side of the panel. Attach the handle to
the overlay panel.
Figure 15. Installing V-Block
Figure 16. Installing Door
Figure 17. Installing Door Lock