
Installation Instructions


PERLICK RESIDENTIAL UNDERCOUNTER INSTALLATION MANUAL
10 | perlick.com/residential
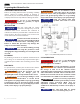
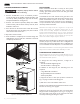
8) Remove the Perlick nameplate from the door front
using a plastic putty knife (Fig. 12). Install the new Perlick
nameplate included in the kit.
9) Insert the bearing into the door hinge bracket (Fig.
13).
10). Insert the V-block into the door bottom hinge
bracket and attach with the e-clip (Fig. 13). Note the
orientation of the V-block.
6°
11) Attach the top and bottom hinges and push plunger
using screws removed in step 6 (Fig. 14).
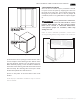
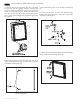
7) Remove the front panel from the door assembly
by removing the door gasket and then removing the
overlay mounting screws, 4 per side, from the perimeter
of the door assembly (Fig. 11). Rotate the front panel
180°. The top becomes the bottom. Reattach using the
same screws and mounting holes and then reinstall the
door gasket.
Figure 11. Removing Front Panel
Figure 12. Nameplate
Figure 13. Bearing and V-Block
Figure 14. Door Hinges