
Installation Guide
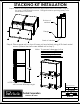
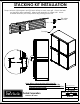

Step 4: Place upper unit on top of lower unit and attach using #10 sheet metal
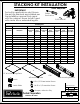
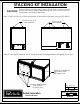
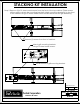
STACKING KIT INSTALLATION
screws (where the rivets were drilled out in step 1).
the bottom of the unit.
by using 1/4-20 machine screws. Flange should be pointing away from
Step 3: Attach mounting plate(where the leg levelers were removed in step 2)
Note: To prevent damage to the
compressor, wait 24 hours
before powering on unit
after turning the cabinet
back to its upright position.
3/12/2014
SW
RELEASE FOR PRODUCTION
JMP
COPYRIGHT 2001 PERLICK CORPORATION. ALL RIGHTS RESERVED.
Milwaukee, WI 53223
DRAWN
Perlick Corporation
95220
JMP 3/12/2014
SCALE
1:20
DATE
REVISIONS
THIS DOCUMENT/PUBLICATION/SOFTWARE/DRAWING CONTAINS PROPRIETARY INFORMATION WHICH IS THE PROPERTY OF THE PERLICK CORPORATION. IT MAY NOT BE REPRODUCED OR TRANSMITTED IN ANY FORM, ELECTRONIC
OR MECHANICAL, INCLUDING PHOTOCOPYING, RECORDING, OR USED IN ANYINFORMATION STORAGE, TRANSMISSION, OR RETRIEVAL SYSTEM, WITHOUT WRITTEN PERMISSION FROM THE PERLICK CORPORATION
A
Flange
cabinet
Bottom of
Back of cabinet
NOTE: Extension of leg levelers
will increase assembly height.
68
15
16
"