RS-CDK INSTALLATION INSTRUCTIONS PERLICK RESIDENTIAL ICED COFFEE DISPENSING KIT To prevent appliance or component damage and injury, read these instructions thoroughly prior to installation and operation. FORM NO. Z2570 REV.
PERLICK RESIDENTIAL RS-CDK INSTALLATION INSTRUCTIONS CONTENTS 3 Introduction 4 Installation 2 | perlick.
PERLICK RESIDENTIAL RS-CDK INSTALLATION INSTRUCTIONS INTRODUCTION CONGRATULATIONS Congratulations on your purchase of a Perlick high quality residential Beer Dispenser. Perlick has proudly manufactured beer dispensing systems for over 50 years for bars, restaurants, stadiums, arenas and large venues around the world. That same technology is used in each and every residential beer dispenser we produce, assuring you’ll pour fresh, cold beer as the brewery intended it to be enjoyed.
PERLICK RESIDENTIAL RS-CDK INSTALLATION INSTRUCTIONS INSTALLATION INSTALLATION OF DISPENSING EQUIPMENT Open the tapping kit box and become familiar with its components. The instructions on pages 4 through 10 will demonstrate how to properly install the tapping equipment on your Perlick Beer Dispenser, with the RS-CDK Iced Coffee Dispensing Kit.
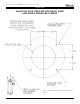
PERLICK RESIDENTIAL RS-CDK INSTALLATION INSTRUCTIONS INSTALLATION MOUNTING HOLE TEMPLATE FOR DRAFT ARMS AND ADARA SIGNATURE TOWERS NOTE: If installing accessory kit on existing unit, skip to page 6.
PERLICK RESIDENTIAL RS-CDK INSTALLATION INSTRUCTIONS INSTALLATION INSTALLATION OF DISPENSING EQUIPMENT Open the tapping kit box and become familiar with its components. If the dispensing head is going to be mounted on a counter top directly above the refrigerated cabinet, have the counter top pre-drilled using the supplied template on page 12. Make sure that the access hole in the refrigerated cabinet is in line with the counter top holes. Remove any obstructions from the access hole of the refrigerator.
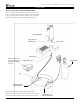
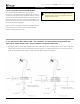
PERLICK RESIDENTIAL RS-CDK INSTALLATION INSTRUCTIONS INSTALLATION Figure 3. Figure 4. 2. Remove air “T” from end of air tube by loosening fastener holding the two halves together. Remove the air tube from the tower being careful not to damage the product tube. 3. Cut air tube at mark made in step 1. Re-install air tube into tower and re-install “T” on the end of the air tube so “T” faces the rear of the tower. 4.
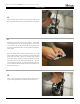
PERLICK RESIDENTIAL RS-CDK INSTALLATION INSTRUCTIONS INSTALLATION 1. Locate the dispensing head , black beer line(s), and hose clamp(s). Slide one end of each beer line onto the stainless steel tubes which protrude out the bottom of the dispensing head and clamp tight. 2. Remove transit tape with a utility knife around the hole in the top of the unit from both inside and outside of the cabinet. Gently punch out foam w/screwdriver and remove. Insert the beer line(s) through the hole in the counter top.
PERLICK RESIDENTIAL RS-CDK INSTALLATION INSTRUCTIONS INSTALLATION 4. Install the Air Scoop Kit. Start by removing the upper set of screws located above the fan on the back wall of the cabinet. 5. Assemble components from the kit as follows – Insert black snap bushing into air scoop mounting bracket, then insert one end of the air snorkel through the snap bushing. A zip tie can be inserted behind the mounting bracket to keep the tube in place.
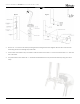
PERLICK RESIDENTIAL RS-CDK INSTALLATION INSTRUCTIONS INSTALLATION 7. Slide one end of red nitrogen hose onto the barb fitting of the regulator and clamp. Slide other end onto a gray quick connect, clamp and attach to coffee tank inlet. 8. Slide black hose from dispensing head to quick connect, clamp, and attach to coffee tank outlet. 9. On the right rear sidewall there is a double column of screws. Remove the left screw. Locate the safety chain and a #10 x 1/2” sheet metal screw from the parts bag.
PERLICK RESIDENTIAL RS-CDK INSTALLATION INSTRUCTIONS INSTALLATION 10. Nitrogen tanks are shipped empty and must be filled prior to use. Turn the adjusting knob on the regulator counterclockwise until the secondary gauge (top) reads zero. Make sure that the valve at the bottom of the regulator where the red hose is connected is in the off position as shown. Watching the secondary pressure gauge, turn the regulator adjusting knob clockwise until the pressure is at 15 psig.
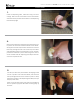
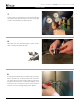
PERLICK RESIDENTIAL RS-CDK INSTALLATION INSTRUCTIONS INSTALLATION CONNECTING THE REGULATOR TO THE NITROGEN CYLINDER 1. Remove the blue plug from the regulator fitting, but do not remove the carbonic washer. NITROGEN 2. Screw regulator onto gas cylinder valve. Tighten with wrench until vertically straight. Be sure that the shut-off valve on the regulator is in the OFF (horizontal) position. 3. Place screw clamp over the end of red line and push onto regulator tail piece. Tighten clamp with a screwdriver.
Perlick Residential is a division of Perlick Corporation © 2018 Perlick Corporation 8300 West Good Hope Road, Milwaukee, WI 53223, USA perlick.com/residential • (800) 558-5592 FORM NO. Z2570 REV.