
Specification Sheet


www.rohlhome.com
INSTALLATION INSTRUCTIONS
Consult your local ROHL showroom for additional information and specications. For complete warranty details and a list of showrooms, go to www.rohlhome.com.
Congratulations on the purchase of your Perrin & Rowe Bathroom Product. Correctly installed and with sensible
care, this product will give you many years of trouble free service.
The Georgian Bathroom Collection
Installation & User Guide
IMPORTANT INFORMATION
Before you proceed... We recommend you engage the services of a registered plumber to install
this product.
For ease of possible future servicing, we also recommend the fitting of conveniently placed
isolating valves.
In addition to the guide below it is essential that the written information overleaf is carefully read
and understood.
Preparation Check Box for Installer
Flush the plumbing system before
installing the bathroom product.
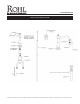
Once unpacked remove large & small base seals,
rosette, hood & lever, securing nut, clamp plate,
pop-up and top waste ready for installation.
1
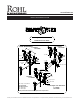
Secure spout with supplied Box Spanner.
Ensure all connections are firmly tightened
3
Please Note: Ceramic disc valves are fitted
as standard to this mixer. Flow from FULLY
OFF to FULLY ON is achieved by rotating the
handles a quarter turn.
2
CARE & MAINTENANCE
Wipe down after use to avoid water spotting and mineral build up.
Occasional cleaning with warm soapy water, followed by a polish with a soft cloth is all that is required to keep the
plated finish in good condition.
Do not use proprietary abrasive liquids, powders, or pads to clean the shower. Do not use any products
with ammonia bleach or limescale remover. You will damage the plated finish and void your guarantee.
BEFORE USE
• Carefully check the installation for leaks.
• If further building work is to be carried out in the vicinity, cover the product with a plastic bag to avoid damaging
the finish.
• Please ensure that the installation complies with local plumbing codes.
4
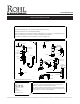
WORK SURFACE
Base Ring
Large Base
Seal
Spout
Clamp Plate
Clamp Bolt
Securing Nut
Box Spanner
Rosette
Small Base
Seal
Washer
Backnut
Valve Body
Flexible Hose
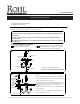
Hood & Lever
Hood & Lever
Rosette
Small Base
Seal
Washer
Backnut
Valve Body
Flexible Hose
Sidevalve to be installed from underside of work surface as
shown.
Ensure connection for flexible hose is facing towards spout.
Leave backnut at the bottom of valve body and place the valve
body up through the work surface hole.
Before screwing down the hood & lever please make sure
orientation of levers is correct. Slide the hood & lever over the
top of valve body just enough to see if it is correctly
orientated.
Correct orientation can be achieved by removing and turning
the vernier insert.
Screw backnut up to the underneath of the work surface.
Connect flexible hose as shown.
WORK SURFACE
BASIN/BIDET
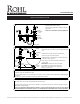
Connect flexible hose as shown.
Connect HOT & COLD water supplies to the side
valve inlets.
Ensure all connections are firmly tightened.
Adjusting Sink Waste
• Ensure that pop-up shaft is in position alongside pop-up
rod.
• Shaft and rod can be cut if space is restricted.
• Secure pop-up using clamp bracket.
• Adjust position of clamp bracket to achieve maximum
movement of pop-up shaft.
• Place pop-up into waste and adjust movement of
pop-up shaft.
O Ring
Pop-Up
Foam
Seal
Rubber Seal
Bottom
Waste
Pop-Up
Rod
Clamp
Bracket
Pop-Up
Shaft
Top Waste
Vernier
Insert
WORK SURFACE
WORK SURFACE