
Specification Sheet


INSTALLATION INSTRUCTIONS
Issue
•
®
IT IS VERY IMPORTANT THAT BEFORE YOU START INSTALLING THIS
FILTER SYSTEM YOU ENSURE YOU HAVE READ THE INSTALL
GUIDES THAT CAME WITH THE TAP AND THE HEATER TANK.
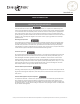
First you will need to remove the filter sump. This
can be done by turning the sump a quarter turn
anti-clockwise and pulling down.
Fix the filter mounting bracket to the inside of the
cupboard with the screws provided, using the
bracket as a template for drilling the holes.
Alternatively make use of the supplied adhesive
pad, ensuring the mounting area is clean by using
the wipe provided.
Making sure:
- There is enough room underneath the filter
housing for filter replacement and maintainence.
- The housing is close enough to the heater tank &
tap so that hoses are not over stretched.
- The housing is accessible for future maintainence
& filter replacement.
1.
11 " MIN
FILTER
MOUNTING
BRACKET
MOUNTING
SCREWS X2
*
*
*
*
M
M
a
a
k
k
e
e
s
s
u
u
r
r
e
e
a
a
l
l
l
l
h
h
o
o
s
s
e
e
s
s
a
a
r
r
e
e
f
f
r
r
e
e
e
e
o
o
f
f
k
k
i
i
n
n
k
k
s
s
*
*
*
*
Attach the G3/8" braided hose from the tap to the
threaded side of the filter housing.
Attach the threaded end of the push-fit braided hose
to the top of the heater tank as shown below.
Re-fit the Filter Sump to the Mounting Bracket.
P
P
l
l
e
e
a
a
s
s
e
e
n
n
o
o
w
w
t
t
h
h
o
o
r
r
o
o
u
u
g
g
h
h
l
l
y
y
c
c
h
h
e
e
c
c
k
k
t
t
h
h
e
e
u
u
n
n
i
i
t
t
f
f
o
o
r
r
a
a
n
n
y
y
w
w
a
a
t
t
e
e
r
r
l
l
e
e
a
a
k
k
s
s
b
b
e
e
f
f
o
o
r
r
e
e
y
y
o
o
u
u
c
c
o
o
n
n
t
t
i
i
n
n
u
u
e
e
.
.
2.
G3/8"
BRAIDED
HOSE FROM
TAP
PUSH-FIT
BRAIDED
HOSE TO
HEATER
TANK
DIRECTION
OF FLOW
Fixing Mounting Bracket
Attaching Hoses
FILTER
SUMP
9/16"
DOMESTIC
HOT IN
9/16"
COLD IN
3.
System Layout
DIRECTION
OF FLOW
G3/8"
BRAIDED
HOSE FROM
TAP
PUSH-FIT BRAIDED
HOSE TO HEATER
TANK
I
I
m
m
p
p
o
o
r
r
t
t
a
a
n
n
t
t
N
N
o
o
t
t
i
i
c
c
e
e
The filter is nearly ready to use – it is
vitally important that you ensure that
all air is bled from the system. Do this
by:
Place a jug under the spout as water
will splutter from the spout until all
of the air is expelled.
Operate the instant hot tap lever
to dispense water, run-off at
least 0.35 gallons of water, let
the system rest for at least 30
seconds and run another 0.35
gallons litres of water, repeat at
least one more time – your instant
hot water tap should now be
ready for use.
• Filter Installation
• Instant Hot Tap
•
Should you require any advice, or a quick solution to a problem with this product please
contact in the first instance the supplier/showroom from which it was purchased.
• T: 1-800-777-9762 • E: rohlinfo@rohlhome.com • W: www.rohlhome.com
1
9001914U
9/16"
FLOW REGULATOR
ConsultyourlocalHouseofRohlshowroomforadditionalinformationandspecications.Forcompletewarrantydetailsandalistofshowrooms,gotohouseofrohl.com
houseofrohl.com