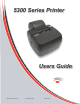
5300 Series Printer Users Guide Pertech Resources Inc.
Disclaimer Information in this document is subject to change without notice. Consult your Pertech® sales representative for information that is applicable and current. Pertech reserves the right to improve products as new technology, components, software and firmware become available. No part of this document may be reproduced or transmitted in any form or by any means, electronic or mechanical, for any purpose with out the express written permission of Pertech.
Important Information to the User In order to ensure compliance with the Product Safety, FCC and CE marking requirements. you must use the power supply, power cord, and interface cable which were shipped with this product or which meet the following parameters: Power Supply Input power to this product must be provided by one of the following: (1) A NRTL Certified power source with a Limited Power Source (LPS) output for use in North America, input rated 100 - 240 Vac, 1.5 A, 50/60 Hz, Output rated 24Vdc, 2.
Contents Preface ............................................................................................................... VI About The Printer ................................................................................................1 Features and Options .................................................................................1 Choosing a Location ...................................................................................1 Unpacking the Printer .................................
Configuration & Diagnostic Print Tests ..........................................................17 Configuration Utility Program....................................................................17 Printer Control Language...............................................................18 Font ...............................................................................................19 RS232 Interface ............................................................................19 USB Interface ..........
Preface This manual has been written to help you Install and Operate your Pertech® 5300 Series Printer. Feel free to contact us if you need further assistance after reading this manual. Please see the Troubleshooting Printer Problems section of this manual and determine the complete part number of your printer prior to calling. Pertech provides technical support Monday through Friday from 8:00 AM to 5:00 PM MST at 307-856-4821.
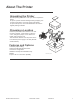
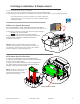
About The Printer Unpacking the Printer Save all packing materials in case you need to repack the printer. To report a printer that was damaged during shipping, see “Contact Information” on the last page of this Guide. To repack the printer, consult the illustration and use the original packing materials. Choosing a Location Place the printer on a level surface on or near the host computer. Leave space to open the cover, change the paper, Ink or ribbon Cartridge, and to insert a form.
Ordering Paper and Supplies The following section lists the paper and supplies available for order. In addition to paper and ribbons, parts, service and repair may be obtained by calling 1-800-800-6614. Paper: Call: 1-800-800-6614 Paper Part Number Ink Jet 5351 One Ply....................................................................................................... 103292057 Impact 5371 One Ply.......................................................................................................
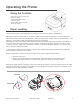
Operating the Printer Using the Controls The 5300 printer includes the following controls : •Paper feed button used to advance paper. •Power switch used to turn the printer on and off. Paper Loading Paper and other printer consumables may be purchased from Pertech by calling 1-800-800-6614. Roll paper must be 3.0 inches wide +/- .03 inches (.762mm) with a maximum diameter of 3.5 inches (88.9mm). Ink Jet 535X receipt printers can accommodate 1 paper ply.
Cartridge Installation & Replacement 1. Press the Power Switch to turn on the printer. 2. Open the front cover. The printhead cradle will move to an accessible position. 3. If replacing print cartridge lift the print cartridge out and discard. Skip this step if no print cartridge is installed. Note: Replacement ink jet print cartridge for your printer 108541001 Replacement impact print cartridge for your printer 100629011 Black 100629012 Purple.
Validation and Document Guides Validation Print Fields Dot column #1 Dot Column #400 The 5300 series printer has 2.5 inch wide printfield. The validation print field height is adjustable from .17 to 1.75 inches. This can be done via the configuration utility or the one button setup. An inserted form can be manually aligned or a optional document guide can be attached to provide a fixed right side stop for the inserted form. The drawings below indicate the typical print positions for a 2 3/4” X 6” form.
Document Guide Installation The Document Guide is a clip in durable plastic part that attaches to the printers Validation Roller to provide a right side guide for an inserted form. NOTE: Before installing the Document Guide make sure the area where the guide is to be installed is free of any dust debris or contamination that could inhibit the movement of the Validation Roller. The Document Guide is installed by attaching it to the Validation Roller.
Cables and Connections Comunications The 5300 comes with two communication interfaces, RS-232 Serial and USB. Additionally, the printer has a cash drawer port and a three pin mini din power coupling. The RS-232 interface connector is a DB9M connector and requires a Null Modem Serial cable for standard PC to printer connections. The USB Interface uses a standard USB 2.0 cable for standard PC to printer connections. A single tele-jack port provides a cash drawer interface capable of running two cash drawers.
USB 2.0 Interface Pin 1 Pin 2 Pin 3 Pin 4 Pin 5 Pin 6 USB Cable Part Number 106356011 EOT/VCC DD+ GND GND GND The USB cable may be attached or detached when the system is on. When Using the USB interface the Windows® Operating System will automatically install the USB port driver. Pertech has available printer drivers at www.pertechresources.com. Warning: When Hot Swapping USB cable make sure that cable is installed into the correct connectors or damage to the printer could result. Cash Drawer 1.
Power Supply To avoid damage to the printer connect the Power Supply last. 1. Make sure the printer power switch is off. 2. Plug the Power Supply Cable into the printer. The power supply cable connector has a locking mechanism to ensure that the cable stays fastened to the printer. When removing the cable release the locking mechanism by pulling the mechanism away from the printer. 3. Plug the Power Supply Cable into a grounded outlet. 4. Turn the power switch on.
Drivers & Utilities XP/2000 Windows Driver Pertech provides drivers for various operating systems. Common drivers can be downloaded off the Pertech web site www.pertechresources.com. For drivers not listed on the web site check with your Pertech representative for availability. For the 5300 to utilize the Pertech drivers or the USB communication interface a driver must be installed.
6. The “Install Printer Software” section will display a list of printers that Windows currently supports and show a button called “Have Disk”. Click “Have Disk” and browse to the temporary folder where the driver was unzipped in step 1. In this folder, Windows will find “5300.INF”. Click “Open”, then click “OK”. Click “OK” again. 8. You can optionally rename your printer and assign it as default. Click “Next”. 9. Click whether or not you want the printer to be shared with other PC’s on a network.
11. Click “Finish”. Windows will issue a warning that the driver is not digitally signed by Microsoft®. To install the driver, click “Continue.” Print Driver Setup COMx Port Set up If using RS-232, it is likely that first time installers will need to adjust the RS-232 parameters to match the attached printer. After installing the driver, go to “Printers and Faxes” on the “Start” menu and right click on the 53xx printer driver. Select “Properties”. Select the “Ports” tab. Select “Configure Port”.
Bi-directional Status The printer driver will display printer status via an icon in the Windows System Tray, which is located on the task bar next to the clock. There are several different icons that could be possibly displayed, but the one shown represents the last printer status item that changed. To display the complete status, right click on the icon and a window will pop-up showing all status items. The icon can be turned off in a number of ways.
Printing Preferences If the printer icon in the printers folder is clicked with the right mouse button and Printing Preferences selected the various parameters to do with the document may be modified. This dialog box is also usually available from within an application within its printer setup. Note that the current application’s Printing Preferences will override any set by other applications. jobs. It is not available if “Continuous” mode is selected.
Commands can be entered in ASCII text or Hexadecimal format. To enter in hex, bracket the hex code with <> symbols. If spaces are added between characters, the printer driver will automatically convert them to <20>, or 20h, which is equivalent to ASCII space character, when OK or Apply is clicked. Note that some commands will affect page length and may make the WYSIWYG (What You See Is What You Get) system no longer an accurate representation of the printed page.
Logo Download Utility Pertech provides a Logo Download Utility to simplify the adding of logos or Bit Mapped images to your printed tickets or receipts. The utility is available for download from the Pertech web site. This utility allows BMP (Bitmap) graphic files to be downloaded into Pertech Resources printer memory for later printing. BMP graphics can be stored in non-volatile Flash or RAM. The BMP Download Utility can be used on either the 5300 series printers, or the A470e printers.
Configuration & Diagnostic Print Tests Configuration Utility Program Pertech Provides a Configuration Utility for the 5300 series that is downloadable from the Pertech web site. The Configuration Utility offers an alternative to the One Button Configuration explained later in this section. This utility requires a Windows XP or 2000 operating system and is easily installed. To install the Utility run setup.exe and follow instructions on the screen.
The user can choose to Lock Settings if desired. This prevents accidental changes from occurring in both the host communication settings and configuration items. When exiting the utility via the “Exit” button, there is a prompt to save the current settings to disk. If the user clicks “Yes”, then there is a second prompt asking if locking is desired. To lock, click “yes” again and enter a password, which can be used to unlock the settings later if desired.
Font USB Interface There are three font options available in all control languages except the A470 Mode they are Standard - Compressed - Expanded. The table below details each of the font options pitch and column capabilities Inkjet Font Pitch (Char/Inch) Columns (Char/Line) Standard 16 40 Compressed 22.8 57 Expanded 13.
Memory Tallies When the printer is set into the ACL Mode control language memory is user define able. The configuration utility allows the user to adjust the memory allocated for Logos, Fonts, Macros and User Data for RAM and Flash memory. Pertech Resources Inc. November 2005 Tallies provide information and can be reset with the use of the one button setup. Available tallied information includes: Printed Lines -Character printed before a carriage return. Hours On - Power on time.
Configuration Report & Setup Mode After the printer is set up, you can run two print diagnostic reports / tests and enter the configuration menu. Below is an example of the configuration report. 1 Press and hold the Paper Feed Button and then press the Power Switch to turn the printer on and start the first test. Validation printers will perform a Self Test if a form is detected, when the power is turned on. Release the Paper Feed Button after 4 seconds for the printing to begin.
1 Configuration Example: ================================= Configure the RS232 Serial parameters for the printer using the configuration menu. Press paper feed to change configuration SET-UP INSTRUCTIONS PRESSING THE PAPER FEED BUTTON WHILE THE GREEN LIGHT IS FLASHING WILL REJECT THE LAST PRINTED PARAMETER. IF THE BUTTON IS NOT PRESSED WITHIN 5 SECONDS. THE PARAMETER WILL BE ACCEPTED AND THE NEXT SET-UP OPTION WILL BE LISTED.
Printer Configuration Options Serial Number: Main Firmware Revision: CRC: Boot Firmware Revision: CRC: ******** * ** *** **** * ** *** **** Printer Control Language PCL: Diag Mode: Auto LF: Soft Fault Recover: Font: Options for ACL Compatibility Mode ACL Language Standard Print CR = CR Automatic Font: Font Quality: Intl Char set: Code Page: Receipt LPI: Validation LPI: Standard Draft USA 437 USA 6 Lines Per Inch 6 Lines Per Inch ���� �������� ���� � ������� ���� � �������� ����� ��� ����� ��� �����
Serial Number: Main Firmware Revision: CRC: Boot Firmware Revision: CRC: ******** * ** *** **** * ** *** **** Printer Control Language PCL: Diag Mode: Auto LF: Font: Options for A470 Compatibility Mode A470 Language Standard Print CR = CR ��� �������� ���� � ������� ���� � �������� ���� � �������� ��� ���� �� � �� ���� � �������� ���� � �������� Font: Font Quality: Char / Line: Intl Char set: Code Page: Receipt LPI: Validation LPI: Standard Draft 33CPL USA 437 USA 6 Lines Per Inch 6 Lines Per Inch
Serial Number: Main Firmware Revision: CRC: Boot Firmware Revision: CRC: ******** * ** *** **** * ** *** **** Printer Control Language PCL: Diag Mode: Auto LF: ACK on CR Font: DO214 Language Standard Print CR = CR Disabled Font: Font Quality: Intl Char set: Code Page: Receipt LPI: Validation LPI: Standard Draft USA 437 USA 6 Lines Per Inch 6 Lines Per Inch 57.
LED Mode Indicators The 5300 series printers are equipped with two color led indicators that identify Paper, Error, Ink Low, Form In, and Power On conditions.
Trouble Shooting Printer Problems LED Error Fault Mode Diagnostics The printer will enter a Fault Mode and will not operate when certain failure conditions are encountered. Confirmation of this condition can be accomplished by the host on the DTR (pin 8) or status with an RS-232 interface.
Trouble Shooting General Issues A. Printer prints garbage when using RS-232 and/or printer occasionally prints garbage even when not sending print job. - Solution : Verify that the COM port is set up to match the attached printer. . B. Printer is not printing and receive error message from Windows that it failed to print. - Verify that the printer is connected and powered on. - Cancel the document.
Service & Support Pertech provides Technical Support for this product by calling 307-856-4821 between the hours of 8AM to 5PM Monday through Friday MST, or by submitting a Support Inquiry at the Pertech web site. www.pertechresources.com under the service/support section. The Model Number, Revision, Date, and Serial Number can be located on the Label attached on the bottom of the printer. Please have this information available when you contact Pertech.
Specifications Dimensions Height Width Length Weight R/V Models Ext.
Pertech Resources Inc.
Index A A470 Compatibility Mode .................. 24, V Additional information ............................. VI Agency Listings ...................................... 30 ASCII 8, .................................................15 Available Models: ................................... VI B Baud .........................................19, 22, 30 Bi-directional Status ............................... 13 Bill out length ..........................................13 C Canned air ...............................
Printer Control Language 16, 17, 18, 22, V Print Cartridge ..........................................4 Print Head Carriage.................................. 4 Print Mode ..............................................14 Print Speed.............................................30 Print Tests.................................... 12, 17, V Publications ............................................ VI Tallies .......................................... 20, 22, V Trademarks ..........................................
Warranty Warranty Pertech Resources warrants all of its transaction printers against defects in material and workmanship for a period of 24 months from date of shipment by Pertech Resources or the rated maximum number of transactions for the specific product – whichever comes first. Kiosk printers, mechanisms and distributed products carry warranties specific to their application or manufacturers’ warranty. Contact warranty@pertechresources.com for details on the specific product warranty.