Peterbilt SmartLINQ Manual Table of Contents How SmartLINQ Works. . . . . . . . . . . . . . . . . . . . . 3 Fault Code Indicators – What the Driver Sees . . . . . . . . . . . . . . . . . . . . . . 4 Sample Email Notification. . . . . . . . . . . . . . . . . . 5 What to Do After the Email Notification. . . . . 6 PACCAR Solutions Portal . . . . . . . . . . . . . . . . . . . 6 What’s on the Dashboard. . . . . . . . . . .
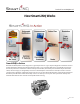
Peterbilt SmartLINQ Manual How SmartLINQ Works SmartLINQ In-Action Peterbilt SmartLINQ takes remote diagnostics a giant step forward – it goes beyond diagnostics and driver alerts to provide detailed communication about problems as they occur, recommended actions, and guidance for how to resolve the problem.
Peterbilt SmartLINQ Manual Fault Code Indicators – What the Driver Sees Stop Engine Immediately Seek Service Immediately Service Advised NOTE: These images only apply to Model 579 and Model 567. The Peterbilt SmartLINQ communication process starts when an engine or aftertreatment system fault is reported on a SmartLINQ vehicle. The driver will see one of these dash indicators. Stop Engine Immediately – Stop now, shut down the truck, and call for a tow if necessary.
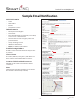
Peterbilt SmartLINQ Manual Sample Email Notification Vehicle Information • • • • Unit# VIN number Event# Fault Event Location Fault Information • • • • • • • Description: Plain English Fault Count Recommended Action: Stop Now, Service Now, Service Soon or Informational Current State: Percent of engine power and potential derate Lamps: showing in truck Additional Information Notes for additional information Troubleshooting Guidance Possible causes and checks the driver may be able to perform.
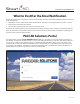
Peterbilt SmartLINQ Manual What to Do After the Email Notification After notification from the system, you can use the information from the email and the PACCAR Solutions web portal to do the following: 1. Identify the location of the vehicle and determine which of the three closest dealerships you want to contact. 2. Research the vehicle fault code details. 3. Have the driver perform any of the checks noted in the email.
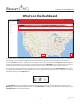
Peterbilt SmartLINQ Manual What’s on the Dashboard The portal opens to the Dashboard, which you can think of as the system’s home page. The contents of each page may change as you navigate through the portal, but the header remains constant throughout your experience. The blue Search box lets you quickly search all content on the portal. Selecting the User Options icon will display a drop down menu where you can change your profile and password. A Map Filter tool is available above the map.
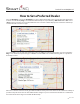
Peterbilt SmartLINQ Manual How to Set a Preferred Dealer Select the Building icon from the Fleet Map’s tool bar to display dealership locations on the fleet map. Dealership locations are indicated by Flag icons and Preferred Dealerships are represented by a Blue Circle with a Star. Select a Flag location you wish to set as a Preferred Dealer and a call out box will be displayed. It contains the dealership’s contact information and service type. Select the Star icon to the left of the dealership name.
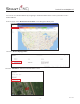
Peterbilt SmartLINQ Manual You can also set a Preferred Dealer by navigating to the Dealer Details of the location you wish to set as a Preferred Dealer From any page, select “Dealers/Service Centers” in the Navigation Menu panel Select the “Dealership Hyperlink” Select the “Checkbox” under the Preferred Dealer section –9– Rev.
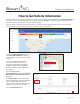
Peterbilt SmartLINQ Manual How to Get Vehicle Information The Fleet Health Tool categorizes your fleet into groups as denoted by “Recommendation”. Each Recommendation icon lets the user choose the visibility of chassis in the Fleet Map. The Eye icon indicates which pins will appear on the map with the location(s) of the vehicle(s) in that category. If your vehicles are not showing on the map, please contact your dealership.
Peterbilt SmartLINQ Manual The Details section expands out to show finer detail about a fault code. Fault Information gives a description of the problem, a fault occurrence count, current state of the engine and any additional information. Troubleshooting Guidance shows the possible causes if available and a check mark will show if there are items the driver can check or perform to possibly avoid a service event. The Event Location section includes the address of the where the fault event occurred.
Peterbilt SmartLINQ Manual How to Get Dealership Information From any page, click on Dealers/Service Centers in the Navigation Menu panel. The tabtab opens and displays information about the dealership that set up your The Dealers/Service Dealers/ServiceCenters Centers opens and displays an alphabetized list of all Dealerships within theSmartLINQ PACCAR account. It lists the name, address, phone/fax numbers, and email address of that dealership. Dealer Network.
Peterbilt SmartLINQ Manual Creating and Managing Vehicle Groups In the case that your fleet is very large, Vehicle Groups are a powerful tool to quickly filter the vehicles to a more manageable subset. The ability to add and edit Vehicle Groups is limited to the Customer Administrator role. Select the “Customers” menu opiton. Select the “Customer Name”. Select the “Vehicle Groups” tab. – 13 – Rev.
Peterbilt SmartLINQ Manual Select “Add Group”. Enter a name for the Vehicle Group you wish to create in the text field and select “Save”. To add or remove trucks into the created group, select the “Pencil” icon. Select the “Checkbox” to add or remove the trucks from the group All changes are saved automatically. – 14 – Rev.
Peterbilt SmartLINQ Manual How to Add Users User management is restricted to users in a Customer Administrator role. Select “Users” in the left Navigation Menu. Select the “+” button. This will open the “Add User” screen. Fill in required “Account” information: First name, Last name, Email and Phone. – 15 – Rev.
Peterbilt SmartLINQ Manual The “Preferences” section is optional. Select the “User Role” box for the options to appear. Select the “User Role”. Customer Administrator: Customer Management. This role has read/write access. Its primary role is to manage User Accounts, and Vehicle Groups. It can also subscribe to Vehicle Groups and receive emailed fault notifications. Customer User: View Only. This role has read only access. It can subscribe to Vehicle Groups and receive emailed fault notifications.
Peterbilt SmartLINQ Manual Set the user “Email Notifications” by selecting the “Pencil” icon. Select the “Notifications” tab. – 17 – Rev.
Peterbilt SmartLINQ Manual Select the desired setting by choosing the radio button. All: Email sends every 4 hours with an “Active” fault. Derate Active/Warning: Email sends every 12 hours with an “Active” fault. Derate Active: Email sends every 24 hours with an “Active” fault. None: the user will not recieve any fault notification emails. Changes are saved automatically. PACCAR Solutions will send an email to the new user to set-up their password, will expire after 24 hours.
Peterbilt SmartLINQ Manual How to Edit Users A Customer User can only edit his/her own profile. Customer Administrators can edit all users including other Administrators. Navigate to the “Users” page from the left Navigation Menu. Find the account to edit and check the box at the left of their name. Select the “Pencil” icon in the blue ribbon above the user list. Make the desired modifications and “Save”. – 19 – Rev.
Peterbilt SmartLINQ Manual How to Subscribe to Email Notifications A Customer User can only subscribe to existing Vehicle Groups. Customer Administrators can subscribe to, create, and edit Vehicle Groups. Select the “User Options” icon and select “User Profile”. Select the “Notifications” tab. Choose an Email Notifications option greater than “None”. This part of the process lets the user determine the severity of emails that will be transmitted.
Peterbilt SmartLINQ Manual Select your company. Select the “Vehicle Groups” tab. Subscribe to the desired Vehicle Groups by selecting the Bell icon. The Bell icon will turn green once you are subscribed. Subscribing to “All” allows the user to receive emails from all vehicles in the fleet. Subscribing to a custom Vehicle Group limits email to only the chassis defined in that group. – 21 – Rev.
Peterbilt SmartLINQ Manual How to Subscribe Other Users to Email Notifications Customer Administration can subscribe to, create, and edit Vehicle Groups. Select “Customers” on the “Navigation Menu”. Select your company. Select the “Subscribed Users” tab. – 22 – Rev.
Peterbilt SmartLINQ Manual Type the user’s email address you would like to subscribe to receive fault notifications for in the search bar. Select the check box next to the user you wish to subscribe – 23 – Rev.
Peterbilt SmartLINQ Manual How to Edit Vehicles Navigate to the “Vehicles” page from the left “Navigation Menu”. Select the “Three Dot” icon next to the vehicle you wish to edit. Select the “Edit Vehicle” Option. You can edit the “Unit Number” and “Description” fields. “Save” your changes – 24 – Rev.
Peterbilt SmartLINQ Manual Frequently Asked Questions Can I delete a user from PACCAR Solutions? A User cannot be deleted. A user can be edited and made inactive by unchecking the “Active” box underneath the email notifications section and saving the changes. How do I edit truck information? Vehicle information is edited by using the following process. From the left hand menu select the “Vehicles” menu. Select the stacked three-dot icon next to the vehicle in the list and then select “Edit Vehicle”.