Owner´s Manual DEA600 Radio Owner´s Manual DEA600 Radio MY 2016 Delphi 4/28/20161 | P a g e
Owner´s Manual DEA600 Radio Contents DEA600 Radio System ....................... 4 Radio source.............................. 25 Display Settings ............................ 42 Introduction ..................................... 4 Phone................................................. 26 Wireless & Networks .................... 42 System Features and Functions ....... 4 Contacts......................................... 27 Wi-Fi ......................................... 43 Radio ....................
Owner´s Manual DEA600 Radio CD ................................................. 55 Rear Seat Audio (RSA) ................. 55 Bluetooth ....................................... 57 CD player not functioning ........ 55 The RSA shows no link ............ 55 Bluetooth Distraction .................... 57 CD Insertion is not possible ...... 55 Precautions ........................................ 56 iPod ............................................... 55 Driver Distraction Avoidance .......
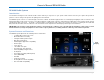
Owner´s Manual DEA600 Radio DEA600 Radio System Introduction The information and figures in this manual describe features that may or may not be on your specific vehicle either because they are options that you did not purchase or due to changes subsequent to the printing of this owner manual. The DEA600 System consists of a 7" Smart Display connected to a Radio. The Smart Display functions as a main display managing the entire user interface.
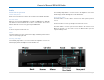
Owner´s Manual DEA600 Radio Radio Radio Button Operation Volume Knob/Power Rotate to Increase/decrease Volume. Press Knob to turn ON/OFF the Radio. One-Hour Timer With key off, pressing the PWR button on Radio or PWR button on RSA will turn ON the receiver and activate the receiver’s one-hour timer. The receiver will turn OFF after one hour or by pressing the PWR button. Eject It removes any disc from the CD slot.
Owner´s Manual DEA600 Radio Smart Display The next right screen is presented once the system senses a Swipe Left action; please see Figure 2, as reference. Getting Started Using the touch screen A “Touch” over a soft key activates or selects the corresponding function, or it opens the selected item; please see Figure 1, as reference. Figure 2: Swipe to the Left action. The next left screen is presented once the System senses a Swipe Right action; please see Figure 3, as reference.
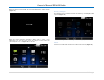
Owner´s Manual DEA600 Radio The next top screen is presented once the System senses a Swipe Down action; please see Figure 4, as reference. Home screen & Navigation buttons The installed application icons are presented at the home screen. The home screen is distributed in a home main screen and subsequent home screens. Each of the home screens present 6 application icons maximum, plus the Audio widget. The number of the subsequent home screens is relative to the number of installed applications.
Owner´s Manual DEA600 Radio Each application icon works as the application activation soft key. The System has the capability to rearrange the application icons according to the user needs. The basic sequence is (see Figure 7 as reference): • • • • Select the desired application. Press, and hold, the application icon to "grab" it. "Drag" the icon to the desired location by moving the application to this one. "Drop" the icon by releasing it.
Owner´s Manual DEA600 Radio • • • Back. Home. Menu. The Back soft key is used to exit the current screen and open the previous screen. The Back soft key button doesn’t have any effect at the home screen. The Home soft key is used to go directly to the home screen. The Menu soft key is used to open the menu related to the current screen (for example, Figure 8); when it is used in the Launcher the Menu soft key will open the System Settings menu (Figure 9 and Figure 10).
Owner´s Manual DEA600 Radio When the System is turned OFF, the clock view illustrated on will be shown (Figure 11). Dim Day / Dim Night The Dimming level is indicated each time the Dim Day, or Dim Night, button is pushed (Figure 13). Figure 11: Clock view in OFF power mode. When the Driver Distraction Avoidance (DDA) mode is active, some application icons from the home screen are grayed out and cannot be selected by the user, see Figure 12 as reference. Figure 13: The Dimming level indicator pop-up.
Owner´s Manual DEA600 Radio If this event occurs, the Media sources are paused. Once it ends, the System continues playing the media. There are some actions that can cancel this mute like: Alarm notification, volume changes, media insertion, BT call, among others. Reverse Mute The radio is muted if the reverse gear is selected. This interruption is ignored if the radio is on BT call. Selecting any transmission gear different than reverse cancels the mute (starts the media).
Owner´s Manual DEA600 Radio The System does not allow the selection of more than one Audio Source option at a time. If the System senses the selection of the current Audio source option no change will take place. The System supports 9 different Audio sources: 5 Media sources and 4 Radio sources. Media Sources The System displays 5 Media sources at the main Audio sources tab-bar: • • • • • USB. CD. Aux. Bluetooth. Rear Aux.
Owner´s Manual DEA600 Radio Fast forward function is activated by long pressing the next soft key for 2 seconds. Fast reverse function is activates by long pressing the previous soft key for 2 seconds. Artist The System presents the albums allocated by artist, illustrated on Figure 20. Views The System presents the view soft key, when it is selected (Figure 19), the following options are displayed: • • • • • Artists Albums. All Songs Playlists. Search. Figure 20: The Artists view.
Owner´s Manual DEA600 Radio Albums The albums view screen follows the distribution and styling as the Figure 23 illustrates. Figure 21: Apple Artist View. Once an artist is selected the System displays the list of the contained albums, as shown in the Figure 22. Figure 23: The Albums view. The System displays the albums contained in the media source selected. The albums are displayed in a grid manner. Up to 10 album icons are displayed per screen.
Owner´s Manual DEA600 Radio Figure 24: Standard Album Artwork icon. For Apple devices the album view screen follows the distribution and styling illustrated on previous Figure 22. Once an album is selected the System displays the list of the contained songs. The System displays up to 5 items per screen. In the case there are more than 5 items the remaining items are distributed in bottom subsequent screens. All Songs Once the All Songs view is selected the System displays the list of the contained songs.
Owner´s Manual DEA600 Radio Figure 26: The Search screen. The Views soft key button is not available for the next Media sources: • • • • Figure 27: The Rear Aux Media source screen. In the case the Aux media source is selected, the user interface shall follow the distribution and styling of the Figure 28. CD. Aux. Bluetooth. Rear Aux. In the case the Rear Aux media source is selected, the user interface shall follow the distribution and styling Figure 27 illustrates.
Owner´s Manual DEA600 Radio USB Playing from a USB The USB port is in the front of the Radio. Five volts DC power is limited to one amp from this port. Devices such as iPod that require greater current will not charge from this port. 1. 2. 3. Connect the USB. The USB Source media is automatically selected and plays the media content of the USB device if no other app of higher priority is in use (I.E. phone call, video, reverse mute…).
Owner´s Manual DEA600 Radio 3. 4. 5. Radio will start playing the USB and shows the track number, Song, Artist, elapsed time, and Album information when available. If the iPod is an unsupported model, it can still be listened to in the vehicle by connecting to the auxiliary input jack using a standard 3.5 mm (1/8 in) stereo cable. To control and browse the selected media source refer to sections Media Sources and Media Audio Control Soft key for further information.
Owner´s Manual DEA600 Radio • • • • • • • The disc is bent. The disc is dirty, scratched, wet, or upside down. The air is very humid. Try the disc again later. There was a problem while burning the disc. The label is caught in the CD player. If the disc is not playing correctly, for any other reason, try a known good CD. If any error continues, contact your dealer. For MP3 Files: • • • • • • Bit rates: 32, 40, 48, 56, 64, 80, 96, 112, 124, 160, 192, 224, 256, 320 kbps for MPEG-1 Audio Layer 3.
Owner´s Manual DEA600 Radio navigation system and the Rear Aux is set automatically, if no other source with higher priority is active (I.E. phone call, video, reverse mute…). During this Mode, the Radio streams the audio from the Navigation system on the speakers (Stereo Signal). This operation is available under the following conditions: With Ignition ON and System ON: the radio shall change to REAR AUX IN mode. can be viewed by swiping the preset bar. Each preset works as soft key button selector.
Owner´s Manual DEA600 Radio • • • 8. 9. Next. Previous. SCAN. Channel Browsing. Presets (Smart Favorites). The SiriusXM user interface screen is illustrated in Figure 31. The System presents 7 presets for this application. To save stations in to preset follow the AM-FM instructions. The WX radio source screen is illustrated in Figure 30. Figure 31: The SiriusXM user interface screen. Figure 30: The WX radio source screen.
Owner´s Manual DEA600 Radio • • Audio Settings. SiriusXM Settings. Figure 33: The Sirius XM Settings screen – Part I. Figure 32: The pop-up sub menu screen. Each of the options in the pop-up submenu works as a soft key. The System opens the Audio Settings in a separate screen in the case this option is selected. In the case the SiriusXM Settings are selected, the System displays the next configurable options in a separate screen (see Figure 33 & Figure 34 as reference): • • • • • • Preset View.
Owner´s Manual DEA600 Radio In the case the “Direct tuning” soft key is selected, a numeric keypad is displayed as Figure 37 illustrates. It can be used to select an specific channel. Figure 35: The Category list screen. The listed elements work as a soft key. In the case the channel list option is selected, a separate screen listing all the available channels is presented. See Figure 36 as reference. Figure 37: The search virtual button screen.
Owner´s Manual DEA600 Radio • • • Previous. Play/Pause. Next. For USB, the Audio Widget is presented as Figure 38 illustrates. Figure 39: The Audio Widget for Bluetooth. The Audio Widget presents the song name and the artist for CD source (see Figure 40 as reference). Figure 38: The Audio Widget with available art work screen for USB. The Audio Widget displays the art work corresponding to the playing song if available.
Owner´s Manual DEA600 Radio The Audio Widget does not present audio controls for the AUX, & Rear AUX; see Figure 41 & Figure 42as reference. Radio source The Audio Widget shall display the next audio controls for the Radio source configuration: • • Previous. Next. The Audio Widget shall present the Radio band selected and the frequency tuned. Illustrated in: Figure 43, Figure 44, Figure 45 & Figure 46. Figure 41: The Audio Widget for the AUX configuration screen.
Owner´s Manual DEA600 Radio Figure 44: The Audio widget for the radio band AM screen. Figure 46: The Audio widget for the SiriusXM configuration screen. Phone Once your device is properly paired (see Settings / Bluetooth section), DEA600 System supports Hands Free features, if the connected device has that capability. Open the Phone App located on the home screen of the Smart Display as illustrated on Figure 47. Figure 45: The Audio widget for the Weather channel screen.
Owner´s Manual DEA600 Radio The Phone screen interface presents these elements (as is illustrated on Figure 48): • • • • • • • A loading image is displayed during the contact list synchronization. See Figure 49 as reference. Numeric Keyboard. Call Button. Search Bar. Contacts Tab. Recent Calls Tab. Favorites Tab. Add Contact Tab. Figure 49: The contact list synchronization screen. If failure is present during the contact synchronization, message "No Contact available" is displayed.
Owner´s Manual DEA600 Radio The System activates the search function in case white box is selected. In the case the search function is activated, the System displays a keyboard, see Figure 51 as reference. Figure 52: The Contact information screen. Favorites Figure 51: The search contact screen. If Favorites option is selected, the 8 favorite contacts are displayed as Figure 53 illustrates. The System is able to capture the information introduced and performs a contact search based on it.
Owner´s Manual DEA600 Radio In order to save a contact as favorite, the desired contact shall be selected and press and hold the desired phone number until the pop-up message “Are you sure you want to add the contact into favorites?” is displayed, then “Ok” option shall be selected. • Making a Call You can call a contact directly from the previously stored contact information if the item Phone 1 or Phone 2 is selected; the System uses the information there to start the dialing process.
Owner´s Manual DEA600 Radio Figure 56: The incoming call screen. Figure 57: The current call screen. In the case the System detects the selection of the Reject soft key the system cancels the incoming call. In the case the System detects the selection of the Hang Up soft key the call is ended. In the case the System detects the selection of the Accept soft key the System allows the incoming call. Audio is distributed through Radio to Vehicle Front Left speaker.
Owner´s Manual DEA600 Radio Figure 58: The pop-up numeric keyboard screen. Messaging If the Messaging App is selected, see Figure 59 as reference, the System displays the received text messages in a list manner grouped by conversations, see Figure 60 as reference. Figure 60: The received text messages screen. The following information and options are available: • • • • • • Contact name. Message. Hear last message soft key. Time. Search soft key. New message soft key.
Owner´s Manual DEA600 Radio Figure 61: New message received. The SMS message information is displayed and provides a predefined message list to replay with, as follows, see Figure 62: 1. 2. 3. 4. 5. Figure 62: Predefined message list The System sends the selected message or opens the message editor or application for the user to write the desired text, see Figure 63. Can´t answer right now. I´m driving, call you later. I’ll contact you later. What’s up? Personalized.
Owner´s Manual DEA600 Radio Apps Only authorized Applications can be installed on the System. Contact your dealer for further information. Clock Open the Clock App by selecting it on the Home main screen, see Figure 64 as reference. Figure 65: Clock screen.
Owner´s Manual DEA600 Radio The Tone items that can be selected as the audio source are: • Tone. • Radio FM. • Radio AM. • SirusXM. Once the alarm is set, the alarm indicator icon is displayed in the top bar of the home screen. See Figure 68 as reference. Figure 66: Alarm list Each item of the alarm list works as a soft key and can be activated or deactivated with the On/Off select soft key. If the alarm hour is selected a numeric pop-up pad is presented, see Figure 67 as reference.
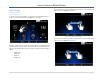
Owner´s Manual DEA600 Radio Application Interface The Camera Views App presents the view of the 4 cameras installed on the vehicle one at a time, each of the camera views option work as a soft key. The System displays the camera view corresponding to the soft key selected. The System presents the Reverse view as default once the application is opened.
Owner´s Manual DEA600 Radio The application indicates the current activated view. The forward camera image is mirrored (left to right) to provide a correct image. Automatic Cameras View The following camera views are activated automatically under certain scenarios: • • • Reverse View. Right View. Left View. The System activates the Reverse View in case the vehicle is put in reverse (if the automatic view function is activated).
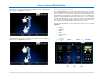
Owner´s Manual DEA600 Radio The default page (page 1) is displayed in the Virtual Gauges app in the following cases: • • • The first time the Virtual Gauges app is opened after an IGN or BATT cycle. When the last selected page is not available. When the last selected page does not contain any gauges. Gauges This manual describes the general function of the Virtual Gauges. Please refer to the vehicle's owner's manual for information about the functionality of individual gauges.
Owner´s Manual DEA600 Radio return to a normal state allowing the second Virtual Gauge in a warning to state to toggle to full screen. All the Virtual Gauges minimized after being in full screen due to a warning state remain in the warning state in their original size while the warning condition of the gauge persists. to save changes or CANCEL soft key to discard changes. See Figure 77 as reference.
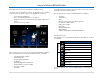
Owner´s Manual DEA600 Radio The General Settings screen shows the page numbers in their 3 states (Selected, Active and Disabled) as defined for the app. The default page selected when accessing the General Settings in the Virtual Gauges app is the page 1. The General Settings screen from the Virtual Gauges app show the active virtual gauges. The Default Virtual Gauges priorities and the User defined Virtual Gauges priorities are saved on the memory.
Owner´s Manual DEA600 Radio Gauge Idle Time Idle Fuel Fuel Usage Rate Drive Axle #1 (front) Oil Temperature Drive Axle #2 (rear) Oil Temperature Drive Axle #3 (center) Oil Temperature Air Filter Restriction Pressure Fuel Filter Restriction/Fuel Pressure Gauge Ammeter Air Suspension Pressure 1 Tractor Brake Application Pusher Axle #1 Pressure PTO Hour Meter Priority NA NA NA 2 3 4 6 7 1 5 N/A – In Cluster 8 9 Priority Preset 2 Gauge Engine Oil Temperature Main Trans Oil Temperature Manifold Pressure (Boost
Owner´s Manual DEA600 Radio Figure 79: Reset configuration pop-up. Figure 80: The settings screen – Part I. OK and Cancel act as soft keys in the pop-up warning. Pressing OK closes the warning pop-up and the General Settings screen and restores Default Virtual Gauges priorities as well as updating the position of the gauges in the General Settings screen and in the Virtual Gauges app.
Owner´s Manual DEA600 Radio The Menu soft key does not have functionality in this screen. While inside the settings menus, the System continue showing the current menu even if there is a track change. Camera Application Settings In the case the Camera Settings is selected, the System displays the following information as activation/deactivation controls, Figure 82 as reference. Display Settings The System opens the Display Settings section in the case this option is selected at system settings.
Owner´s Manual DEA600 Radio • • Bluetooth. Bluetooth Network Connection. A password to enable the connection might be required if the network is a limited access network. In the case a password is required a pop-up sub screen along with a virtual keyboard is displayed illustrated in Figure 85. Figure 84: The Wireless & Networks settings screen Figure 85: The Wi-Fi password request. The Bluetooth & Wi-Fi activation options are presented to the user as slider controls.
Owner´s Manual DEA600 Radio Figure 86: The Wi-Fi menu screen. Figure 87: The Wi-Fi settings option. In the case the System detects the activation of the Menu soft key or hard key the System displays a pop sub menu with the following options, see Figure 87 as reference: In the case the advanced option is selected the System displays the standard advanced Wi-Fi menu, see Figure 88 as references. • • • • Scan. WPS Pin Entry. Advanced. Help. Figure 88: The Advanced Wi-Fi menu screen.
Owner´s Manual DEA600 Radio • • • • • • • Advanced Audio Distribution Profile (A2DP). Audio/Video Remote Control Profile (AVRCP). Hands-Free Profile (HFP). Phone Book Access Profile (PBAP). Message Access Profile (MAP). Personal Area Networking Profile (PAN). Serial Port Profile (SPP). The System activates the detection to other Bluetooth devices if the "Visible to all nearby Bluetooth devices" option is activated. The "Visible to all nearby Bluetooth devices" function is activated for 2 minutes.
Owner´s Manual DEA600 Radio Automatically, the DEA600 will connect to the first available paired device, starting from the last paired/connected device. Figure 91: Bluetooth Pairing request. If the System detects the selection of the white box a keyboard is displayed, if available. The System captures in the White Box the introduced PIN. See Figure 92, Figure 93 & Figure 94. Figure 93: Bluetooth connecting process. Figure 92: Bluetooth PIN request. Figure 94: Bluetooth device connected.
Owner´s Manual DEA600 Radio In the case the Cancel button is selected, the System cancels the connection process closing the pop-up screen. If the connection process is cancelled a pop-up message is displayed stating "Pairing failed. Unable to connect to remote device". See Figure 95 as reference. Figure 96: The Keyboard sound option screen. The System allows the activation and deactivation of the keyboard sound option. Figure 95: Error – Pairing failed.
Owner´s Manual DEA600 Radio • • • • • • • Automatic date & time. Automatic time zone. Set date. Set time. Select time zone. Use 24-hour format. Choose date format. The System shall present the following date format options only. Each of these operates as a soft key selection item to change the applicable setting: • • • 12/31/2014. 31/12/2014. 2014/12/31. Figure 97: Automatic Date & Time settings screen. Applications The System supports the standard application manager settings.
Owner´s Manual DEA600 Radio Each item in the list works as a soft key. Each item in the list presents the next information: • • • Application icon. Application name. Application memory space. The System displays up to 5 items per screen. In the case there are more than 5 items the remaining items are displayed in subsequent screens. In the case a listed item is selected, the System presents the following controls and information. See Figure 100 as reference.
Owner´s Manual DEA600 Radio Figure 101: The System Information screen. Language & Inputs In the case the Language & Inputs menu is selected, the System displays the following options: • • Language. Text to speech output. Figure 102: The Language & Inputs options. Language In the case the Language option is selected, the System displays the following language options, see Figure 107 as reference: • • • English. Español. Français. Each option works as a soft key.
Owner´s Manual DEA600 Radio Figure 103: Languages menu screen. Each language option works as a soft key. The System allows the selection of one option at a time. If the language is changed to other than English a pop-up message is displayed stating: "System about to Reboot". As part of the pop-up message, the next two soft keys are displayed: • • Ok; to proceed. Cancel; to not proceed. Text to speech output The System presents the "Text-To-Speech" option.
Owner´s Manual DEA600 Radio Figure 105: The System audio screen – Part I. Figure 107: The System audio screen – Part III. The Manual Equalization and the Auto Equalization options work as soft keys. The Fade and Balance configuration options are presented in a bar selector manner. Manual Equalization In the case the Manual Equalization option is selected, the System displays the following configurable options, see Figure 108 as reference: • • • Bass. Middle. Treble.
Owner´s Manual DEA600 Radio Figure 108: The Manual equalizer screen. Figure 109: The Auto equalizer screen Part I. The System adjusts the Bass value accordingly with the selected value in the Bass bar control. The System adjusts the Middle value accordingly with the selected value in the Middle bar control. The System adjusts the Treble value accordingly with the selected value in the Treble bar control. Each Audio setting section has a checkbox as a selector control.
Owner´s Manual DEA600 Radio Figure 110: The System audio screen Part II. The System allows the selection of one option at a time. Speakers Configuration Figure 111: Seek sensitivity screen. The scale of the seek sensitivity Bar is from -6 dB to +6 dB. The System detects 12 steps on the bar. The System adjusts 1 dB per step of the corresponding value.
Owner´s Manual DEA600 Radio Tips and Troubleshooting Radio Unable to tune stations You are in a weak signal area. • Increase the Seek Sensitivity (see Seek Sensitivity section for details). 1. 2. 3. 4. Remove the device, after that pair and connect the device. Refer to DELETE ONE OR DELETE ALL DEVICES and to Pairing a Bluetooth Device and Connecting a Device sections. Make sure the device is turned on.
Owner´s Manual DEA600 Radio while the radio starts. The communication shall be reestablished after this time lapse expires. Other Phone functionalities are restricted while in the Driving Distraction Avoidance Driving State. Precautions System memory The DEA600 is not a safety product. The cameras and the rear auxiliary inputs are provided for driver conveniences only. If the battery is disconnected before or at the same time as the ignition line, the system does not guarantee the memory retention.
Owner´s Manual DEA600 Radio iPod and iPhone are trademarks of Apple Computer, Inc., registered in the U.S. and other countries. Damage Disc Don’t attempt the following: • To play a cracked, warped or damaged disc. Playing a bad disc could severely damage the playback mechanism. • To grip or pull out the disc while it is being pulled back into the player by the automatic reloading mechanism. • To insert a disc into the mechanism when the unit is powered OFF.
Owner´s Manual DEA600 Radio Conformity assessment issues FCC/IC Regulatory Notice Modification statement Delphi Electronics & Safety has not approved any changes or modifications to this device by the user. Any changes or modifications could void the user’s authority to operate the equipment. Delphi Electronics&Safety n’approuve aucune modification apportée à l’appareil par l’utilisateur, quelle qu’en soit la nature.