
Manual

Page 22
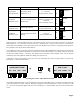
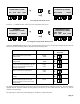
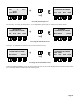
STRETCH ACTIVITY ACCESSED THROUGH: FUNCTION BUTTON:
Select and activate a pre-existing
stretch
START
–EDIT
1
Create(edit), name, and activate a new
stretch
START
–EDIT
1
Copy an existing stretch (except for
G5TH), edit the copy (if desired),
name, and activate the new stretch.
COPY
–DEL
2
Delete a non-factory stretch COPY
–DEL
2
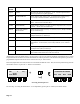
Return to the RUN screen with no
change
RUN
3
Deactivate(STOP) the current stretch
file and revert to unstretched tuning
STOP
4
The following flowcharts plot the various steps required to accomplish these stretch activities. Each of these four examples
highlight only the sequence of button presses typically necessary for just one of these activities, that is to say, with no
mistakes or back-tracking. The screen steps outlined above for accessing the STRCH file menu are represented in sequence
between the two screen drawings at the top of each flowchart. Depending on which stretch activity you wish to pursue, you
would then follow along from the appropriate arrowed path exiting the second screen drawing in the flowchart.
The following key will assist in understanding the “shorthand” of these flowcharts:
1. To the right (or sometimes above) each front panel function button—“1” through “4”—depicted on the flowchart is the
exact label for that button as shown on the LCD display at the current step in the programming.
2. With the exception of the top two LCD screen drawings in each flowchart, the word descriptions at various steps do not
necessarily appear on the LCD screens but are meant only to explain the action at these steps.
3. The appearance of the “
L
” icon indicates that the user must press one of the buttons depicted horizontally to the right
of it in order to execute a choice in the current step of the programming and advance to the next step.
4. The appearance of an asterisk “*” near a button indicates that pressing that button in the current step of the programming
will cause the LCD screen to be redrawn with new functions assigned to the four Function buttons.
5. A diamond (
"
) box indicates that the next step in the programming depends upon specific choices made up to that point.
For example, under the “Creating A New Stretch” flowchart, a box labeled “4 characters?” is encountered. If the user
has entered four characters for the stretch name at this point, the next step will follow the “YES” path downward in the
chart (at which point the LCD display re-labels the function buttons as indicated). If, at any given time, this diamond
box is encountered when less than four characters have been chosen (as is normally the case for at least the first three
times the box is encountered), the “NO” path is followed. In this example, that means that the function buttons continue
to allow positioning of the cursor under various characters and/or selecting (or removing) a character from the current
stretch name under construction.
NOTE: When deleting stretches, the motor for the rotating strobe disc will always be turned off. The motor will begin
again upon returning to the RUN screen when stretch activity is concluded.
L
L
L
L
L
L