peterson AutoStrobe™ 590 Strobe Tuner Instruction Manual Revised 5-99 for Software Revision 1.11 by Michael Skubic © 1998-99 Peterson Electro-Musical Products, Inc. 11601 S. Mayfield Avenue, Alsip IL 60803-2476 Phone: 1-708-388-3311 FAX: 1-708-388-3341 email@petersonemp.com http://www.petersontuners.
TABLE OF CONTENTS THE ORGANIZATION OF THIS MANUAL . . . . . . . . . . . . . . . . . . . . . . . . . . . . . . . . . . . . . . . . . . . . . . . . . . . . . Page 1 THE AutoStrobe 590—AT A GLANCE . . . . . . . . . . . . . . . . . . . . . . . . . . . . . . . . . . . . . . . . . . . . . . . . . . . . . . . . . . Page 1 1. INTRODUCTION . . . . . . . . . . . . . . . . . . . . . . . . . . . . . . . . . . . . . . . . . . . . . . . . . . . . . . . . . . . . . . . . . . . . . . Page 1 2.
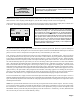
THE ORGANIZATION OF THIS MANUAL Congratulations on your purchase of the peterson AutoStrobe™ 590 strobe tuner. For your convenience, this manual is organized into three major sections. The first, "The AutoStrobe 590—At A Glance", comprises just three short pages of "must read" information that everyone should read before attempting to turn the Model 590 on and use it.
5) Completely remove the fuse from the unit. 6) Make sure the "Fuse Pull" lever is in the absolute far left position, completely clear of the Voltage Selection Card. 7) Insert the tip of a needle-nose pliers, scissors, or other suitable item through the small hole at the edge of the selection card. (NOTE: if you believe that you will need to switch this card often, you might consider acquiring a special extraction tool available from Peterson.
PETERSON MODEL 590 TUNER REVISION X.XX SERIAL # T590 XXXXX The initial screen during the power up phase is depicted here. Line three shows the software revision number and line four the serial number of the particular tuner. NOTE: We advise that you write down the serial number shown on this initial screen and keep it with your records for future reference in case anything should happen to your unit that would prevent this screen from appearing.
NOTE: The automatic note detection feature is based on reference tuning of A=440 Hz and Global Cent Offset (which appears on the second line of the RUN screen) set to 0 cents. Any deviation from these tuning references will limit proper note sensing to less than the usual ±50 cents range. For most applications, deviations in the range of A430 to A450 or, separately, up to about ±40 cents Global Cent Offset will yield reasonable results for automatic note selection.
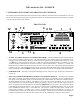
THE AutoStrobe 590—IN DEPTH 1. SUMMARY OF FEATURES AND FRONT PANEL CONTROLS We will begin with a brief description of the front panel controls, indicators, and basic features of the Model 590. This will provide you with a quick reference guide to the front panel of the tuner. Detailed information about each feature is explained in the succeeding sections of this manual.
4. EIGHTY-CHARACTER LCD MENU SCREEN — Simplicity and ease of operation are enhanced by the intuitive and user-friendly menu screen displays which address all the functional features of the tuner. 5. FOUR MENU-DRIVEN FUNCTION BUTTONS — The action of each of these four push buttons is defined by whatever specific description is currently displayed immediately above them on the bottom line of the LCD screen. These software-defined buttons permit great flexibility and simple user interaction with the Model 590.
This button is connected in parallel with the 1/4-inch jack at the rear of the tuner labeled "METRONOME SWITCH". Any momentary-close contact device such as a footswitch may be used in place of or in addition to the METRONOME ON/OFF button at any time. (The front-panel button will continue to operate with a device plugged into this rear jack unless the device is held in the closed position—make sure that the device operates in a momentary-close fashion.
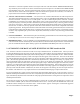
KEY= C A=440 C 00 ¢ 1 MET 2 3 + ÷ 7 AUTO SETUP MODE 2 4 KEY= C A=440 C 00 ¢ MAN SETUP MODE 1 MET 2 3 4 Accessing Manual Note Select Mode KEY= C A=440 C 00 ¢ 1 2 MET 3 4 + ÷ 7 MAN SETUP MODE 2 KEY= C A=440 C 00 ¢ AUTO SETUP MODE 1 2 MET 3 4 Accessing Auto Note Select Mode While the MAN MODE is indicated, the selection of note will not be affected by the incoming audio signal and must be selected by pressing one of the note buttons below the strobe disc.
KEY= C A=440 C 00 ¢ AUTO SETUP MODE 2 3 + ÷ 7 1 MET 1 4 SETUP MENU PLEASE SELECT MODE OPTN FILE 1 2 RUN DIAG 3 4 Accessing the Setup Screen b) VIEWING AND MODIFYING PARAMETER DEFAULTS The "OPTN" or Option selection provides further menu screens, each of which is dedicated to viewing and/or altering a given SETUP parameter.
As each SETUP screen is accessed, the value of each parameter shown is the CURRENT state of the parameter as last altered by any method: directly under the RUN or METRONOME screens, a previous access to the SETUP screens, or, if neither of these occurred, the last power-up default settings. Conversely, any change to these parameters under a SETUP screen will be reflected immediately upon exiting SETUP whether the changes were stored or not.
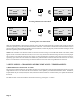
AUTO–NOTE SETTING MODE IS NOW : XXX NEXT 2 OFF ON 3 4 1 ÷ 7 1 RUN + METRONOME SETTINGS BEATS/MIN=XXX X=BEATS/MEAS NEXT DOWN UP RUN 1 2 3 4 Accessing the Metronome Setting Screen The Metronome SETUP screen is unique in that two parameters are accessible on one screen. The front panel UP ARROW/DOWN ARROW buttons are used to modify the BEATS/MIN parameter; the "2" and "3" Function buttons modify the BEATS/MEAS parameter.
to achieve both completely, that is, if by "pleasing", one means smooth beat-free intervals, and, if by "flexible", one means satisfactory harmony in all possible key signatures. The AutoStrobe 590 always powers up with Equal Temperament and all offsets applied to notes when defining (editing) custom temperaments are relative to it. In other words, if one creates a temperament in which the C# note is 5.2 cents sharp from the pitch for C# in an equal-tempered scale, a setting of +05.2¢ would be entered.
KEY= C A=440 C 00 ¢ AUTO SETUP MODE 2 3 1 ÷ 7 1 + 4 SETUP MENU PLEASE SELECT MODE OPTN FILE RUN DIAG 1 2 3 4 Accessing the Setup Screen The next step—accessing the FILE menus—is accomplished by pressing the “2” button (now labeled: FILE): SETUP MENU PLEASE SELECT MODE FILE RUN DIAG 1 2 3 4 2 ÷ 7 OPTN + TEMPERAMENT MENU PLEASE SELECT MODE START COPY –EDIT –DEL RUN STOP 1 2 3 4 Accessing the File Menu Screen Under this TEMPERAMENT MENU screen, all temperament-related activit
1. To the right (or sometimes above) each front panel function button—"1" through "4"—depicted on the flowchart is the exact label for that button as shown on the LCD display at the current step in the programming. 2. With the exception of the top two LCD screen drawings in each flowchart, the word descriptions at various steps do not necessarily appear on the LCD screens but are meant only to explain the action at these steps.
A comprehensive flowchart at the end of this instruction manual shows ALL possible paths through the temperament menus and provides a good reference once the fundamental concept of the these menus is understood. You may note that at almost every point, there is a button function (like BACK or REDO) which jumps to a logical earlier step of the current activity or a button function (like RUN or CNCL—short for "cancel") which jumps out of the current activity with no changes made.
1 2 3 + 2 ÷ 7 PICK NAME = ABCDEFGH I JKLMNOPQRSTUVWXYZ01 23456789 TMPR=_ _ _ _ < — — — — > BKSP CNCL 4 PICK NAME = ABCDEFGH I JKLMNOPQRSTUVWXYZ01 23456789 TMPR=_ _ _ _ < — — — — > BKSP CNCL 1 2 3 4 Selecting a Character To Enter Into the New Temperament File Name The cursor underline is now under the “B” in the selection string, but no character has been added to the temperament file name. To do this we must press the ENTER button on the front panel. (Note our position in the flowchart.
1 2 3 + ENTER ÷ 7 PICK NAME = ABCDEFGH I JKLMNOPQRSTUVWXYZ01 23456789 TMPR=B _ _ _ < — — — — > BKSP CNCL 4 PICK NAME = ABCDEFGH I JKLMNOPQRSTUVWXYZ01 23456789 TMPR=B G _ _ < — — — — > BKSP CNCL 1 2 3 4 Entering the Second Character Into the New Temperament File Name For the third character, a “blank” in our example of “BG 1”, we could either continue to advance through the letters and numbers in the selection string to arrive at the “blank” character or we could make use of the wrap-around featu
1 2 3 + 1 (Press and hold) ÷ 7 PICK NAME = ABCDEFGH I JKLMNOPQRSTUVWXYZ01 TMPR=B G _ 23456789 < — — — — > BKSP CNCL 4 PICK NAME = ABCDEFGH I JKLMNOPQRSTUVWXYZ01 23456789 TMPR=B G _ < — — — — > BKSP CNCL 1 2 3 4 Selecting the Final Character To Enter Into the New Temperament File Name And, finally: 1 2 3 + ENTER ÷ 7 PICK NAME = ABCDEFGH I JKLMNOPQRSTUVWXYZ01 23456789 TMPR=B G _ < — — — — > BKSP CNCL THE NAME CHOSEN FOR TEMPERAMENT IS: BG 1 REDO 1 OK 2 CNCL 3 4 4 Entering the Final
We are assuming that we have chosen a valid name for our file and have, consequently, followed the “NO” path from the “Name already exists?” decision box on the flowchart. Thus, we have now entered the “Edit Notes” phase of our temperament file creation. From this one screen, we can now define the note offsets for all 12 scale notes. Note that this screen shows you which temperament file you are editing as well as which scale note you are editing.
KEY= C A=440 C 00 ¢ 1 2 MET 3 4 + ÷ 7 AUTO SETUP MODE KEY KEY= Bb A=440 C AUTO SETUP MODE 1 2 00 ¢ MET 3 4 Choosing Alternate KEY Transpositions 5. ENHANCED RESOLUTION OF INTONATION MEASUREMENTS As you continue to practice your intonation with the Model 590, you will find that your pitch accuracy continually improves. As you find yourself playing more and more closely to perfect intonation, you may wish to adjust the tuner more precisely to your pitch.
a. Connect an external microphone to the EXTERNAL INPUT connector of the tuner. Set this microphone on a stand so that you can face away from the tuner. b. Adjust the tuner to the tuning key of your instrument as detailed above. If necessary, raise or lower the standard tuning reference pitch of the tuner (Concert A setting under the SETUP menu). c. You are now ready to begin. For the remainder of this section we will assume that your instrument is tuned in "C" to a pitch of A = 440 Hz.
(Note that, at this point, the metronome has not actually been turned on; no audio or visual metronome beats have begun cycling.) The second method available for initiating the Metronome screen is to press the "Metronome On/Off" button below the "1" button on the front panel ONCE while the RUN screen is active.
of from 1 to 8 beats in length which is the range of the BEATS/MEAS parameter. As with the BEATS/MIN parameter, values will "wrap around"—1 around to 8 or 8 around to 1—if one attempts to decrement or increment through the limits. Once it is started (and a suitable volume is set), the metronome will sound a short "blip" at each beat. The accented blips are distinguished from the unaccented ones by a distinctly higher-pitched sound.
the relative strength and frequency of these over-tones or "partials" and the manner in which these parameters change over the course of the sound that makes a note from a piano, for example, distinguishable from that of a trumpet.
APPENDIX A: WHY USE A "REAL" STROBE TUNER? There are many cheap "strobe pattern" tuners on the market which attempt to emulate the look of the image produced by an authentic rotating strobe disc. This is usually done with an array of LEDs (Light Emitting Diodes) which are simply turned ON or OFF in sequence so as to "appear" that the light image is drifting left or right.
APPENDIX B: WHY BE CONCERNED ABOUT UNEQUAL TEMPERAMENTS? Temperament refers to the specific frequency (pitch) intervals placed between notes in a musical scale. With 12 notes per octave (the most prevalent case but, by no means, the only case), there are an infinite number of ways to set the audio frequencies of these notes relative to one another. Through the centuries, many have wrestled with the challenge of creating the most pleasing, yet universally flexible, temperament of these 12 intervals.
AC Voltage . . . . . . . . . . . . . . . . . . . . . . . . . . . . . . . . . . . . . . . . . . . . . . . . . . . . . . . . . . . . . . . . . . . . . . . . . . . . . . . . Page 1 accuracy tuning . . . . . . . . . . . . . . . . . . . . . . . . . . . . . . . . . . . . . . . . . . . . . . . . . . . . . . . . . . . . . . . . . . . . . . . . . . . . . . . . . Page 5 Auto-Note selection . . . . . . . . . . . . . . . . . . . . . . . . . . . . . . . . . . . . . . . . . . . . . . . . . . . . . . . . . . . . .
screen . . . . . . . . . . . . . . . . . . . . . . . . . . . . . . . . . . . . . . . . . . . . . . . . . . . . . . . . . . . . . . . . . . . . . . . . . . . . . . . . . . . . . Page 6 FILE . . . . . . . . . . . . . . . . . . . . . . . . . . . . . . . . . . . . . . . . . . . . . . . . . . . . . . . . . . . . . . . . . . . . . . . . . . . . . . . . . Page 12 initial . . . . . . . . . . . . . . . . . . . . . . . . . . . . . . . . . . . . . . . . . . . . . . . . . . . . . . . . . . . . . . . . . . . . . . . . .