PetSafe® Deluxe In-Ground Cat Fence™ Receiver Collar Operating Guide Please read this entire guide before beginning.
Thank you for choosing PetSafe®, the best selling brand of electronic training solutions in the world. Our mission is to be the most trusted brand in the pet ownership experience. We want to ensure your pet’s safety by providing you with the tools and techniques to successfully train your pet. If you have any questions, please contact the Customer Care Center at 1-800-732-2677 or visit our website at www.petsafe.net.
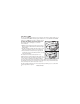
Prepare the Receiver Collar To Insert and Remove the Battery Note: Do not install the battery while the Receiver Collar is on your pet. This Receiver Collar utilizes a replaceable PetSafe® battery (RFA-188). This unique battery is designed to make battery replacement easier and increase water protection. To activate the collar, insert the battery module (A). Using the edge of the Test Light Tool as shown, turn the battery clockwise until the vertical line on the battery is pointed to the “ON” position (B).
Two Color LED The two color LED indicator shows good or low battery. Good battery equals 1 flash every 60 seconds with Green LED. Low battery equals 3 flashes every 60 seconds with the Red LED. If there are no LED lights it is time to change the battery. To Set the Static Correction Level E Read all steps before attempting to set the Static Correction Level. 1. With the battery installed, press the Correction Level Button and release when the Receiver Indicator Light lights red (E). 2.
Function and Response Table Indicator Light Response Static Correction Level Receiver Collar Function Temperament of Pet 1 Red Flash 1 No Static Correction, Tone Only 2 Red Flashes 2 Low Static Correction Timid 3 Red Flashes 3 Medium Static Correction Timid or Average 4 Red Flashes 4 Medium High Static Correction Average or High Energy 5 Red Flashes 5 High Static Correction High Energy Flashes 3 Red Flashes every 60 seconds Low Battery www.petsafe.
Fit the Receiver Collar Important: The proper fit and placement of your Receiver Collar is important for effective training. The Contact Points must have direct contact with your cat’s skin on the underside of his neck. To assure a proper fit, please follow these steps: G 1. Make sure that the batteries are not installed in the Receiver Collar. 2. Start with your cat standing comfortably (G). 3. Center the Contact Points underneath your cat’s neck, touching the skin.
6. Trim the collar as follows (I): I a. Mark the desired length of the Receiver Collar with a pen. Allow for growth if your cat is young or grows a thick winter coat. b. Remove the Receiver Collar from your cat and cut off the excess. c. Before placing the Receiver Collar back onto your cat, seal the edge of the cut collar by applying a flame along the frayed edge.
To Re-Thread the Collar Slide Buckle The slide buckle prevents the collar from becoming loose around your cat’s neck. If you need to take your cat out of the Pet Area, remove the Receiver Collar and leave it in the Pet Area.
Training Guide Cat Training Introduction This training guide offers a choice of two training methods: On Lead Method and Supervised Tie Out Method. Both methods require close supervision of your cat throughout the training period. Carefully read both methods to determine which is right for you and your cat. Be Patient With Your Cat Important: Proper training of your cat is essential to the success of the PetSafe® Deluxe In-Ground Cat Fence™. Read this section completely before beginning to train your cat.
Preparation Your goal is to train your cat to turn away from the Boundary Zone every time he hears the warning beep from the Receiver Collar. During training, your cat must develop an understanding of the Boundary and that you require him to remain within it. Cats are independent creatures. In order to gain the correct response, you must always work with a kind, calm and respectful manner. Gain your cat’s trust and you will build a mutual respect which will ultimately lead to success.
2. Reward your cat for allowing you to put on the Receiver Collar and leave him for a short period of time (5 - 15 minutes). Gradually increase the time your cat spends wearing the Receiver Collar to an hour or more. 3. Your cat is ready to move on to Training when you observe him behaving normally (e.g., grooming, eating, sleeping, showing affection) while wearing the Receiver Collar.
2. Put the harness and lead on your cat. Lead him into the Pet Area and up to a chosen point by the Boundary Flags. 3. Holding the Receiver Collar near your cat’s ears, lead him into the Warning Zone. 4. As the beep sounds, urgently say “run away, run away” while pulling your cat on the harness into the Pet Area. Praise and give affection to your cat. 5. Connect the response to the beep with the Boundary Flag response by carrying a spare Boundary Flag.
Goal: To teach your cat to associate the Static Correction with the position of the Static Correction Zone. Steps: 1. Set the Receiver Collar to Level 2 – the lowest Static Correction level. 2. Fit the Receiver Collar as detailed on pages 6 and 7 of this guide. 3. Lead your cat to the Boundary Flags, but let him move through the Warning Zone to receive the small Static Correction. Note:You may need to remove every other flag at this stage to encourage your cat to approach the Static Correction Zone. 4.
Days 8 thru 14 – Unleashed Observation Training sessions should start at 10 – 15 minutes, gradually increasing to one hour and more. Your cat is ready for this phase only when he normally avoids the Boundary Flag line. During this phase, watch your cat carefully. Goal: To give your cat free run of the Pet Area. Steps: 1. Fit the Receiver Collar as detailed in on pages 6 and 7 of this guide. 2. Allow your cat freedom in your property while you act as a minder. 3.
Training Guide - Supervised Tie Out Method Goal: To train your cat to turn towards home every time he hears the warning beep from the Receiver Collar. Training should take about one week. Setup: 1. When training a cat, use a harness for attaching the tie-out. 2. Set the Receiver Collar to Correction Level 2 or 3 depending on the size and temperament of your cat. The higher the Correction Level, the stronger the Static Correction. 3. Cats must wear Receiver Collars much tighter than standard collars.
Leave the Boundary Flags in place for 3 weeks after your cat is trained. Then remove every other Boundary Flag every 4 days until they are all gone. Keep the Boundary Flags for future use. Regularly check the Receiver Collar and the fit against your cat’s skin. ___________________________________________________________________ Accessories To purchase additional accessories for your PetSafe® Deluxe In-Ground Cat Fence™, contact the Customer Care Center at 1-800-732-2677.
Troubleshooting Receiver Collar is not beeping or correcting. • Check battery to make sure it is installed properly. • Check that both lights are lit on the Fence Transmitter. If not, perform the “Short Loop Test.” The Receiver Collar is beeping, but my cat is not responding to the Static Correction. • Make sure that Static Correction Level is at 2 or above. • Test the Receiver Collar with the Test Light. • If the Test Light flashes, check the fit of the Receiver Collar.
Test Light Instructions 1. Set the Correction Level to 2 or above. 2. Hold the Test Light Contacts to the Contact Points. 3. Walk toward the Boundary Wire holding the Receiver Collar at your pet’s neck level until the Test Light flashes. Note: If the Test Light does not flash, install a new battery and re-test. If Test Light still does not flash, contact the Customer Care Center at 1-800-732-2677.
Short Loop Test The Short Loop Test is a simple test to determine if each component (Fence Transmitter, Receiver Collar and Boundary Wire) is functioning properly. 1. Disconnect the Boundary Wire and Ground Wire. 2. Cut approximately 10 feet of unused Boundary Wire and connect it to the Boundary Wire Terminals. 3. Spread the Boundary Wire out into a circle. Set the Boundary Control Switch to B. 4. Set the Boundary Width Control knob to 10 and the Static Correction Level to 2 or above. 5.
Terms of Use and Limitation of Liability 1. Terms of Use This Product is offered to you conditioned upon your acceptance without modification of the terms, conditions and notices contained herein. Usage of this Product implies acceptance of all such terms, conditions, and notices. 2. Proper Use This Product is designed for use with pets where training is desired. The specific temperament of your pet may not work with this Product. We recommend that you not use this Product if your pet is less than 6 lbs.
Caution The PetSafe® Deluxe In-Ground Cat Fence™ is NOT a solid barrier. The system is designed to act as a deterrent to remind pets by Static Correction to remain in the boundary established. It is important that you reinforce training with your pet on a regular basis. Since the tolerance level to Static Correction varies from pet to pet, Radio Systems Corporation CANNOT guarantee that the system will, in all cases, keep a pet within the established boundary.
Perchlorate Battery Perchlorate Material – special handling may apply. See www.dtsc.ca.gov/hazardouswaste/perchlorate.
www.petsafe.
Radio Systems Corporation 10427 Electric Avenue Knoxville, TN 37932 1-800-732-2677 www.petsafe.net 400-845/2 Covered by US Patent 5,868,103; 6,637,376; 6,921,089; 7,017,524; D531,117S. Other patents pending.