
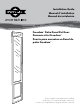
Installation Guide

www.petsafe.net
8
ENFR
ES
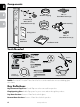
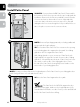
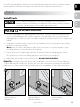
3D Before drilling into the Patio Panel, it is important not to
drill inside the Patio Panel rib lines where the glass is located.
Only drill into outer edge section. You may need to slide
Patio Panel over slightly to correct before drilling.
3E Drill
₇
⁄ ₆ ₄” (2. 5 mm)
holes through the sliding
glass door frame
clearance holes into the
Patio Panel.
3F Fasten the Patio Panel
to the interior side of
sliding glass door frame
using four #6 x ½” sheet
metal screws. DO NOT
OVERTIGHTEN.
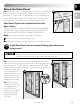
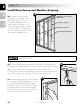
Install Patio Panel with T-brackets into an Exposed or Recessed
sliding glass door frame using screws
• Slide the Patio Panel against the sliding door jamb. Measure and mark the top center and bottom
side of the Patio Panel where sliding door will close against. Then mark on the sliding door frame
(use a pencil or something that can be cleaned away). These marks are for a marking guide only for
the two T-brackets.
• Slide the panel over and up to be able to place the T-brackets into the track of sliding glass door.
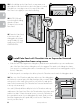
3G Take one of the T-brackets and place at the top of the sliding glass
track where the vertical part of the bracket aligns with your mark. Mark
with a pencil on the inside of the track for your pilot holes and do the
same for the bottom track. (The T-brackets are universal and will work
in the top or bottom track).
Use a
₇
⁄ ₆ ₄ ” (2.5 mm) drill bit to drill pilot holes for T-brackets at the top
and bottom of the Patio Panel. Place the T-brackets back into place and,
with the four M4 x 10 mm sheet metal screws, secure the T-brackets in
the top and the bottom of your sliding glass door track. Slide your Patio
Panel back against the door jamb and you will see the T-brackets in
front of your Patio Panel.
3D
3E
3F
2
3G