
Manual


6 1-800-732-2677
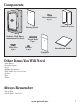
3. Place A side of Pet Door back
into wall and use the drywall
screws to hold unit in place
temporarily (2C).
4. Lift the fl ap and push the
Center Locator until it is
touching the outside wall.
5. Make sure all the folded fl aps
are resting fl ush on the inside
of tunnel and that you have
not completely pushed Center
Locator out of Pet Door.
6. Mark the holes on the Center
Locator (2D).
7. Remove the Pet Door from
the inside wall.
2C 2D
8. Drill out the marked holes with your 5/16" drill bit. Be careful to keep these holes as straight
as possible.
9. You are now ready to work from the outside wall. Line up the three holes on the template with
the three holes that you just drilled. Check for square and tape in position.
10. Repeat the instructions for cutting the hole.
Note: If you are going through vinyl siding it is best to carefully score and cut the siding before cutting
through plywood.
____________________________________________________________________________________________
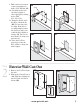
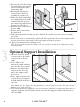
Optional Support Installation
1. Measure from the inside
of outer wall to the inside
of inner wall as shown
(3A).
2. Cut a 2X4 to the
measured length, making
sure that the cut is square.
3. Remove any debris that
may be inside the wall
where the support will
be located.
4. Place support inside wall
so that the top of support
is fl ush with the bottom of
cut-outs.
3A 3B
Note: Make sure the support fi ts snug and that it is not too long or too short. In either instance,
damage to the wall can occur.
5. Use 2 drywall screws (supplied) or 2 wood screws (optional) to fasten the inner side of
support as shown. Check again to make sure that the support is fl ush with bottom of
cut-outs (3B).
Step
3