
Manual


www.petsafe.net 7
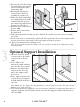
6. Use the 2 drywall screws (supplied) or 2 wood screws
(optional) to fasten the outer portion of the support (3C).
Note: If placing screws into vinyl siding it may be necessary
to drill a hole through the siding slightly larger than the heads
of the screws. This will allow the screws to tighten fl ush with
plywood and not buckle the vinyl siding.
3C
____________________________________________________________________________________________
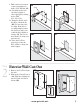
Pet Door Installation
1. Using the holes left by the drywall screws on the A side of Pet Door as pilot holes, drill a 1/2"
hole for the toggle bolts (4A).
2. Install the Toggle Bolts into the A side of the Pet Door as shown (4B).
3. Place the A side of the Pet Door back into the cut hole and tighten the bolts (4C).
Tip 1: You may need to start the toggle bolt into the hole.
Tip 2: Sometimes you need to hold the screw out so the toggle is locked while you tighten the
screw until the toggle is tight enough that it will hold itself in place while you fi nish tightening.
Be careful not to overtighten.
1/2"
4A
4B
4C
4. Y
ou are now ready to work from the outside wall.
With B side in position, mark location of 4
toggle bolt holes. Remove B side of the Pet Door. Drill marked locations with 1/2" drill bit.
5. Install the toggle bolts into the B side.
Note: If installing in a vinyl siding application, you may want to place closed cell foam and/or
silicone caulk between the Pet Door fl ange and the siding (sold separately in the PetSafe
®
Universal
Pet Door Install Kit).
Step
4