
Assembly Instructions

Print Date 10/21/14 Updated 9/23/14 CS
1. Purpose
This is a visual guide to aid in the installation of the City Post anchor system. This document
covers the recommended installation procedure for installation.
2. Definitions/Tools
City Post Assembly: The complete City Post assembly includes:
• Post – the taped final assembly Anchor Cup – Aluminum molded anchor that will be
imbedded into the roadway
• Epoxy Shield – Clear sheet used to prevent epoxy from making contact with the post.
• Rubber Gasket - 0.20” rubber ring to seal the base and anchor cup
Core Drill: Any drill capable of accepting and centering a 2.1” minimum sized core bit.
Core Bit: Any masonry bit capable of creating cores a minimum of 2.1” in diameter.
Numerous Suppliers have bits: HILTI, Grainger and BOSCH, etc.
Epoxy/Adhesive: There are three adhesive systems that we have trialed with good results.
Please refer to the table below: all times are for a nominal 86
o
F; higher temps will result in faster
times, lower temps will take longer to cure. 7 floz or 200 ml of epoxy for estimating for one
install.
Work Time
Cure Time
Dispensing / Application
Pexco Epoxy EA56 8 min 1 hr Hand mixed and Poured
Hilti RE-500 Epoxy 3 hr 12 hr Cartridge system / multiple guns
Hilti HY 200A Hybrid
(CONCRETE ONLY)
4 min 30 min Cartridge system / multiple guns
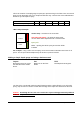
Depth Gauge: Disposable tool used as a stop point for epoxy fill, see below.
Protective Gear: Glasses, latex gloves, rag for cleanup, etc…. your list may vary.
3. Preliminary Preparation – CRITICAL for new installations
Ensure that the clear epoxy shield and the black rubber gasket are
installed between the City Post and the anchor cup. Screw down the
anchor cup tightly until it stops.
City Post assembly ready for installation
2” Anchor
Installation Guide and Recommendations