(CPFAFFD) C- aFardz ‘132 315$ r
Dear Housewife, At last you are the proud owner of this Sewing Mochinel The machine was fully explained to you and you were delighted with the many useful and wonder ful things performed on this true wonder of en gineering.
The following accessories are available at slight additional charge I Contents 1 box for housing accessories, No. 1466 a 1 edger with guide Z—153a bers Choice of Needle Sizes and Thread Num 3. Cleaning and Oiling ice 4. Cause of Faults and Simple Home Serv The Electric Motor bobbins No. 970 sewing machine needles, System No. 130 R “ • 6 1. To Prepare for Sewing 2. Sewing 1 feller No. 823 1 hemmer No. Z—824, 4 mm 5 Important Hints • 11 • 14 1 threader, No. 188 1 screwdriver, No.
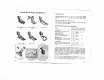
Presser feet and their designations Important Hints Always obtain a I and n e d I e s from your Sewing Machine Dealer. Never use ejust oil, but only best quality any kind of lubricating sewing machine oil. Use only needles of System No. 130. Only Sewing Machine Experts shou ld be entrusted with any repairs to your machine.
To prepare for sewing I I ‘ ted Before despatch from the works, each machine is subjec any nce experie to a severe test run. Therefore, should you to trouble with the machine, the cause may well be due settings wrong manipulation. Do not interfere with any thread without first carefully checking the upper and under feed the n of positio the and ing, the tensions, the needle g”. “Sewin at dog, the control of which should be set Inserting the Needle and Raise the needle bar to its highest point.
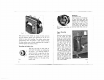
Replacing the Bobbin Case With thumb and forefinger of your left hand hold the bobbin case (complete with bobbin) by its latch (Fig. 1) and slide the case on to the small stud in the center of the hook (Fig. 5). Now press Fig 5 the bobbin case down so that the latch clicks into pasition. Upper Threading Fig. 6 Fig.3 Now press on the winder by means of latch and turn the free balance wheel over towards you to set it in motion as you start treadling.
Picking up the Lower Thread — Fig. 7 With your left hand hold the end of the upper thread above the bedplate, leaving the thread slack. Turn the balance wheel towards you to allow the needle to travel down and up again to its high est point; the lower thread will be brought up in a loop through the needle plate. Place the ends of both Fig. 7 threads under the presser foot to the back. Do not move the threaded need le unlessa piece of ma terial has been placed beneath it. [ 2.
__ Regulating the Thread Tensions — Figs. 9—li The Upper Thread Tension is regulated by turning the setting flange of upper thread tensioner a (Fig. 6). Clockwise turning increases the tension; anticlockwise turning loosens the tension. — The U n d e r T h r e a d T e ing the small screw a (Fig. too the tension is increased decreased by anti-clockwise n s I o n is regulated by turn 4) with a screwdriver. Here by clockwise adjustment and adjustment.
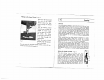
Cleaning and oiling [ After cleaning apply I a few drops of hig h-grade sewing machine oil to all wo rking parts. Do not, ho wever, apply too much oil ( ] Fig. 12 Machine Head with open Face Cover Plate ; a few drops at the right places will pro ve ode quote. After oiling run the machine rap idl y for a short while and then, be fore you start to sew, wipe all parts clear of any surplus oil.
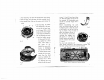
1. The Head (Fig. 12). Open the hinged face cover plate. 2. The Arm (Fig. 13). Lubricate all points marked thus 0. 3. The Needle Plate. Take out the screws and remove the plate. 4. The Hook (Fig. 14). Move the needle bar to its high est and tilt the head over on its hinges. With a small brush dust the hook. Apply a few drops of paraffin to the race between the hook Fig. 14 Fig. 15 16 II and the bobbin carrier IV; then work the mach ine rapidly for a short while. Now apply a few drops of oil.
______________________________________ 2. Certain working ports of the machine are dry a few drops of oil. 4. Cause of faults and simple home service 3. A component part has worked itself loose it with a screwdriver Please always remember: many machine troubles may be caused by your not carefully following these working instructions. In many cases, faulty working of your mach- 1. Thread ends have become entangled in the hook race — — 2.
material — remove the needle plate and thoroughly thread used change the needle or the thread to give the correct relation between the two; (see page 5: “Relative Needle and Thread Sizes”). 4. The thread curls, because it is unsuitable for machine sewing use a different thread. 5. The needle used is not of the correct system obtain correct needles from the suppliers of your machine. — clean the feed dog. 7.
material — remove the needle plate and thoroughly clean the feed dog. The material puckers In all cases where faulty working of your sewing machine cannot be rectified by your following the above directions, please consult your Sewing Machine Dealer. He will al ways be glad to advise you. 1. Both tensions are too severe loosen the setting flange on upper thread tensioner and the screw on bobbin case; (see page 12: “Regulating the Thread Tensions”). — 2.
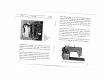
The E’ectric Motor 1. Line Voltage The motor works on 115 volts. 2. Tensioning the Drive Belt a) Loosen both screws holding the guard to motor and remove the guard. Fig. 20 shows Motor Housing with Guard removed. b) Loosen the two screws b which are now visible Fig. 20. — see c) By moving the motor up or down, the correct belt tension may be obtained. Retighten both screws. 3. Changing the Carbon Brushes a) Remove the Vbelt. b) Take out the 4 screws c in motor end shield plate see Fig. 20.
-e - 9? paq paq Id, 0 0 II) black a DC Jo a 012 6) CC 0 a !4!M 6 WnJUOfQ U