
Operation Manual


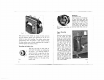
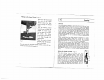

Picking
up
the
Lower
Thread
—
Fig.
7
General
Turn
the
balance
wheel
to
move
the
thread
take-up
lever
to
its
highest
point.
Place
the
material
under
the
presser
foot,
lower
the
presser
bar
and
commence
to
sew.
When
4
making
the
first
few
stitches,
hold
the
ends
of
bath
threads
in
your
hand,
so
that
they
do
not
get
sewn
down
or
get
drawn
into
the
race.
Never
force
the
material
along
by
either
pushing
or
pulling
it,
but
merely
guide
the
work;
otherwise
the
needle
may
break.
It
is
best
to
always
make
a
short
practice
run
on
a
remnant
before
commencing
on
your
work.
When
sewing
hard
or
thick
pieces
of
material,
or
when
stitching
across
seams,
assist
the
needle
by
carefully
turning
the
balance
wheel
with
your
hand.
This
practice
will
guard
against
the
needle
bending
or
breaking.
Before
sewing
the
corner
of
a
seam,
with
a
hand
sewing
needle
draw
a
thread
through
the
fabric
and
sew
along
one
edge.
At
the
corner
leave
the
needle
in
the
fabric
to
act
as
a
pivot,
turn
the
material
and
continue
to
sew
while
holding
both
ends
of
the
tacking
thread.
This
way
you
will
prevent
stoppages
at
corners
which,
otherwise,
easily
occur.
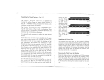
Setting
the
Length
of
Stitch
—
Fig.
8
The
machine
has
in
front,
on
the
r
i
g
h
I,
a
stitch
regulating
lever
a
with
thumb
screw
b,
with
which
the
required
stitch
length
may
be
selected
on
the
scale
c.
Before
you
can
make
any
adjustment
the
thumb
screw
must
be
turned
to
the
left.
The
more
you
loosen
this
screw,
the
greater
the
up
and
down
movement
of
the
regulating
lever
will
be,
and
the
stitches
will
increase
or
decrease
accordingly.
For
re
verse
sewing
you
must
move
the
lever
to
the
top.
[
2.
Sewing
With
your
left
hand
hold
the
end
of
the
upper
thread
above
the
bed-
plate,
leaving
the
thread
slack.
Turn
the
balance
wheel
towards
you
to
allow
the
needle
to
travel
down
and
up
again
to
its
high
est
point;
the
lower
thread
will
be
brought
up
in
a
loop
through
the
needle
plate.
Place
the
ends
of
both
threads
under
the
presser
foot
to
the
back.
Do
not
move
the
threaded
needle
unlessa
piece
of
ma
terial
has
been
placed
beneath
it.
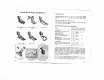
Fig.
7
4i
Fig.
8
—a
—b
10
11