
Operation Manual


Regulating
the
Thread
Tensions
—
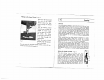
Figs.
9—li
The
Upper
Thread
Tension
is
regulated
by
turning
the
setting
flange
of
upper
thread
tensioner
a
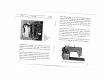
(Fig.
6).
—
Clockwise
turning
increases
the
tension;
anti-
clockwise
turning
loosens
the
tension.
The
U
n
d
e
r
T
h
r
e
a
d
T
e
n
s
I
o
n
is
regulated
by
turn
ing
the
small
screw
a
(Fig.
4)
with
a
screwdriver.
Here
too
the
tension
is
increased
by
clockwise
adjustment
and
decreased
by
anti-clockwise
adjustment.
It
is
generally
only
necessary
to
adjust
the
upper
thread
tension.
Satisfactory
stitching
is
possible
only
if
upper
and
under
thread
tensions
are
correctly
set.
After
you
have
sewn
an
inch
or
two,
inspect
the
stitching
on
top
and
underneath.
The
tensions
are
satisfactory
if
both
threads
are
drawn
into
the
material
e
q
u
a
II
y
and
lock
in
the
center
of
the
work
(see
Fig.
9).
If,
however,
loops
have
formed
on
the
underside,
the
upper
thread
is
too
slack
and
must
be
given
more
tension
by
turning
the
setting
flange
a
(Fig.
6)
to
the
right
(Fig.
10).
If
loops
continue
to
be
formed
on
the
u
n
d
e
r
s
i
d
e
of
the
work,
it
is
possible
that
the
under
thread
has
been
tensioned
too
severely
and
this
must
be
corrected
by
turning
the
small
screw
a
(Fig.
4)
a
little
to
the
left.
If,
on
the
other
hand,
the
thread
is
lying
fIat
o
n
to
p
of
h
e
m
a
t
e
r
i
a
I
(Fig.
ii),
or
if
loops
hove
formed,
the
upper
thread
may
be
too
tight
and
you
must
loosen
the
Regulating
the
Presser
Foot
The
presser
foot
must
exert
on
the
material
sufficient
pressure
to
ensure
satisfactory
feeding
of
the
material.
The
presser
bar
is
set
for
oIl
regular
sewing
work
on
light
and
medium
weight
goods.
Heavy
or
hard
texture
materials
require
more
pressure.
To
increase
the
pressure,
turn
the
setting
screw
to
the
right;
to
decrease
the
pressure,
turn
the
screw
to
the
left,
I.
e.
upwards.
Removing
the
Work
from
the
Machine
Raise
the
take-up
lever
to
its
highest
and
lift
the
presser
foot.
Draw
the
work
to
the
back
of
the
machine,
away
from
the
needle.
The
ends
of
the
thread
should
be
cut
approx.
3’
from
the
needle
and
be
placed
under
the
foot
to
the
back,
thus
leaving
the
machine
ready
for
the
next
run.
b
-J
tension
by
turn
ing
the
flange
a
—
Fig.
6
—
to
the
left.
If
this
adjustment
does
not
improve
the
stitch
forming,
the
under
thread
must
then
re
ceive
more
ten
sion
by
turning
__
the
screw
a
—
Fig.
4
—
to
the
right.
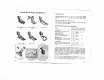
F;g.
9
Fg.
10
Fig.
11
12
13