CPFAFFi Automatic 93 INSTRUCTIONS FOREWORD Your dream has come true. You ore now the proud owner of a Pfaff Automatic 93, the sewing machine which will enable you to master all ordinary sewing and darning lobs that may come up in a home. In addition, your machine can sew a large number of beautiful decorative designs completely automatically. This instruction book will help you understand the machine and give you valuable tips to make sewing more fun four you.
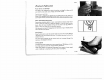
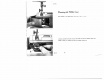
DR506 Qieijicn c6 $,“i Machiw Engaging the Sewing Mechanism .4 I. by Hold balance wheel and turn stop motion knob clockwise (as indicated black arrow). Disengaging the Sewing Mechanism Hold balance wheel and turn stop motion knob counter-clockwise (toward you). The sewing mechanism is disengaged for bobbin winding. The Workplate The plate is used to enlarge the work area for ordinary sewing.
DR5 I Power Drive and Sewlight Push plug I into receptacle 2 on back of machine, and plug 3 at other end of cord into the wall outlet. Cord 4 leads to the foot control. Foot-driven machines hove merely a sewlight cord whose plug is pushed into the wall outlet. To switch on the sewlight, push button on face cover. Mount driving belt. Before you drop the machine, remove the beltfrom the stand wheel, pulling itto the right.
DR 4898 $&ip1e $tIu4iq .4 For stroight-stitch sewing set: Lever A=O Lever B=Center+ (For stroight stitching, too, a fashion disc should be inserted in the machine.) Control G regulates the stitch length. For detailed instructions please refer to page 20. To backtack the end of a seam, simply depress the finger-tip control.
DR 489A i92a1 $“i If you want to switch from straight (A on “0”) to zigzag stitching, insert the zigzag disc, and turn lever A to desired stitch width (indicated by numbers ito 4). For most sewing jobs it is best to leave zigzag disc (A) in the machine so that you can quickly change over from straight to zigzag stitching. Lever B changes the position of the needle in the needle plate slot. Thus the stitching con be moved from the center to the left or right of the slot, as desired.
Aiitcusati 9a.chtcn 7t.cts Functional Stitches Three exchangeable fashion discs are furnished with each machine. These discs are used to make the zigzag stitch, the elastic serpentine stitch, and the blindstifch, and are marked as follows: Disc A = zigzag stitch Disc B = elastic serpentine stitch Disc C = blindstitch Ornamental Stitches Fashion discs D, E, F and G serve to produce various decorative designs.
OR 544A Changing the Fashion Discs Always lerk stitch width lever A to “0’ before you insert or remove a disc. Turn thumb nut R counter-clockwise to release the disc in the zigzag mechanism, then pull ii up and take it out. Push the disc onto the stud and rotote it until stud H snaps into one of the slots. Then tighten the thumb nut by turning it clockwise. Set the machine for the desired stitch width and stitch length.
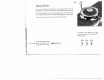
DR 614 icoj,ig c Case in 6 3 1 e4 6 Raise needle to its highest point and open free arm cover. Lift latch k with the thumb of your left hand and pull out bobbin case with bobbin. When you release the latch, the bobbin drops out.
Oni th 73ô66in Disengage the sewing mechanism (see page 4) and flick presser bar lifter to highest position. Raise the spool pins to the vertical position. Place spool of thread on one of the spool pins and set bobbin on bobbin winder spindle so that the key at base of spindle enters slot in bobbin, DR 549 Threading the Machine Lead the thread from spool I through both front holes of thread retainer2 and thence to the bobbin on the bobbin winder spindle.
6 into th 73c66e,, Case n 10 ? a 9t.tt 6 rd you, ond insert end falls from the top down towa in in left bond so that the thread bobb 1, hold n tratio illus in n As show bobbin into bobbin case. the case slot. in case and pull the thread into Hold the bobbin firmly in the bobb g. opening at the end of the sprin spring until it emerges from the Pull the thread under the tension . d hanging from the bobbin case Leave about three inches of threa that the bobbin cannot fall out.
9 L,istin c66in Ca.c€ tk 37 Raise take-up lever to its highest point and lift the latch with the thumb and forefinger of your right hand. Turn bobbin case until slot points up (see arrow). Place bobbin case on center stud s of hook. In replacing the bobbin case, it is best to hold the loose end of thread so that it will not get jammed between bobbin case and hook. Release the latch and press against bobbin case until you hear it snap into place.
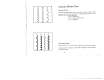
Types of Fabrics Mercerized Cotton Silk Needle Size Fine Fabrics such as georgette, chiffon, batiste, voile, lawn, silk. 80 to 100 0 to 000 twist 60 or 70 Lightweight Fabrics such as dress silks and cottons, sheer woolens, shirting, draW 70 to 80 A& B twist 80 50 to 70 B&C twist 90 40 to 50 C& D j5t Heavy Fabrics such as coating, denim, corduroy, slipcover fabrics, bed tickings, lightweight canvas. Synthetics, Rayon, Acetate including nylon, orIon, dacron, plastics, etc.
£J,i,ictant 9.:acec 1c a6cut 1 On Pfaff 93 sewing machines, System 130 R, flat-shank needles are used for all ordinary sewing and embroidery work. The lost column in the chart on page 16 gives you the needle size required for the material in hand. Genuine Pfaff needles, System 130 R, are available from every Pfaff dealer. Bent or blunt needles should not be used. jg DR 080 ln he ,‘Veete 9 Chan Bring needle bar to its highest point and lower sewing foot.
tij ‘ha?iny through the two rear spool of thread on one of them. Loce the threod Raise the spool pins to the vertical position ond ploce a openings of threod retoiner 2 (see illustroiion). ly into the slot ted, and jerk it far over to the right so that it slips proper Pull threod between ony two of tension discs 3, os illustra the machine. of top the t press the thread between spool and tension agains and under the thread check spring.
DR 619 1 •1 I 5 17
0R615 eutaflon Ccect If your tension is correct, you will Balanced tensions are essential for sewing. have perfect seams as sketched below (Ill). Sketch I Ca use: tight. Upper tension too loose or lower tension too Sketch II Cause: the fabric. The threads interlock on the underside of — — fabric. The threads interlock an the surface of the loose. Upper tension too tight or lower tension too IT II A Z4winfy i4i t4€ c in 6 73 6 III Hold needle thread lightly in your left hand.
DR 580 7yu1t?tIn7 U y iei ‘7.eiisio,i The bobbin thread tension has been set for a medium grade and need not be adjusted for all ordinary sewing operations. If a special sewing operation should require a looser or tighter tension, turn the small knurled screw on the bobbin case with the tip of your thumb as follows: Turn it left gEE( — for looser tension. Turn it right >) — for tighter tension.
OR 008 p1atun $titti4 length and to limit it in The stitch length controj serves to regulate the stitch sewing backwards. F (the higher the number, The numbers on the control indicate the stitch length machine ceases feeding. the “0”, on set is l the longer the stitch). When the contro the number indicating the To regulate the stitch length, turn the control until left edge of the slot. (The desired stitch length is opposite the mark on the illustration.
DR 042 n th n 6 Cha m 9 t it in $wuIij ‘Etwt Lift both needle and presser bar to their highest positions and turn sewing foot thumb screw b to the left. Tilt the foot sideways and puli it down. nber, ding. the (The Reverse procedure to slip on new foot and tighten screw b securely.
DR 616 awij ticu ,4lachiiw 6c Raise the needle and remove the sewing foot. Put the rear end of your brush under the edge of the needle plate and lift until the press stud snaps out. Turn needle plate upside down and replace so that raised portion is at front (see illustration). Press down stud, thread needle with embroidery thread or darning wool and lower presser bar lifter. Now you can embroider and darn without presser foot, moving the work freely by hand.
0R08.3 • i?eg 9ôct m c anin an? 6 I your brush 1 snaps out. Remove the sewing foot. Attach darning foot No. 93-100154-91 from the rear. Hold spring clip c so that it is behind the needle set screw, and tighten screw b. Ate- 7 j2cs $eivin 9ôce (with Clear-View Shoe) All-purpose sewing foot No. 93-100179-00 is attached as instructed on page 21. The tronsparency of its shoe facilitates all sewing operations where it is impor tant to watch the needle penetrate the fabric.
Ca an /i1ainhnana! Longevity and smooth machine performance are dependent on regular and proper cleaning and oiling. Use PFAFF sewing machine oil only. Never lubricate machine with animal or vegetable oils. All moving and rotating ports require regular lubrication. DR 053 To oil mechanism in free arm, remove sewing foot, raise needle and swing out free arm cover. Turn thumb nut r until free arm top cover is loose. Now lift the top cover and pull it out lengthwise of the arm.
There are two openings in the rim of the stitch width dial, one on the left and the other at the back (see arrows). These openings are the oil holes of the zigzag mechanism. Make sure you put only one drop of oil into the oil hole located on the left of the balance wheel, if there is such an oil hole on your machine. Do not lubricate the bobbin winder. DR053 DR557 lle and swing is loose. Now jincipal oiling The raceway in the sewing hook is the most important oiling point.
DR 024 t ?3ut6 9 9 th h Chaqin The built-in 15-watt sewing light illuminates the area of stitching perfectly. To change the light bulb, remove the face cover, push the bulb into its socket, turn left, and pull out. When inserting sew light bulb, be sure to slide bulb pins into socket slot. Press bulb in and turn right. [ 7uscoinfy the a€e Côo To change the light bulb or oil the parts at the needle-bar end, remove the face cover by pulling it upwards. 9ai Cco .
C7c6te hcctinfy 4 5 1. Machine Skips Stitches I Cause: Remedy: Needle incorrectly inserted. Push needle up as far as it will go and be sure that the long groove faces toward you, and flat side of shank away from you. Wrong needle. Choose the correct needle from chart on page 14. (For ordinary sewing, use System 130R needles.) 1 Needle bent. Insert new needle. Machine threaded improperly. Check and correct threading as instructed on pages 16 and 17. Needle too fine or too thick for the thread.
ii 3. Needle Breaks Cause: Remedy: Bent needle strikes point of sewing hook. Replace needle at once to prevent further damage. Needle too thin or thread too heavy. Use correct needle and thread sizes. Fabric pulls needle so it bends and strikes needle plate. Don’t force the feeding motion. Guide the material lightly. Bobbin case inserted incorrectly; Push bobbin case until you hear it snap into place. 4. Faulty Stitch Formation Ca use: Remedy: Improper tension. Adjust tensions as instructed.
6. Machine Works Heavily Remedy: Cause: cted by pieces Hook raceway tacks oil or is obstru of thread. Mechanism clogged by inferior oil. . Bobbin winder working while sewing Clean and oil hook raceway. Use only Pfaff sewing machine oil — never salad oil or glycerine. Stop bobbin winder. or 7. Machine Fails to Sew Zigzag Ornamental Stitch Desired Remedy: Cause: at all. Wrong fashion disc inserted or none insert proper fashion disc. Jerk stitch width lever to “0” and e (see pp. 6, 7 and 9).
847600 Zipper Insertion Machine Setting: A=0; B= 4 of zipper depends Pin or baste closed zipper on wrong side of fabric. Position the zipper. Turn on whether or not you wont the edge of the fabric to overlap of zipper, stitch fabric to right side. Run a straight seam close to left edge Use right edge on. operati uous contin one in across end and up the other side of foot as a guide. OR 002 Quilting Machine Setting: A=0; B=+ 4 parallel rows of Edge stitcher No.
847551 Flat Felled Seams Mochine Setting: A=0 or 2; B= ‘I Flat felled seams are used to durably join two pieces of fabric. They ore made in two operations. Flat felled seams usually are straight-stitched. Narrow zigzag stitches ore used for felling on elasticized fabrics only. 4 First Seam Lay pieces together with the wrong sides facing and the bottom piece pro truding ‘/a inch.
847551 Hemming Machine Setting: A=O or 2 to 3; B=4 to sew a uniform hem. You can The hemmer foot is indispensable if you wont ing on the type of fabric you ore hem with straight or zigzag stitches, depend facilitate insertion into the hemmer using. Clip off the corner of the fabric to is in line with the left edge of the foot curl. Feed fobric so that the raw edge not be folded twice and the raw c hemmer foot. If you feed less, the fabri will edge will show. DR 073 4 DR 074 .
838 954 Overcasting Edges Machine Setting: A=2 to 4; B= 4 Overcasting prevents frayed edges. Use a long wide zigzag stitch and sew edge with the needle taking one stitch into the fabric and the other over its edge (normal tension setting). You may overcast edges after fabric is cut and before the pieces are joined. DR 081 838 954 Butt Seaming Machine Setting: A=3 or 4; B= 4 Two similar pieces of fabric which do nat ravel easily may be butted together and joined with zigzag stitches.
DR 076 Darning without Darning Hoops You will really appreciate the free arm of your Pfaff 93 when you darn tubular clothing, such as underpants, sleeves, socks or stockings without darning hoops. 4 Trim ragged edges of hole with the fabric grain, then stitch bock and forth across the hale from one side to the other with the machine running at high speed. ii Now sew back and forth over preceding work with short stitches taken lengthwise of the arm.
DR 559 DR 056 Darning Machine setting: A=O; 8=4 Prepare your machine for darning as instructed on pages 22 and 23. Place fabric into darning hoop, the damaged area being in the center of the hoop. Hoops may be obtained from your Pfaff dealer. Triangular Tears Triangular tears are best darned by placing the torn section between hoops and making close stitches across and lengthwise. Move work under the needle with both hands.
DR 582 838 954 Inserting Pakhes Elastic Fabrics Insert fashion disc B (elastic serpentine stitch). Machine Setting: A=4; B= Stitch Length: Medium be used for Large holes can be patched quickly. The following methad may the rest jersey and other elastic fabrics. Cut patch so that its grain will match area. ed damag the over patch of the fabric. Place the Sew ii down with an elastic serpentine stitch of medium length. LI .4 trim close For additional strength, stitch over corners twice.
DR 567 Blindsfitching stitch). Insert fashion disc C. Machine Setting: A=4; B=1 he following method may be used for tch so that its grain will match the rest damaged area, - stitch of medium length. Stitch Length: Maximum Skirts, dresses and ladies’ coats of medium and heavyweight fabrics ore hemmed with blind stitches. To do this, insert the blindstitch disc and a No. 70 needle. Use embroidery thread No. 50 or silk thread that matches the fabric. Ease upper tension somewhat. rners twice.
DR 082 Sewing Buttonholes Insert fashion disc A. l (first notch); B= s A= / Machine Setting: t Stitch Length: Almost 0 (for buttonhole seam) . Use only No. 50 embroidery and darning threod on buttonhole gouge to button Attach buttonhole foot No. 847616 and set slide length when beginning of first right hole length desired. The buttonhole is the arrow). seam reaches red end of slide indicator (see te page, the bat-tacks at each When you fallow the procedure on the opposi as a buttonhole seam.
Instructions for Buttonholing I Sew first side over a filler cord. When beginning of seam reaches red end of slide indicator on buttonhole gauge, it is the right length. Leave needle in fabric on right side of its throw. thread. slide on buttonhole gouge to buttonright length when beginning of first 2 Lift foot, turn fabric around clockwise, using needle as a pivot. Lower foot, take one stitch to the left, pull filter cord taut and toy it parallel to completed line of stitching. see arrow).
— g-lCO79 Button Sewing Insert fashion disc A. Machine Setting: A=0; B= with your Pfaff. The needle won’t Don’t be afraid to sew on buttons or rings The latter may happen only break and the threads will not get loose either. stitch, It won’t be worthwile to with ready-mode clothing sewn with a chain button, but you will appreciate take the machine out for sewing on o single and bed covers, on shirts pillow on s this feature when sewing lines of button There your machine will etc.
DR 044 836954 Attaching Lace Machine Setting: gs with your Pfaff. The needle won’t • either. The latter may happen only ham stitch. It won’t be worthwile to ngle button, but you will appreciate on pillow and bed covers, on shirts urtains, etc. There your machine will sewing foot No. 931OO179-OQ and A=2; B= You can attach lace edging in one simple operation. Fold the edge of the fabric about /e” over to the wrong side, following the texture, and preferably iron it down.
DR 033 838 954 Applique is very effective on buster suits, pinafores, bibs, frocks, covers, wall hang Applique Work ings, or wherever a gay note is desired. Insert fashion disc A. Fill out small, but essential sections of 2 to 2; B= + Machine Setting: A=lt/ design with granite stitches. V Applique is easy and modern. Trace design on wrong side of fabric ond baste a piece of contrasting material to right side.
DR 038 Monogram Embroidery lique is very effective on buster suits, 3fores, bibs, frocks, covers, wall hang Insert fashion disc A. or wherever o gay note is desired. out small, but essential sections of Machine Setting: A=3 to 4; B= 4 ign with granite stitches. V Prepare machine as for darning. Script letters are best for monogram embroi dery without a sewing foot. It requires a little pratice. You will soon enjoy creative embroidery once you have learned to move the material at a uniform rate.
838 954 Straight-Stitch Hemstitching Infert fashion disc A. Machine Setting: A=0; B= Stitch length: Medium to maximum. Insert twin hemstitching needle, System 130 Zwi-Ho, as instructed on page 15. Turn out needle set screw a little further than for ordinary needles. The thread size, threading procedure and thread tension are the same as for cording work (see page 45).
Cording Machine Setting: A=0; B=# To cord on your Pfaff 93, use a cording foot and a twin needle. Twin needles are available for needle distances of 1.2 oa”), ( / 3 1.6 (h/l6), 1.8, 2.0 (/o4”), 2.5 (3/), 3.0, and 4.0 (5/) millimeters. Cording feet are available in three varieties, as follows: needle. Pin tucks are made with cording foot No. 847680 (7 grooves, /64” wide each) and a 1.2-mm twin twin needle. 1.6-mm a l/ia’ and ill.) see wide each; For narrow cording use cording foot No.
Turn sewing foot thumb screw b to the left and take out the sewing foot. Slip on cording foot ond tighten screw b securely. It is best to turn out screw b completely if you want to slip on a cording foot with the guide attached. Thread Size Pin tucks and narrow cording are made with a No. 50 embroidery thread, wider cording with sewing silk in the needle and on the bobbin. Set the machine for a medium stitch length. Upper Threading Place a spool of threoci on each of the two spool pins.
foot and tighten screw b securely. attached. Spacing between Tucks To ensure uniform spacing between parallel tucks, place the preceding seam into one of the grooves of the foot and use it as a guide. vith sewing silk in the needle and on For a larger spacing between tucks, use the adustabIe guide (see ill. on page 46) which is part of every cording foot. Various Cording Effects thread retainer openings 2, as illus between the center and front tension Dugh the hole at its end.
NV DR 554 93 0 179 Coarse-Thread Embroidery NV f ] ri M Yj I NV - I V V Insert fashion disc A. Machine Setting: A=O to 4; B=optional Buy a coarse, four-ply embroidery thread in the desired colors. Embroidery designs made with this thread are very aifractive. They have dimensional quality and closely resemble manual embroidery work. The adjoining designs were made with the aid of the zigzag disc.
DR 555 I 93W0175 Autonatic Embroidery Embroidery Machine Setting: A=2 to 4; B= Stitch Length: Minimum =0 to 4; B=optionol --ply embroidery thread in the desired jns made with this thread are very ave dimensional quality and closely embroidery work. signs were made with the aid of the ke the design illustrated in the middle, Insert fashion disc D, E, F or G, and use No. 50 em I broidery thread, Numerous pattern variations are possible by changing stitch width and stitch length.
858 954 Stitching Synthetic Materials Insert fashion disc A. Curtains Machine Setting: A=1 to 3, depending on material; Be Stitch Length: Minimum To finish the edge of synthetic curtain fabrics, such as Diolen, use a matching synthetic thread. If necessary, ease the upper and lower tensions somewhat. Both these hints should be adhered to in order to avoid shrinking of both the thread and the fabric in the laundry. To butt seam the various sections of curtains, proceed as instructed on page 33.
Two-Needle Decorative Sewing Insert fashion discs A to G. Machine Setting: A=up to 2; B= I Automatic embroidery designs ore particularly attractive when sewn with twin needles and different color thread. The distance between both needles must not exceed /64 inch. (For threading the twin needles see cording instructions on page 45) d. If necessary, ease the upper and Beautiful border effects can be produced by combining zigzag, serpentine, and blindsiiich designs. fabric in the laundry.
Contents Foreword Essential Parts of Machine Fundamentals of Machine Operation Operation of Your Sewing Machine Workplate Motor Disengaging Mechanism Electrical Information Foot Control Straight Stitching Zigzag Sewing Automatic Fashion Discs Changing the Fashion Discs Removing the Bobbin Case Winding the Bobbin Inserting a Full Bobbin into the Bobbin Case Inserting the Bobbin Case Recommended Needle and Thread Sizes Important Facts about Needles Changing the Needle Upper Threading Correct Tension Regulatio