■ G01 ■ For • Por • Pour G01-1110, G01-1180, G01-3110, G01-3180, G01-3210, G01-3410 Tub & Shower Three Handles Metal or Acrylic L P AM S Copyright © 2016 Pfister® Inc.
CAUTION: ATTENTION: ADVERTENCIA: Before Continuing Avant de poursuivre Antes de continuar Thank you for purchasing this Shower. All Pfister products are carefully engineered, and factory tested to provide long trouble–free use under normal conditions. This Shower is easy to install using basic tools and our easy to follow illustrated instructions. 1 1C 1A 50” 6’6” 4” 1D BEFORE PROCEEDING Locate water supply inlets and shut off the water supply valves.
2 3 ¥ 2E ¦ 2C 2A 2D 3J 3G 3E 3J 2B A 3A 3C 3D B3B 3E 3A A 2. FOR VALVE BODY INSTALLATION Position valve body (2B) so that Dimension from valve centerline (2D) to finished wall (2C) is 1-7/8” to 2-5/8”.
5 4A 4C 5A 4B 4D 5D 5C 5E 5B 5. FOR TUB FILLER Install 1/2 inch iron pipe lengh per recomended dimensions (see rough-in Layout) to Elbow (5A). Apply PTFE plumbers tape on both ends of Pipe Nipple (10A) (not included). Screw Pipe Nipple (5A) into the elbow inside the wall and tighten with pipe wrench. The Pipe Nipple (5A) is to project 3-7/8” to 4” from the finished wall. Add protective washer (5B). Screw on tub filler spout (5C); align and tighten until seal is achieved. 4.
6 7 6A 6E 7K 7R 7Q 7S 6B 6B 6C 6D 7E 7F 7G 7D 6C 6G 6F a 7J 6F b 6E 6A 7P FLANGE INSTALLATION OR REMOVAL 6a FLANGES FOR STANDARD 3 VALVE DIVERTER a b 7. HANDLE INSTALLATION OR REMOVAL Before proceeding, close both Valves (CLOCKWISE) 7a METAL HANDLES Attach Metal Handle (7M) onto Stems (7N) with Screws (7P). Snap Index Buttons (7Q) “H” on Left, (7R) “C” on Right, and (7S), “Arrow in center. Reverse the above procedure for handle removal.
CAUTION: ATTENTION: ADVERTENCIA: 8 Before Continuing Avant de poursuivre Avant de continuar DISASSEMBLY 1. Replacement parts are available at the store where you bought your faucet 2. When replacement parts are not available, simply write to Pfister Customer Service 3. Always turn off water and relieve pressure before working on your faucet. 8. FLUSHING Remove shower head and flush valve by turning water on full OPEN Position, both HOT and COLD sides, until water is clear.
12 11 A 12B 11A 12A 12C 12B 11C 12C 11. HOT AND COLD VALVE MAINTENANCE Turn off water. (Please see instructions 6 and 7 for trim removal) Re-move Button, Remove Screw, and Lift off Handle. Prior to removalof Cartridge Assembly (11B) be sure water supply is turned off. Un-screw Cartridge Assembly (11B) from valve body (11A). Inspect and replace parts (11B or 11C) as necessary. Inspect andreplace parts (11B or 11C) as necessary. 11.
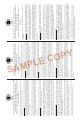
973-030* 960-090 Standard Clásico 960-170* Brass Laiton Bronce 973-163* 971-500 910-022 970-028 950-001 950-050 931-500 950-980 910-030 910-671 960-801* 972-201* 941-409* Plain/Massif/Simple 940-444 941-403* Red/Rouge/Rojo 960-130A 941-406* Blue/Bleu/Azul 972-201* 940-333 971-860A 941-333 971-880A 949-406* Blue/Bleu/Azul 949-336 Blue/Bleu/Azul 949-403* Red/Rouge/Rojo 949-333 Red/Rouge/Rojo 949-339 Grey/Gris 949-409* Plain/Massif/Simple 920-145* 19701 DaVinci Lake Forest, CA 92610 Phone:
Pfister™ Garantía Mecánica y sobre el Acabado Limitada de por Vida Cubre las funciones y el acabado por el tiempo en que usted sea propietario de su casa (Las Aplicaciones Comerciales Limitan la Duración de las Garantías) Recurso exclusivo: En el caso de que haya un defecto en el Producto que viole las garantías que preceden, Price Pfister, a su opción, reparará o reemplazará la pieza defectuosa del Producto. La reparación o el reemplazo del Producto es el recurso exclusivo.