
Installation Guide


ENGLISH
ENGLISH
6 7
8
9
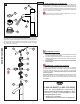
6 WATER SUPPLY CONNECTIONS
Gently separate hot and cold Supply Tubes (6A), approximately three inches apart.
Connect water Supply Lines (6C) to Faucet Inlets (6B). Hot water supply line goes to hot
inlet tting indicated by red tag (6D). (Supply lines not included). Follow manufacturer’s
instructions when installing supply lines.
Hold the Faucet Inlets (6B) steady using an adjustable wrench while tightening Supply
Lines (6C). Do not twist Supply Tubes (6A)!
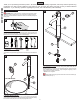
7 DRAIN INSTALLATION
Install and adjust Drain (7A) using separate instructions supplied with the Drain assembly.
(Not included, order separately.) For sinks with an overow, order T47-9GS*. For sinks
without an overow, order T47-7GL*.
8 UNIT START UP
Turn on hot and cold water supplies, and check for leaks above and below the sink.
9 FAUCET FUNCTION
By lifting the Lever Handle (9A) up, the valve will be activated allowing water to ow.
The water ow will increase by continuing to lift up the Lever Handle (9A). By rotating
the Lever Handle counter-clockwise, the water temperature will decrease to cold ow
only. By rotating the Lever Handle clockwise, the water temperature will increased to
hot ow only.
3
6A
6C
6D
6C
6A
6B
6B
COLD
HOT
7A
9A
9A
COLD
HOT
OPEN