
Installation Guide


ENGLISH
ENGLISH
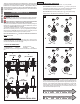
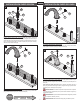
THICK WALL INSTALLATION THIN WALL INSTALLATION
6
7
8
9
Go To Step 10
STOP
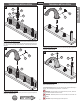
6 DIVERTER INSTALLATION
From above deck, place Washer (6A) and slide and thread Diverter Body (6B) into Main
Body (6C). Be sure to position Diverter Body (6B) with Set Screw Hole (6D) facing
tub. Secure Diverter Body (6B) with Set Screw (6E). Thread Rod (6F) into Diverter
Body (6B).
7 SPOUT INSTALLATION
Assemble and align Quick Connect Spout (7A) onto Diverter Body (7B) and tighten Set
Screw (7C). Place Button (7D).
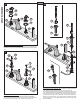
8 SPOUT INSTALLATION
Assemble and align Quick Connect Spout (8A) onto Diverter Body (8B) and tighten Set
Screw (8C). Place Button (8D).
9 KNOB INSTALLATION
Place Knob (9A) onto Diverter Stem (9B) as shown. Make sure Knob (9A) is securely
tighten to Diverter Stem (9B).
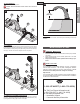
For pressure testing: Seal
Spray Hose (9D)
with Plug (9E) (Supplied with Rough-In
0X6-44). Run water and perform pressure test. Look for leaks.
WARNING: Pressure testing is not to exceed 250 PSI (1724 kPa). Make sure
pressure is balanced between hot and cold inlets.
WARNING: Differential pressure of hot and cold inlets must not exceed 100
PSI (689 kPa).
CAUTION: Slowly remove Plug (9D) to relieve pressure.
3
6B
6A
6C
6E
6D
6F
8D
8C
8A
8B
7D
7A
7C
7B
9A
9B
9D
9E