
Instruction Manual


Chapter 10: Working With Audio
261
Try out the preview with the octave on 0, and then again on –1, you’ll hear all of the voices an octave lower on the –
1 setting. Leave it at 0 for this demo.
There are 3 Humanization settings (timing, pitch, and portamento) that affect the sounds of the individual voices.
Timing controls how “tight” the group sounds, with a setting of zero being perfectly synced start/stop times. Let’s
set it to about 20, to give some natural looseness to the group.
Pitch controls how steady the pitch will be. If set to zero the pitch will be exactly the MIDI pitch, if set higher, the
pitch will vary up/down with the original WAV file.
Portamento controls how fast the pitch will change from one pitch to another. Settings above zero give smooth
transition from one pitch to another.
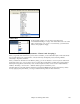
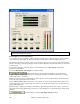
Pitch Styles
When you generate audio harmonies to your recorded vocal tracks, you can select Pitch Styles to add vibrato and
scooping effects to the vocal harmonies. There is a drop down combo list at the bottom of each voice. You can
choose a type of “pitch effect” (combination of vibrato and scooping) called a Pitch Style to be applied to each
harmony voice.
In the example screenshot, we have chosen “Crooner,” “Lite Jazz,” “Lounge,” and “Head Voice” – somewhat
similar vibrato types, but different for each harmony voice.
The Pitch Styles are especially useful for harmonies generated from MIDI tracks, because these lack any vibrato.
Now by applying these pitch effects, you can get a natural sounding vibrato for these harmonies.
Now let’s preview our harmonies! Press the [PREVIEW] button, and after a 5-10 second delay, you’ll
hear a 10 second sample of the harmony. Once you hear it, you can tweak the settings, for example:
- make the original voice louder by increasing the Dry Voice Level slider.
- to make the individual harmony voices louder, increase their sliders.
- to change the stereo separation, change the Pan sliders
- to make the group more “loose” sounding, increase the Timing slider
- to make the pitches and pitch-transitions more human, increase the Pitch and Portamento sliders
- change the whole Octave of all of the harmonies with the octave slider.
If you’d like to get more help on-line about the settings, inside the dialog press the Help button and then
click anywhere in the dialog.
This launches the Band-in-a-Box Help file with more information.
When you are happy with the settings, press the [GENERATE] button. This generates a harmony for the complete
song (takes about 20 seconds for “Listen” depending on your CPU speed).
The dialog then exits, and your song is ready to play in Band-in-a-Box.
Band-in-a-Box gives you a confirmation message that the audio harmony has been created.
Tip: When playing back the harmonies, mute the MIDI melody (right click on Melody part at the top of the screen or Alt+9).
If you want to hear what the harmonies should sound like – we have included a completed version of “Listen 4 part
harmony.MP3” and this is included on the “c:\bb\Tutorial - Audio Harmonies” folder.
Melody Pitch Tracking
Now let’s use the Audio Harmonies for a different purpose, to “fix” pitches that may be out of tune, or to change
some pitches to more interesting notes.
For this, reload the song Listen.MGU. Now resave it by [Save As] and give it the name “Listen Pitch
Tracking.MGU.” Now, we’re going to change some notes of the MIDI melody. Open the notation, and
change the pitch of the D note at the end of bar 2 to an E. Also change the ‘B’ at bar 7 to a ‘G’ below it.
At bar 10, change the ‘E’ note to a C#.