
Instruction Manual


Chapter 12: Tutors, Wizards, and Practice Aids
389
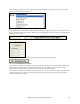
Usually you'll want to customize these snapshot bars to control which bars get included in the “a” or “b” substyle.
In the Violet.MID style, the Style Wizard has offered to include Bars 9-101 (inclusive) and wants to put them all on
the “a” substyle. Continuing on, we want to make a great sounding style, so it is important that we have the
following two items correct:
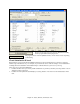
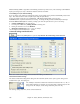
The “BB Parts” have to be correct. We can audition the MIDI file by playing a loop and listening
to the MIDI file and muting channels by clicking on the “Channel” checkboxes. From that, we can
hear the individual parts and assign them correctly, as we would like them in the style. By playing
the MIDI file inside the Style Wizard we can tell which bars to use for the “a” and “b” substyles.
Note: The Style Wizard has entered some of these settings automatically – but you'll have to type in the data as shown.
The Snapshot Bars should be correct for the “a” and “b” substyle. You need to tell the program what bars to
use for the “a” substyle and for the “b” substyle. The program makes an attempt to guess at this, but since MIDI
files can contain many different substyles (and a Band-in-a-Box style allows only 2), you'll likely want control over
these snapshots yourself.
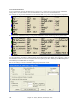
Tip to help you choosing which bars to use:
To listen to the MIDI file, you can either exit the Style Wizard dialog
and just play the song like any other Band-in-a-Box file, or play a
looped section inside the Style Wizard using the [Play], [Stop], and
“Loop at Bar” settings.
OK, the Style Wizard has already made the correct settings for the “BB Parts” for us, so we don't need to make any
changes there. Let's move to the Snapshots section, and enter the bar numbers that correspond to the substyles that
we'd like for the Jazz tune. After listening to the tune, we notice that there is a “2-feel” Jazz section, and a “4-in-the-
bar” section. We want those as “a” and “b” substyles, so we enter the bar #s that correspond to these settings.
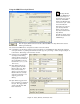
In the Snapshots area of the Style Wizard:
- Enter “1-20” for the bars for the “A” Substyle.
- Enter “21-28, 37-68” for the “B” Substyle.
- Enter “12, 20” for the “A” Drum Fills.
- Enter “28, 36, 44, 52, 60, and 68” for the “B” Drum Fills.
Note: Of course you don't need to enter this much detail. You could just enter a single range like 1-20 for the “a” substyle
and make a quickie style. We're illustrating “advanced” style-generation here.
Press [Generate NEW style…]; choose a name for your style, and the style will be
made.
Let's call it Violet.STY. Now to hear your style! You could play the style with any song of course, by loading in a
song and then loading in the Violet.STY It is easily available from the Favorite Styles dialog (Shift+F9).
For this tutorial, load in the song V_TEST.MGU that we made for you. That's a Jazz Swing song using different
chords than Violet, and it uses the Violet.STY (So you need to have made that style before you try to play the song
or you'll get a “Violet.STY not found” message.)
Save the existing song before loading in the new song. When Band-in-a-Box saves a song that has an entire MIDI
file on the Melody or Soloist tracks it gives it a special MGX extension. So you'll be saving the file as Violet.MGX.
Alternatively, if you'd prefer to play the Violet.STY style without loading in another song, you can do it as follows.
Since the Violet.MGX file currently has the entire MIDI file on the Melody track the first thing we need to do is