
Instruction Manual


Chapter 13: Tools and Utilities
413
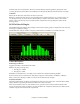
Channel View
Channel View is only meaningful when metering a stereo track, or Aux/Master inserts (which are almost always
stereo). The Channel View setting has no effect on a mono track.
If metering a stereo insert, select the Left+Right button to view the summed frequency response of both the Left and
Right channels. Select the Left or Right buttons to view only one of the channels.
Zoom In/Out (Adjust the vertical amplitude resolution in dB.)
If a track has wide dynamics, zoom out to see all the bands without scrolling. If zoomed out too far, it can be
difficult to visually judge frequency levels. All the bands may appear about the same level.
Zoom In to see the best amplitude resolution. For instance, in the screenshot above, the display was zoomed to 3 dB
per ruler line, which emphasizes the differences between loud and quiet frequency bands.
View Range Scroll
Adjust the Scrollbar to center the display to taste. When zoomed-in on a quiet track (as in the screenshot above),
you would scroll down to get a good view of the frequency distribution.
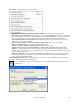
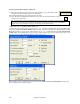
PG Vocal Remover Plug-In
The PG Vocal Remover plug-in can reduce the level of lead vocals on many
recordings. You can fine-tune the vocal removal frequency range, and
optionally reduce the level of residual vocal reverb.
PG Vocal Remover exploits a common mixing technique; the lead vocal is
often center-panned (i.e., the left and right stereo channels have identical vocal
loudness). Typically the bass and kick drum is centered, and often snare drum
is centered. However, most accompaniment instrumental tracks and backup
harmony vocals are side-panned (louder on one side than the other).
On typical recordings, we can subtract one stereo channel from the other,
which removes “common mode” lead vocal, but leaves side-panned
accompaniment tracks relatively unaffected.
Operation
Enable Plug-in Checkbox
Toggle the checkbox to compare the sound with/without the Vocal Remover activated.
Balance Slider
Fine-tune with the Balance slider. The center position is typically as good as it gets, but some recordings have
accidentally mismatched Left-Right balance. This is common with vinyl or cassette recordings, or CD-reissues of
Oldies. You may get improved vocal cancellation by twiddling the Pan slider to find a “sweet spot.”
Lo Limit and Hi Limit Sliders
Adjust these sliders to fit the nature of the vocal. The default settings are fine for many tunes. Frequencies below
the Lo Limit and above the Hi Limit are not processed, preserving fidelity except in the vocal midrange. Set the Lo
Limit slider just low enough to attenuate low vocal notes. Set the Hi Limit slider just high enough to attenuate high
vocal harmonics.
Obviously the best settings are different for a Baritone, Tenor, Alto, or Soprano voice. They are best set by ear.
Some sopranos have warm low tone, but some Baritones have very bright tone, so the mid-frequency vocal range
may be wider than expected.
Reduce Reverb Checkbox
Toggle the checkbox to compare with/without Reverb Reduction.
Reduce Reverb Amount Slider
Reverb Reduction behaves like a dynamics compressor, but the loudness of the center channel affects the loudness
of the side channels. Move the slider to the right to increase the effect. The effect compares the relative level