
User Guide
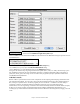


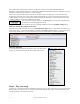

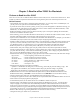

Table Of Contents
- PG Music Inc. License Agreement
- Table of Contents
- Chapter 1: Welcome to Band-in-a-Box!
- Chapter 2: QuickStart Tutorial
- Chapter 3: Band-in-a-Box 2010.5 for Macintosh
- Welcome to Band-in-a-Box 2010.5
- New Features in Band-in-a-Box 2010
- More New RealTracks
- QuickStart Tutorial
- Quick Song Settings
- Save Default Mix
- Improved Audio Rendering
- DAW Plug-in Mode
- Freeze Tracks
- RealTracks Enhancements
- New Favorite Songs/Styles Dialog
- Rendering Tracks
- StylePicker Enhancements
- New in the StyleMaker
- Chapter 4: The Main Screen
- Chapter 5: Guided Tour of Band-in-a-Box
- Chapter 6: Band-in-a-Box PowerGuide
- RealTracks
- RealDrums
- Song Settings
- The Chordsheet
- Chord Preview/Builder
- MIDI file “Chord Wizard”
- Applying Styles
- The StylePicker
- Playing, Pausing, and Stopping Songs
- Changing Volume, Panning, Reverb, Chorus, Bank
- Freeze Tracks
- Saving Songs
- Preferences – User Settings
-
- Show Chords with push/rest chars
- Metronome During Recording
- Harmony Volume Adjust
- OK to Load Style with songs
- Write Guitar part on 6 channels
- Turn External Keyboard’s Local On at end of session
- OK to beep with messages
- OK to prompt to reduce/expand
- For Roman Numerals in minor keys, use relative major
- Save Button on main screen works as Save As
- Name MIDI files with .MID extension
- Allow larger fonts on Chordsheet
- Color for Chordsheet Area
-
- Other Editing Features
- MIDI Setup
- The JukeBox
- Chapter 7: Notation and Printing
- Chapter 8: Automatic Music Features
- Chapter 9: Recording Tracks
- Chapter 10: Audio Features
- Chapter 11: Wizards, Tutors, and Fun
- Chapter 12: User Programmable Functions
- Chapter 13: CoreMIDI and Apple DLS Synth
- Chapter 14: Reference
- PG Music Inc.
- Index
- Registration Form
Chapter 2: QuickStart Tutorial
13
Chapter 2: QuickStart Tutorial
Creating music with Band-in-a-Box is as easy as 1-2-3! In this tutorial, you’ll see just how easy it is to get Band-
in-a-Box making music for you.
Step 1 – Enter the Chords
There are numerous ways of entering chords into Band-in-a-Box. We’ll discuss five fast ways of entering chords:
1. Using the Computer Keyboard
2. Playing directly on a MIDI Controller Keyboard
3. Using the Chord Builder
4. Importing Chords from a MIDI file
5. Loading an Existing Band-in-a-Box Format Song
On the main screen of the program, you’ll see an area called the Chordsheet.
Each of the numbered cells on the Chordsheet represents a bar. In this example, you can see that there is an F6
chord in the first bar of this song. Similarly, one row down, you can see an F6 chord in bar 5, and later in the song,
a G7 in bar 7.
Notice the box in the first half of bar 1. This is the highlight cell, and it represents the bar you are currently working
on. You can move the highlight cell around using the cursor keys, or select a specific bar using the mouse.
Enter Chords Using the Computer Keyboard
To enter a specific chord, move the highlight cell to where you want to place the chord. For example, if you wanted
to add (or change) a chord in bar 20, you would highlight bar 20 on the Chordsheet. Next, type in your chords. If
you want an F7 at bar 2, type F and 7 on your keyboard and press Return. Notice that when you use the Return
key, the highlight cell moves to the second half of the bar. You could then enter another chord at beat 3. Chords are
commonly typed using standard chord symbols (like C or Fm7 or Bb7 or Bb13#9/E), but you can enter them in any
of the supported chord symbol display formats like Roman Numerals, Nashville Notation, and Solfeggio.
Enter Chords Using a MIDI Controller Keyboard
If you have a MIDI controller keyboard, you can use it to enter chords into Band-in-a-Box. First, you must make
sure that your cables are properly connected and you have the correct input drivers selected.
If you play a chord on your MIDI keyboard, and then press Ctrl+Enter, the chord will be entered into the
Chordsheet at the current highlight cell position.