
User Guide


Table Of Contents
- PG Music Inc. License Agreement
- Table of Contents
- Chapter 1: Welcome to Band-in-a-Box!
- Chapter 2: QuickStart Tutorial
- Chapter 3: Band-in-a-Box 2010.5 for Macintosh
- Welcome to Band-in-a-Box 2010.5
- New Features in Band-in-a-Box 2010
- More New RealTracks
- QuickStart Tutorial
- Quick Song Settings
- Save Default Mix
- Improved Audio Rendering
- DAW Plug-in Mode
- Freeze Tracks
- RealTracks Enhancements
- New Favorite Songs/Styles Dialog
- Rendering Tracks
- StylePicker Enhancements
- New in the StyleMaker
- Chapter 4: The Main Screen
- Chapter 5: Guided Tour of Band-in-a-Box
- Chapter 6: Band-in-a-Box PowerGuide
- RealTracks
- RealDrums
- Song Settings
- The Chordsheet
- Chord Preview/Builder
- MIDI file “Chord Wizard”
- Applying Styles
- The StylePicker
- Playing, Pausing, and Stopping Songs
- Changing Volume, Panning, Reverb, Chorus, Bank
- Freeze Tracks
- Saving Songs
- Preferences – User Settings
-
- Show Chords with push/rest chars
- Metronome During Recording
- Harmony Volume Adjust
- OK to Load Style with songs
- Write Guitar part on 6 channels
- Turn External Keyboard’s Local On at end of session
- OK to beep with messages
- OK to prompt to reduce/expand
- For Roman Numerals in minor keys, use relative major
- Save Button on main screen works as Save As
- Name MIDI files with .MID extension
- Allow larger fonts on Chordsheet
- Color for Chordsheet Area
-
- Other Editing Features
- MIDI Setup
- The JukeBox
- Chapter 7: Notation and Printing
- Chapter 8: Automatic Music Features
- Chapter 9: Recording Tracks
- Chapter 10: Audio Features
- Chapter 11: Wizards, Tutors, and Fun
- Chapter 12: User Programmable Functions
- Chapter 13: CoreMIDI and Apple DLS Synth
- Chapter 14: Reference
- PG Music Inc.
- Index
- Registration Form
Chapter 7: Notation and Printing
138
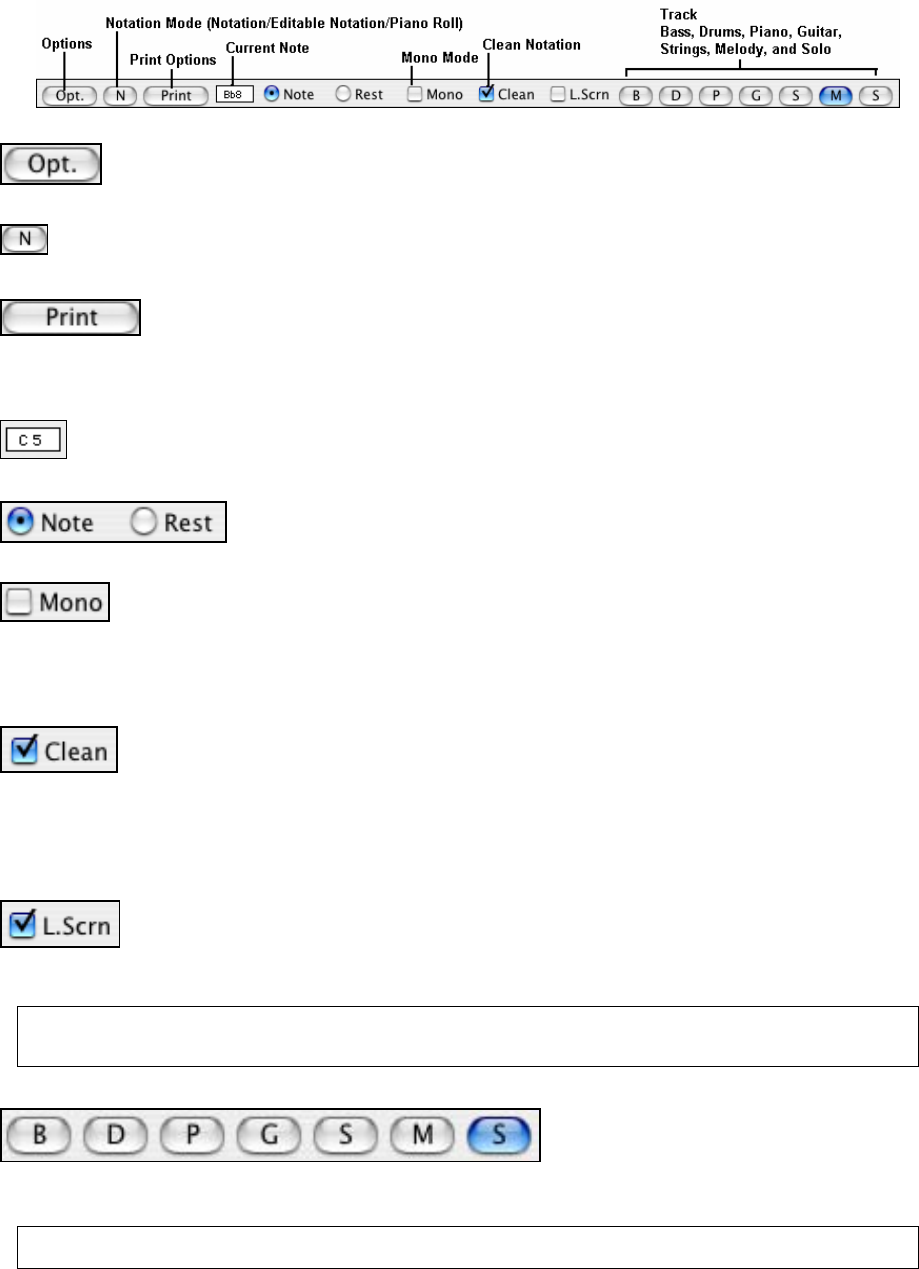
Options
The options button launches the Notation Windows Settings dialog, where notation display
options are set.
Notation Mode
This is an important button. It is the Notation Mode button. This toggles between the 3 modes of the
Notation window, Standard Notation mode, Editable Notation mode, and Staff Roll mode.
Print Options
Press this button to Print the Notation to any standard printer supported by the Macintosh. (If
you haven't set up your printer to
work with any other MAC programs, then you'll need to select a printer in the Chooser.) This launches a dialog box
that lets you set options for printing (described elsewhere).
Current Note
This box displays the name of the note that the mouse is currently over. This is the note that will be
inserted when you click to insert a note.
Note or Rest Checkbox
These determine whether a Note or a Rest will be inserted when a mouse is
clicked.
Mono Mode
When this checkbox is selected, the notation is entered as monophonic (one note only). This is
useful for melodies that only have one note playing at a time.
Mono mode is a faster way to enter notes, because the Notation Window will automatically delete a note that is
present at the same location that you are putting a new note on. So if you have mistakenly put a B note on as a C,
you just click on the B note, and if in mono mode the C will be deleted automatically.
“Clean” Notation
When music has been played in from a MIDI keyboard, there are frequently effects like grace
notes, glitches, and notes played off time.
The Clean Notation mode is an intelligent feature that “Cleans Up The Notation” for you. It does this by
eliminating the display of grace notes and glitches, and also simplifies the Notation display so it is more readable.
Clean Notation doesn't affect the actual content of the track, just how it is displayed. In general, this should be on,
since it improves the display. But if you want to see every grace note or glitch that was played, then turn it off.
Looping the Notation Screen
While a song is playing, click the “L. Scr” checkbox and the song will loop for the 4 bars
shown on the notation screen. For example, if you let the soloist create a great sounding Jazz
solo, you can then look at the notation and sight read along with the solo. When you reach a particularly interesting
or difficult part that you would like to practice, set the L. Scr to “On” and it will loop that 4 bar phrase.
Tip: Since you might be holding your guitar or sax as you try to play with this command, we've made some easy hot keys to
navigate around. The “NUMPAD 1” key turns the Looping on or off. The Cursor Up / Down keys jump to the previous / next
screen.
The Track Buttons
These stand for Bass, Drums, Piano, Guitar, Strings, Melody, and Solo. Normally you will be displaying the
Melody or Soloist track, but you can display or print any track from Band-in-a-Box.
Note: The instrument tracks are not created by Band-in-a-Box until you press [Play], so you may notice that the track is
blank (or shows a previous song) until the song has been played once!