
User Guide


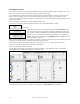
Table Of Contents
- PG Music Inc. License Agreement
- Table of Contents
- Chapter 1: Welcome to Band-in-a-Box!
- Chapter 2: QuickStart Tutorial
- Chapter 3: Band-in-a-Box 2010.5 for Macintosh
- Welcome to Band-in-a-Box 2010.5
- New Features in Band-in-a-Box 2010
- More New RealTracks
- QuickStart Tutorial
- Quick Song Settings
- Save Default Mix
- Improved Audio Rendering
- DAW Plug-in Mode
- Freeze Tracks
- RealTracks Enhancements
- New Favorite Songs/Styles Dialog
- Rendering Tracks
- StylePicker Enhancements
- New in the StyleMaker
- Chapter 4: The Main Screen
- Chapter 5: Guided Tour of Band-in-a-Box
- Chapter 6: Band-in-a-Box PowerGuide
- RealTracks
- RealDrums
- Song Settings
- The Chordsheet
- Chord Preview/Builder
- MIDI file “Chord Wizard”
- Applying Styles
- The StylePicker
- Playing, Pausing, and Stopping Songs
- Changing Volume, Panning, Reverb, Chorus, Bank
- Freeze Tracks
- Saving Songs
- Preferences – User Settings
-
- Show Chords with push/rest chars
- Metronome During Recording
- Harmony Volume Adjust
- OK to Load Style with songs
- Write Guitar part on 6 channels
- Turn External Keyboard’s Local On at end of session
- OK to beep with messages
- OK to prompt to reduce/expand
- For Roman Numerals in minor keys, use relative major
- Save Button on main screen works as Save As
- Name MIDI files with .MID extension
- Allow larger fonts on Chordsheet
- Color for Chordsheet Area
-
- Other Editing Features
- MIDI Setup
- The JukeBox
- Chapter 7: Notation and Printing
- Chapter 8: Automatic Music Features
- Chapter 9: Recording Tracks
- Chapter 10: Audio Features
- Chapter 11: Wizards, Tutors, and Fun
- Chapter 12: User Programmable Functions
- Chapter 13: CoreMIDI and Apple DLS Synth
- Chapter 14: Reference
- PG Music Inc.
- Index
- Registration Form
Chapter 11: Wizards, Tutors, and Fun
186
Beyond impressing your friends with your newfound improvisational prowess, this feature has practical implications
as well. For example, you can concentrate on practicing your solo phrasing and playing “in time” without
concerning yourself with which notes to play (Band-in-a-Box will supply the correct notes: see the next section for
details.)
Recording Using the Wizard
To record the Wizard, press the [Rec] button to record, and play the Wizard. This will be recorded. You can use the
feature of recording the Wizard to enter music without a MIDI keyboard that doesn't sound as stiff as most music
entered in step time. This is how it works:
- Press [Rec] to record.
- As the song plays, play the melody that you want on any Wizard key, using the same key for each note, in the
rhythm of the melody. The Wizard notes won't be the exact melody, but don't worry about that as you record.
- When you're finished, go to the Notation window. You now have the notes with the correct durations and
times, but the wrong pitches.
- One by one drag the notes up to the correct melody note, holding down the shift, control, and
key for sharps,
flats, and naturals respectively. You'll then have entered a melody that sounds like it was recorded from a
keyboard, without the stiff sound of a melody entered in step time!
Note: If you have the wizard on, the SPACEBAR won't stop playback. You need to press ESCAPE to stop playback if the Wizard is
on. This is because people mistakenly hit the spacebar while playing the wizard, which would stop the song inadvertently.
Audio Chord Wizard (“Chords from MP4”)
This amazing wizard automatically figures out the chords from any MP4, M4A, AIFF or other audio file
and displays them in Band-in-a-Box. Just load an audio file to instantly see the chords.
Launch the Audio Chord Wizard with the toolbar button or with the Windows | Run AudioChordWizard
menu command.
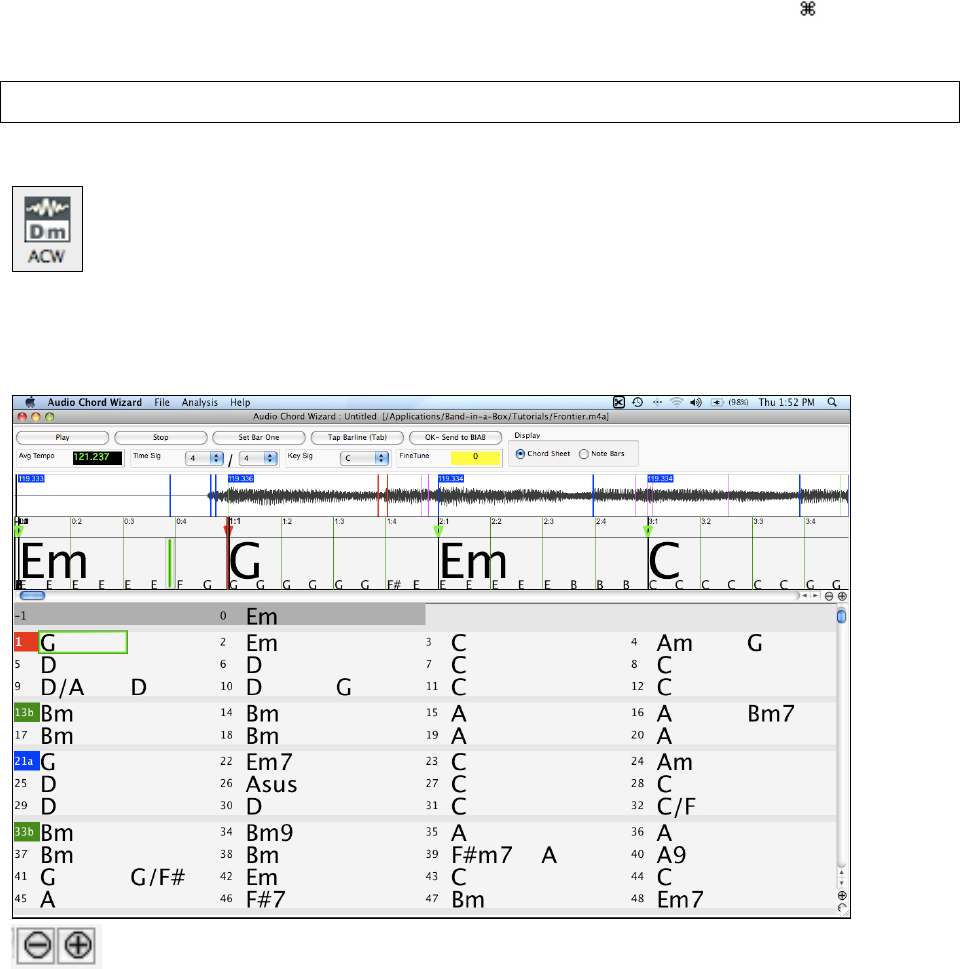
Audio Chord Wizard Window
The Audio Chord Wizard window shows an overview of the open wave file with the bar lines and chords as
interpreted by the wizard below. Controls and settings are found in the toolbar at the top of the window, and the
lower part of the window either shows chords and bars in a Chord Sheet view or notes in a Note Bars view.
The zoom buttons at the bottom of the screen adjust the scale of the display. The minus button shrinks
the display to show more bars, the plus sign expands the display but shows fewer bars.