
User Guide


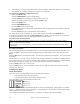


Table Of Contents
- PG Music Inc. License Agreement
- Table of Contents
- Chapter 1: Welcome to Band-in-a-Box!
- Chapter 2: QuickStart Tutorial
- Chapter 3: Band-in-a-Box 2010.5 for Macintosh
- Welcome to Band-in-a-Box 2010.5
- New Features in Band-in-a-Box 2010
- More New RealTracks
- QuickStart Tutorial
- Quick Song Settings
- Save Default Mix
- Improved Audio Rendering
- DAW Plug-in Mode
- Freeze Tracks
- RealTracks Enhancements
- New Favorite Songs/Styles Dialog
- Rendering Tracks
- StylePicker Enhancements
- New in the StyleMaker
- Chapter 4: The Main Screen
- Chapter 5: Guided Tour of Band-in-a-Box
- Chapter 6: Band-in-a-Box PowerGuide
- RealTracks
- RealDrums
- Song Settings
- The Chordsheet
- Chord Preview/Builder
- MIDI file “Chord Wizard”
- Applying Styles
- The StylePicker
- Playing, Pausing, and Stopping Songs
- Changing Volume, Panning, Reverb, Chorus, Bank
- Freeze Tracks
- Saving Songs
- Preferences – User Settings
-
- Show Chords with push/rest chars
- Metronome During Recording
- Harmony Volume Adjust
- OK to Load Style with songs
- Write Guitar part on 6 channels
- Turn External Keyboard’s Local On at end of session
- OK to beep with messages
- OK to prompt to reduce/expand
- For Roman Numerals in minor keys, use relative major
- Save Button on main screen works as Save As
- Name MIDI files with .MID extension
- Allow larger fonts on Chordsheet
- Color for Chordsheet Area
-
- Other Editing Features
- MIDI Setup
- The JukeBox
- Chapter 7: Notation and Printing
- Chapter 8: Automatic Music Features
- Chapter 9: Recording Tracks
- Chapter 10: Audio Features
- Chapter 11: Wizards, Tutors, and Fun
- Chapter 12: User Programmable Functions
- Chapter 13: CoreMIDI and Apple DLS Synth
- Chapter 14: Reference
- PG Music Inc.
- Index
- Registration Form
Chapter 12: User Programmable Functions
226
2. The easiest way is to import strings from another style that already has strings. This allows you to use existing
string patterns. For example, the Miami Pop style has a nice strings part.
Let's import the “Miami Pop” strings into our style.
- Choose the [LOAD] button.
- Select the ZZMIAMI.STY style from the file dialog.
- Select the [Strings] button to display the String patterns for this style.
- Select an 8-beat String pattern to copy and press the [COPY] button.
- Choose the [LOAD] button.
- Select the ZZLITROK.STY style.
- Press the OPEN button to open this style.
- Choose an empty 8-beat “b” String pattern (because that is where the String pattern was recorded in) and press
the [PASTE] button.
- Press the [SAVE] button to save the Lite Rock style with Strings.
The strings will play in the “b” substyle only, because that's how they were made in the Miami Pop style.
You could now import the Guitar from the ZZCONTRY.STY for example, using the steps above. It is quite easy
to quickly add instruments to styles by importing instruments from other styles.
Let's Record some new bass patterns.
Note: If you are not able to play patterns in real time (“live”), then you shouldn't record these Bass, Piano, Guitar, or Strings
patterns. You cannot enter them in step time.
Only Drum patterns can be entered in step time. If you can't enter them in real time, import an instrument from existing styles as
described above.
Recording a Bass Pattern
Move the highlighted cell to an unused Bass pattern. If you're recording a pattern lasting 8 beats, record this on the
top line “A 8 beat.” This pattern will be used when the song has chords lasting 8 beats or more without a chord
change.
Press the [REC] button to record the bass pattern. You will need to wait during a 2 bar lead-in. Then you record the
2 bar pattern.
Play the pattern on a C7 chord. You can use all 12 notes; just play a pattern that you would have normally played in
the song if the song were on a C7 chord (C E G Bb). When you're finished recording the pattern, you'll see a dialog
box listing all of the options available. Just accept all of the defaults by pressing the [OK] button.
Press the [SAVE] button to save your new style.
Press the [EXIT] button to close the StyleMaker window and exit. Make sure that you have saved the style first,
otherwise edits will be lost.
Creating New Styles
Making Drum Patterns
There are 2 screens in the StyleMaker associated with making drum patterns.
1. The StyleMaker screen with drum patterns.
2. The Drum Pattern Editor, allowing step editing of patterns.
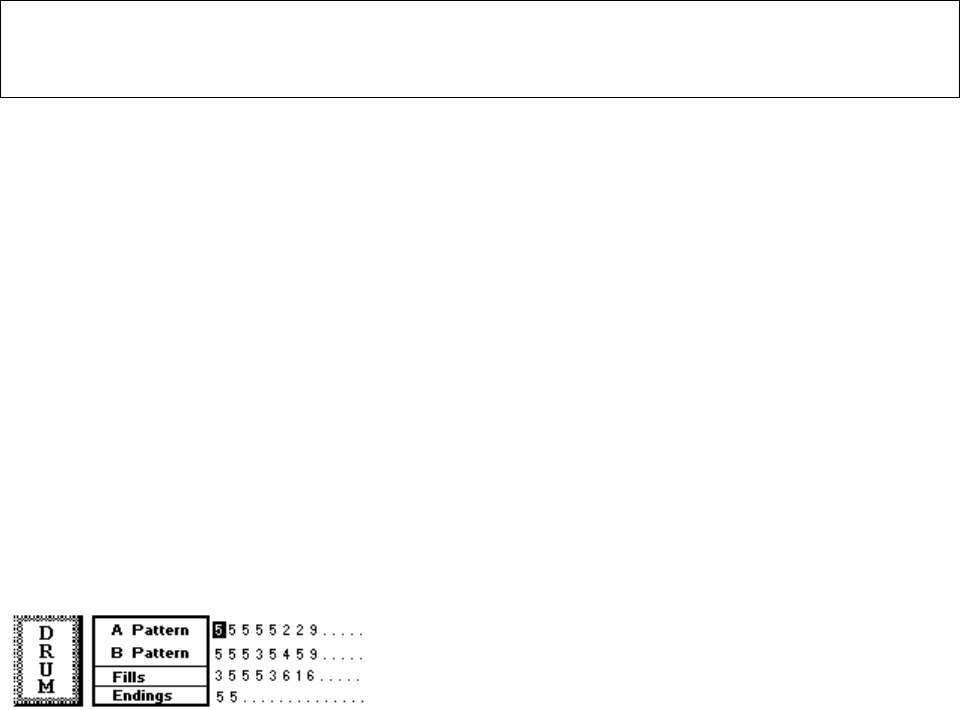
1. The StyleMaker screen with drum patterns looks like this:
The screen will look like this. The solid box indicates the currently selected pattern. Empty patterns are indicated
by a (.), i.e., patterns that have not been recorded yet. If a pattern has been recorded there will be a number in place
of the (.) indicating the weight of the pattern.
The 4 rows are for the different types of patterns, “a” substyle, “b” substyle, Fills and 2 bar Endings.