
User Guide


Table Of Contents
- PG Music Inc. License Agreement
- Table of Contents
- Chapter 1: Welcome to Band-in-a-Box!
- Chapter 2: QuickStart Tutorial
- Chapter 3: Band-in-a-Box 2010.5 for Macintosh
- Welcome to Band-in-a-Box 2010.5
- New Features in Band-in-a-Box 2010
- More New RealTracks
- QuickStart Tutorial
- Quick Song Settings
- Save Default Mix
- Improved Audio Rendering
- DAW Plug-in Mode
- Freeze Tracks
- RealTracks Enhancements
- New Favorite Songs/Styles Dialog
- Rendering Tracks
- StylePicker Enhancements
- New in the StyleMaker
- Chapter 4: The Main Screen
- Chapter 5: Guided Tour of Band-in-a-Box
- Chapter 6: Band-in-a-Box PowerGuide
- RealTracks
- RealDrums
- Song Settings
- The Chordsheet
- Chord Preview/Builder
- MIDI file “Chord Wizard”
- Applying Styles
- The StylePicker
- Playing, Pausing, and Stopping Songs
- Changing Volume, Panning, Reverb, Chorus, Bank
- Freeze Tracks
- Saving Songs
- Preferences – User Settings
-
- Show Chords with push/rest chars
- Metronome During Recording
- Harmony Volume Adjust
- OK to Load Style with songs
- Write Guitar part on 6 channels
- Turn External Keyboard’s Local On at end of session
- OK to beep with messages
- OK to prompt to reduce/expand
- For Roman Numerals in minor keys, use relative major
- Save Button on main screen works as Save As
- Name MIDI files with .MID extension
- Allow larger fonts on Chordsheet
- Color for Chordsheet Area
-
- Other Editing Features
- MIDI Setup
- The JukeBox
- Chapter 7: Notation and Printing
- Chapter 8: Automatic Music Features
- Chapter 9: Recording Tracks
- Chapter 10: Audio Features
- Chapter 11: Wizards, Tutors, and Fun
- Chapter 12: User Programmable Functions
- Chapter 13: CoreMIDI and Apple DLS Synth
- Chapter 14: Reference
- PG Music Inc.
- Index
- Registration Form
Chapter 12: User Programmable Functions
229
6. pattern played on 6th of 8 (6, 14, 22...)
7. pattern played on 7th of 8 (7, 15, 23...)
8. pattern played on 8th of 8 (8, 16, 24...)
9. PRE-FILL special value - refers to the bar before a fill
10. FILL refers to the bar of a fill (not applicable to drums because there is a special row for drum fills).
11. POST-FILL refers to the bar after a fill (same as the first bar after a part marker).
Drum Fill on Substyle (USUAL SETTING = Any)
This setting is only relevant on the Drum Fills line. It lets you specify if you want the drum fill to be used on the “a”
substyle, the “b” substyle, or either. The default setting is Any.
Late Triplets (USUAL SETTING =usual setting = 0)
This is only relevant in drum patterns with time base =12 (triplet feel). If you want the 3rd triplet to be played late
(as is usually done in slow jazz style), then set a number from 0 - 11. Default is 0 (not late at all). A typical setting
for a slow triplet style is triplets late =5 (the units are 120/beat).
Now let’s make the ending drum pattern.
Endings are 2 bars long. In the case of the drums, this is done by 2 consecutive 1 bar patterns on the ending row.
Move to the Endings row. Input a 1 bar pattern in the first column and then another 1 bar pattern in the 2nd. These
2 patterns are the ending patterns so you should make the 2nd pattern an ending drum pattern typically with a crash
cymbal on beat 3 for example.
“Auto Endings”
If you‘ve made a style, and haven’t included an ending, a 2-bar ending can be generated automatically, based on the
style.
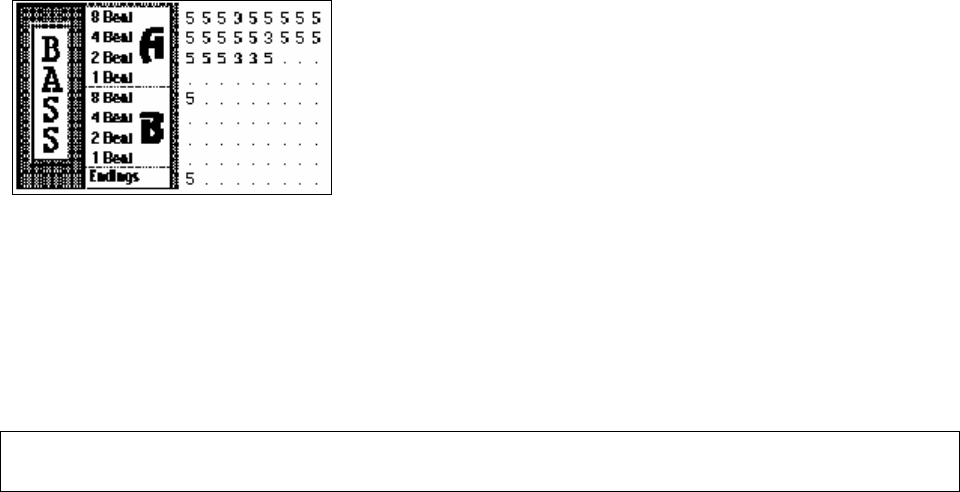
Making Bass Patterns
Bass patterns are recorded live from a MIDI keyboard. If you can't play in real time, or if you don't have a MIDI
keyboard you'll have to import these instruments from other styles (as we will be doing with the strings).
The Bass Screen
If you're making a simple bass pattern you'll only need to record pattern(s) on the A 8 beat row (the top row).
These patterns will be chosen for every chord, regardless of the length. But if you want the style to play different
patterns when the song is encountering chords that last 1, 2, 3, or 4 notes, you should record separate patterns on
these rows.
Recording a Bass Pattern
Move to the top row of the bass area, in column 1. Press the [REC] button. This will begin the recording of the
bass pattern. You will hear a 2 bar lead-in and then you record a 2 bar bass pattern. For your bass pattern, you will
play a pattern based on a C7 chord. You can use all 12 notes, but should just play the pattern as you would if the
chord was a C7. You should center the bass patterns around MIDI note 48 (C3).
Tip: If you are uncertain what to play, edit another style that comes with the program by pressing the [LOAD] button and selecting
another style - you can then play the bass patterns by pressing the [PLAY] button to see what patterns we used to make it, and
imitate them in your style.
After you have recorded the bass pattern, a dialog box with options will appear. This allows you to specify the
conditions that must occur for this pattern to be played back in the song. These are called masks. Usually you can
just accept all the defaults, which allow the pattern to be played at any time.