
User Guide
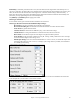
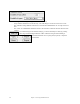

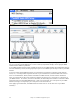


Table Of Contents
- PG Music Inc. License Agreement
- Table of Contents
- Chapter 1: Welcome to Band-in-a-Box!
- Chapter 2: QuickStart Tutorial
- Chapter 3: Band-in-a-Box 2010.5 for Macintosh
- Welcome to Band-in-a-Box 2010.5
- New Features in Band-in-a-Box 2010
- More New RealTracks
- QuickStart Tutorial
- Quick Song Settings
- Save Default Mix
- Improved Audio Rendering
- DAW Plug-in Mode
- Freeze Tracks
- RealTracks Enhancements
- New Favorite Songs/Styles Dialog
- Rendering Tracks
- StylePicker Enhancements
- New in the StyleMaker
- Chapter 4: The Main Screen
- Chapter 5: Guided Tour of Band-in-a-Box
- Chapter 6: Band-in-a-Box PowerGuide
- RealTracks
- RealDrums
- Song Settings
- The Chordsheet
- Chord Preview/Builder
- MIDI file “Chord Wizard”
- Applying Styles
- The StylePicker
- Playing, Pausing, and Stopping Songs
- Changing Volume, Panning, Reverb, Chorus, Bank
- Freeze Tracks
- Saving Songs
- Preferences – User Settings
-
- Show Chords with push/rest chars
- Metronome During Recording
- Harmony Volume Adjust
- OK to Load Style with songs
- Write Guitar part on 6 channels
- Turn External Keyboard’s Local On at end of session
- OK to beep with messages
- OK to prompt to reduce/expand
- For Roman Numerals in minor keys, use relative major
- Save Button on main screen works as Save As
- Name MIDI files with .MID extension
- Allow larger fonts on Chordsheet
- Color for Chordsheet Area
-
- Other Editing Features
- MIDI Setup
- The JukeBox
- Chapter 7: Notation and Printing
- Chapter 8: Automatic Music Features
- Chapter 9: Recording Tracks
- Chapter 10: Audio Features
- Chapter 11: Wizards, Tutors, and Fun
- Chapter 12: User Programmable Functions
- Chapter 13: CoreMIDI and Apple DLS Synth
- Chapter 14: Reference
- PG Music Inc.
- Index
- Registration Form

Chapter 13: CoreMIDI and Apple DLS Synth
254
Specific details of your Audio MIDI Setup screen will differ from this example, depending on your MIDI interface
and your connected external MIDI devices. This is a relatively complicated example, with an eight port MIDI
interface and four different synthesizers.
If your MIDI Interface has been properly installed, the picture of your MIDI Interface will automatically appear in
the Audio MIDI Setup window, showing input/output “pins” for each MIDI input and output socket on your MIDI
Interface.
You need to inform Audio MIDI Setup about your external devices (keyboards, synthesizers, drum machines,
mixers, etc.). Click the [Add Device] button for each of your external devices, and then double-click each new
device to set Manufacturer, Model, number of Send/Receive MIDI channels, and other relevant information.
After your external devices have been created and configured, the last step is to “wire them up” to the picture of
your MIDI interface. For instance, in the above illustration, the KX-88 keyboard controller is connected to MIDI
input/output pair #8 on the MTPII MIDI Interface. Click on an input/output “pin” on the picture of your MIDI
Interface, and drag to an output/input “pin” of the picture of an external device.
After supplying this information, CoreMIDI will know what devices are “on the other side” of your MIDI
interface(s).