
User Guide


Chapter 11: User Programmable Functions
196
other patterns. The 2 patterns with a weight of 2 will be played less often than the
patterns with weights of 5.
Use of a weight of 9 on one of the patterns is a special case. Patterns with a weight of 9
will always be played instead of any other patterns on the same row. These patterns
usually have other options associated with them to ensure they are played under certain
circumstances only. For example the pattern on this row has an option set of “Bar Mask
= post fill” which means it will be the bar after a drum fill. In this case, the pattern has a
Crash cymbal on beat 1. This pattern will always be played when the song is at the first
bar of a new part (which is the bar after a drum fill).
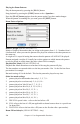
You can examine the options for any pattern by selecting the pattern by
mouse clicking on it, and then clicking on the [EDIT] button. Move
around the screen to different patterns by either using the cursor keys or
mouse clicking on the desired pattern.
Let's examine the Drum pattern by pressing the [REC] button. This opens
the Drum Editor window. This screen allows you to create or Edit drum
patterns in step time.
There are 16 columns, representing 1 bar of 16th notes. The numbers on this screen
represent velocities from 0 to 127. Using the bottom row of the computer keyboard i.e.
the XCVBNM,. / keys is the fastest way to put in commonly used velocities, or by
selecting the various commonly used velocity buttons at the bottom right of the Drum
Pattern Entry screen. You can also just type in the number that you want. Try typing in
some new drum notes. Press the [PLAY] button to audition them.
Let's create a new drum fill.
- Move to an empty location on the “Fills” line.
- Press [REC] to open the Drum Pattern Entry screen.
- Type a drum pattern in the drum grid.
- Save the pattern by pressing [EXIT] to exit the Drum Editor.
- Accept the generic settings in the Drum Pattern Recorded dialog box.
You will see your new pattern on the Fills line as represented by a weight number.
Let's use COPY/PASTE to simplify creating a new drum pattern.
- To make another fill, move to an existing fill.
- Choose the [COPY] button to copy that drum fill to the clipboard.
- Move to an empty pattern.
- Choose the [PASTE] button to paste in the previous drum fill.
- Now press [REC] to launch the Drum Pattern Entry screen and step edit the drum
fill. You will only need to change a few notes of the fill to make a variation of the
one you have copied.
Save the style by pressing the [SAVE] button. Save allows you to rename the style so
you don't affect the original ZZLITROK.Style.
Change the Patches that are assigned to the Style.
Each style can have patches assigned to it. For example if you want the style's Piano part
to use a Rhodes piano, you can select the piano patch of 5, which is the General MIDI
number for the Rhodes Electric Piano.
- Press the PATCH button.