
User Guide


Chapter 6: Making Songs in Band-in-a-Box
137
Edit Functions
The on-screen display of the song file name includes “*” when the file has
been changed.
- Edit | Undo and Edit | Redo allow you to Undo (or redo) most operations. Multiple Undo supports up to 999
levels of undo (configurable). The default number of undos is 99. If
you need to change this, it can be done in Opt. | Preferences “Number
of Levels of Undo.” The range can be 5 to 999. You can also choose Edit | Redo to redo an undo.
Technical Note: Audio Undos are large WAV files, so are stored in an Undos folder in the BB directory. This directory is
emptied when the undos are no longer needed.
- Edit | Cut functions like a delete command. It removes bars of chords from a song.
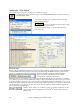
Highlighting Regions
This feature makes it easier to perform editing operations, such as copy/insert, etc. Simply highlight the region and
select the option. This feature also aids in Copy from..to...; Erase; Transpose; Insert; and Delete. For example, if
you select (highlight) a region by dragging the mouse and then choose one of the Edit menu commands the dialog
box will automatically adjust to the correct values, based on the region that you've highlighted.
To select a region of Chordsheet, Notation, or Audio window, you can Shift+click on the end point to easily select a
large area
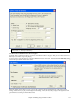
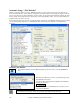
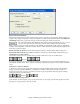
The Copy Chords and/or melody dialog is typical of the range selection dialogs used by several functions. You
are able to set a range for the function to be either part of the song, or the whole song.
Copy and Pasting a Section of Chords
Copying a section of chords is done in the same manner as copying text in a Windows word processor (read on if
you are unfamiliar with how this is done). There are also similar “keyboard shortcuts” for these operations as listed
in Keystroke Commands – Hot Keys section of this guide.
Copying Chords to the Windows Clipboard
- Select the region to copy. Place the mouse cursor at the bar to begin the selection. Then, holding down the left
mouse button, drag the mouse over the region. As you do this you will see that the region will be inverted (i.e.
looks dark). When you have selected the desired region of chords to copy, release the mouse button.
- Copy the selected region to the clipboard. Click on the Copy button or choose Copy from the Edit Menu.
Pasting Chords from the Windows Clipboard
Assuming you have already copied some chords to the Clipboard (see previous topic), you are then ready to paste
the copied chords into another part of your chordsheet.
- Move the highlight cell to the bar to begin the paste of chords.
- Click on the Paste button or choose Paste from the Edit Menu.
Tip: The copied section remains in the clipboard and can be used repeatedly. Example: If you're inputting a song with
verse, verse, bridge, verse, you can simply copy the first verse to the Clipboard, and then repeatedly paste-in the other
verses. The clipboard contents remain intact even if you load in a new song, so you can copy and paste between songs.
Additional Copy function for Chords/Melody
The menu command Edit | Copy From.. To.. launches the Copy Chords and / or melody dialog.
This allows you to copy Chords, Melody, Soloist, and Lyrics for a range of bars. If you're copying the
Melody/Soloist you'll need to specify which chorus you wish to copy.
If you want to extend the song by inserting a new section by copying an existing range of bars, then select the
“Insert Bars at destination” checkbox to insert the extra bars.