
User Guide


Chapter 6: Making Songs in Band-in-a-Box
165
Record a Vocal or Any Live Instrument
To start recording audio, plug your instrument or microphone into the computer’s sound card. The Line Out from
electronic instruments or amplifiers can be plugged directly into the Line In jack. To record your voice, or an
acoustic instrument such as a flute, plug a microphone into the Mic jack.
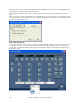
If you have a Sound Blaster card, this button is used to select the Microphone input and/or Line In input
to record digital audio. The Windows mixer Record settings can also be used.
Open the Record Audio dialog box with the [R. Aud] button. This dialog box lets you set the
parameters for the recording session.
You can adjust recording levels from this dialog with the [Set Recording Properties] button.
Once you have set the recording properties and tested the recording input levels, recording is easy. Simply tell
Band-in-a-Box the place in the song where you want to start recording, whether or not you want to record the MIDI
data along with your acoustic instrument, and press [Record]. If you choose to start recording from the beginning
of the song, Band-in-a-Box will start with a lead-in count before the music starts playing. If you are starting from
elsewhere in the song recording starts instantly.
Punch-In Recording
Punch-in audio recording allows you to punch-in record or overdub a section of audio. You can hear the existing
audio part when you are overdubbing.