
User Guide

Chapter 12: Wizards, Tutors, and Fun
316
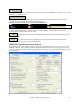
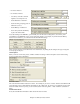
Bass Part Type
You can set this to “Root,” “Root-3-5,” or “Walking Bass.” If you choose “Root,” the chord Wizard will assume
that any bass note is the root of the chord. Choosing “Root-3-5” will cause the Chord Wizard to assume that the
bass pattern is mainly on the root, 3rd and 5th of the chord. If you choose “Walking bass,” it will assume that the
bass notes can be changing and can include many notes beside the root. Setting the Walking bass line will likely
result in fewer chords overall than setting the “Root only” option.
Allow Suspended (Sus) Chords
The setting for “Allow Sus chords” determines if chords like Csus or Bbsus7 will be included. The “Allow 7th
chords” specifies if 7th chords like C7 or Bbm7 would be allowed. Simple Rock songs might not have 7th chords or
Sus chords. Allowing chords with no thirds should be set in a hard rock song, or similar song with “power chords”
that might not contain the 3rd of the chords.
Delay Lowest Bass Note
Usually a bass player plays the root of the chord at or near the time when the chord
changes. But in solo piano playing or some bass styles, the bass doesn't state the root until later on, and this setting
should be set to “delayed” in a solo piano style of this type.
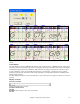
Primary Style
Set the primary style of the song to Jazz or Pop
using the Lead Sheet Method combo box.
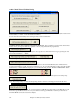
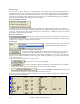
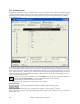
Using the Chord Options Presets to quickly make settings
For the song “Violet Song.MID,” we know that this is a Jazz Swing type of song, so we
press the Preset Called “Jazz Standard.” By doing this, we see that the chord options
have then been set to Chord Resolution of 2 beats, no slash chords, walking bass, sus chords, 7
th
chords, and Jazz
lead sheet. These settings look OK for our Jazz song, if we wanted to customize it (e.g., to allow slash chords) we
could do it at this point.
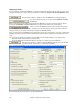
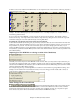
So, to recap, using the Chord Wizard is a 3-step process.
1.
We've loaded in the song “Violet Song.MID.”
2.
Pressing the preset button called [Jazz Standard], we then looked at the Chord Options
settings for the various channels and they looked OK, so we didn't make any changes.
3.
We then press [INTERPRET CHORDS NOW] – this gets the
Chord Wizard to interpret the chords, and write them onto the Chordsheet.
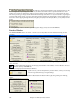
Once we've pressed the [Interpret Chords Now] button, we can see the results, by looking at the chordsheet. Here
are the chords that were interpreted.