
User Guide

Chapter 4: The Main Screen
44
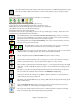
When the combo button is selected you can choose one of your ten favorite preset instrument combos.
The patches are set from the [Fav. Patches] button in the Preferences. For example, you could setup Combo #1 to
be an Acoustic Jazz combo which would send out patches like Acoustic Bass, Acoustic Piano, Acoustic Guitar,
Flute, etc.
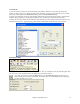
When a Combo is selected changes to volume, reverb, etc. will apply to all parts. Right-click on the Combo radio
button to open a menu of commands that apply to the entire combo.
Mute will mute all parts.
Save all tracks as WAV file will render the tracks together into one wave file or render them as individual wave files.
Song has changed, needs regeneration will regenerate a new arrangement for all parts.
You can Render Song to Audio Track, which mutes the individual tracks and plays the rendered audio wave, or you
can Un-Render Song from Audio Track, which will erase the audio track and play the individual tracks again.
The Freeze and Un-freezecommands apply to all tracks.
If you like the current mix (of volumes, panning, reverb), and you want this applied as a default for all songs, you
can choose Save Current Mix as Default. Load Default Mix restores the default mix you have saved, and Reset Mix
sets the mix back to “factory defaults.”
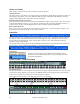
Drop Panel
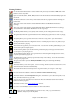
The [Drop] button is used to drag and drop tracks from Band-in-a-Box to Digital Audio
Workstations that don’t support direct drag and drop. Many DAWs will allow you to do this
directly, but, if your sequencer does not support the direct drop of a track that is not yet generated, you can drag
from a radio button (Combo, Bass, Piano, etc.) to the Drop panel. When the button turns bright green the track has
been generated and is ready to drag from the [Drop] button to your DAW.
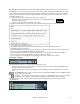
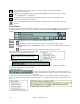
Audio
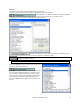
The Audio Playback settings dialog makes it easy to mute, solo, or
change the volume of the audio track, similar to the control of the
other instrument parts in Band-in-Box. There are also Tone and
Reverb controls for RealTracks. Click on the “Audio” label on-screen
to open this dialog.
Master Reverb and Tone can be set by clicking the Combo button,
and then using the Audio Reverb and Tone controls.