
User Guide
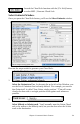


Table Of Contents
- PG Music Inc. License Agreement
- Table of Contents
- Chapter 1: Introduction
- Chapter 2: QuickStart Tutorial
- Chapter 3: Summary of New Features
- _
- All New 32-bit PPC Carbonized Engine.
- Odd-Time Signature Support.
- Maximum Number of Soloists increased
- New Count-In Options
- Harmony – Low Root Feature.
- Strauss-in-a-Box
- Transform 4/4 Melody to a Waltz 3 /4 \(“Strauss-
- Transform “Waltz” Melody to 4/4 \(“De-Strauss” t
- Bass player plays better “5ths
- Load Previous Style, Load Next Style.
- “Chase Volumes” added for playback.
- Drum count-in options
- StylePicker Enhancements.
- StylePicker Dialog “show all” button
- Mono/Stereo menu options
- Video and Audio Memo support
- Soloist “Note-Density” option.
- Dedicated menu items added on GM Menu
- New Hot Keys
- Configuration Files
- About Hot Key Names on the Menus
- New Program Hints Added
- _
- Chapter 4: Guided Tour of Band-in-a-Box
- Chapter 5: The Main Screen
- Chapter 6: Band-in-a-Box PowerGuide
- Chapter 7: Notation and Printing
- Chapter 8: Automatic Music Features
- Chapter 9: Recording Tracks
- Chapter 10: Built-in Drums
- Chapter 11: User Programmable Functions
- Chapter 12: Tutors and Wizards
- Chapter 13: CoreMIDI and QuickTime OS X
- Chapter 14: Reference
- PG Music Inc.
- Index
- Registration Form

Chapter 9: Recording Tracks 129
3. As the song plays, play the melody on any keys on the bottom two rows of
the QWERTY keyboard, in the rhythm of the melody. The “wizard” notes
won't be the correct melody of course, but don't worry about that as you
record. When you're finished, look in the Notation window. You’ll see
notes in the right places and with the correct durations, but with the wrong
pitches.
4. Drag the notes with the mouse and drop them on the correct place on the
staff. You’ll hear the notes play as you drop them, and the names will show
in the note name box. For sharps, flats, and naturals, hold down the shift
key, control key, or
key respectively. You'll end up with a melody that
sounds like it was recorded live, without the rigid feel of tracks entered in
step time.
Tip: If you have the wizard “On,” the spacebar won’t stop playback. You need to press
[Esc] key to stop playback when the Wizard is on. This is to prevent stopping the song
inadvertently if you mistakenly hit the spacebar while playing the wizard.
Importing Pre-Recorded MIDI Data
Standard MIDI files can be read in to the Melody or Soloist tracks from MIDI
files or from the clipboard. You can read in all of a MIDI file, or selected
channels and a specific range of bars. Use one of the following two commands:
1. MEL | Import Melody from MIDI File… to select a MIDI file from disk
using the file dialog.
2. MEL | Import Melody from Clipboard - when the MIDI data is already
copied from another program to the clipboard.
Once chosen, the Import MIDI File dialog box opens.