PHAESUN GmbH INSTRUCTION MANUAL READ AND SAVE THESE INSTRUCTIONS
! WARNING WARNING: To avoid fire shock and serious personal injury, follow these instructions. Important Safety Instructions 1. Read all instructions and safety information before installing your new fan. Review the accompanying assembly diagrams. 2. Before installing the fan, disconnect the power by removing fuses or turning off circuit breakers. 3. Make sure that all electrical connections comply with local codes, ordinances, or National Electrical Codes.
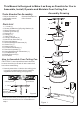
This Manual Is Designed to Make it as Easy as Possible for You to Assemble, Install, Operate and Maintain Your Ceiling Fan Assembly Drawing Tools Needed for Assembly - Philips Screwdriver - Slotted Screwdriver - Adjustable wrench - Wire Cutters - Stepladder 1 3 2 Parts List 1. J - Hook (1) 2. Screw (2)/Washer (2)/Spring Washer (2) 3. Wire Connectors (3) 4. Rubber grommet (1) 5. Downrod (1) 6. Canopy (1) 7. Yoke Cover (1) 8. Canopy Setscrew (2) 9.Yoke Cover Setscrew (3) 10 . Downrod Support 11.
How to Assemble Your Ceiling Fan (Cont’d) 3. First, loosen the two setscrews in the downrod support, carefully thread for electrical wires through downrod (Figure 3). Electrical Wires Hairpin Clip Hairpin Clip 4. Put the downrod into the downrod support and align the clevis pin holes in the downrod with the holes in the downrod support. Install the clevis pin and secure with the hairpin clip, then re-tighten the two setscrews (Figure 4) securely while pulling up on the downrod.
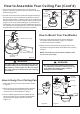
How to Hang Your Ceiling Fan (Cont’d) 4 . Hang the fan up into the J-hook, be sure the rubber grommet rests properly on the J-hook. As shown in figure 8a and 8b. Ceiling Joist J-Hook Rubber Grommet 5. Securely attach the canopy/yoke cover to the downrod/rubber grommet assembly by using two canopy/yoke cover setscrews supplied with your ceiling fan (Figure 9). Canopy + Canopy setscrew NOTE: This step is applicable after necessary wiring is completed.
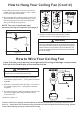
How to Operate your Ceiling Fan 1. Setting the Code: The remote unit has 16 different code combination. It may be necessary to test a couple frequency code settings to improve signal reception and/or eliminate interference from other remote control household items. Multiple fans should have different code settings to allow independent fan control. To set the code, perform these steps. 2. Transmitter: Remove battery cover. Press firmly below arrow and slide battery cover off.
Maintenance 1. Periodic cleaning of your new ceiling fan is the only maintenance that is needed. ! WARNING Do not use solvents when cleaning your ceiling fan. It could damage the motor and create the possibility of electrical shock. 2. When cleaning, use only a soft brush or lint free cloth to avoid scratching the finish. 3. Abrasive cleaning agents are not required and should be avoided to prevent damage to finish.