
User manual


1
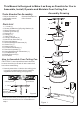
Parts List
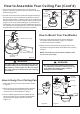
CAUTION: To avoid possible electrical shock,
be sure electricity is turned off at the main fuse
box before assembling.
1. Securely attach the J-Hook to the ceiling joist
using the screws/washers/spring washers
supplied with the ceiling joist (Figure 2).
1. J - Hook (1)
2. Screw (2)/Washer (2)/Spring Washer (2)
3. Wire Connectors (3)
4. Rubber grommet (1)
5. Downrod (1)
6. Canopy (1)
7. Yoke Cover (1)
8. Canopy Setscrew (2)
9.Yoke Cover Setscrew (3)
10 Downrod Support
11. Downrod Support Setscrew (2)
12. Clevis Pin (1)
. Hairpin Clip (1)
14. Fan Motor Assembly (1)
15. Receiver Assembly (1)
16. Hand-Held Remote Transmitter (1)
17. Fan Blade Set (3)
18. Blade Setscrew (6)
19. Fan Wires
.
13
Assembly Drawing
Tools Needed for Assembly
-
- Adjustable wrench - Wire Cutters
- Stepladder
Philips Screwdriver - Slotted Screwdriver
This Manual Is Designed to Make it as Easy as Possible for You to
Assemble, Install, Operate and Maintain Your Ceiling Fan
How to Assemble Your Ceiling Fan
2.Remove the clevis pin and hairpin clip from the
downrod and retain them for reinstallation in
step 4.
Figure 2
Ceiling Joist
Screw (2)
Washer (2)
Spring Washer (2)
J - Hook
Outlet Box
6
18
17
16
Figure 1
3
4
19
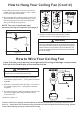
1 2
3 4
5 6
F/R OFF
5
2
1
12
13
7
14
15
11
10
9
8