
User manual


How to Operate your Ceiling Fan
4
1. Setting the Code: The remote unit has 16 different code
combination. It may be necessary to test a couple frequency
code settings to improve signal reception and/or eliminate
interference from other remote control household items.
Multiple fans should have different code settings to allow
independent fan control. To set the code, perform these steps.
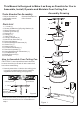
2. Transmitter: Remove battery cover. Press firmly below arrow
and slide battery cover off. Slide code switches to your choice
of up or down position. Factory setting is all down. Do not use
this position. With a small screwdriver or ball point pen slide
firmly up or down (Figure 12). Replace battery cover on the
transmitter.
3. Receiver: Slide code switches to the same positions as set
on your transmitter (Figure 13).
Note1: When you set the codes, please remove the yoke cover
setscrews (3) from the yoke cover first and then replace the
screws after the codes setting completed.
Note2: Receiver in controllers system features an automatic
learning function. There are no frequency switches on the
receiver unit. The receiver will automatically scan the frequency
from the hand-held control if an changes are made. The frequency
settings should be changed only in the case of interference or
if multiple ceiling fans with the same type of control system are
installed in the same structure.
Hand-Held Remote Transmitter
Figure 12
Code Switches
ON
1 2
3 4
5 6
F/R OFF
Battery
9V x 1
5. The remote buttons instruct as below (as shown in figure 14):
OFF Button - fan off
1st Button - high speed
2nd Button - medium high speed
3rd Button - medium speed
4th Button - medium low speed
5th Button - low speed
6th Button - minimum speed
F/R Button - toggles between air upflow and air downflow
Figure 14
1 2
3 4
5 6
F/R OFF
4. Operating & Using Remote Transmitter:
Install one 9 volt battery (included) into the hand-held remote
transmitter. Press any fan speed button and allow the receiver to
scan (normally within 3-5 seconds) the fan is now programmed and
ready for normal operation.
Note: If not using for long period of time, remove battery to
prevent damage to transmitter. Store the transmitter away from
excessive heat or humidity.
Receiver
Unit
Figure 13
ON
ON
2
3
4
1
Motor Bottom
Cover
Code Switches
Yoke Cover
Yoke Cover
Setscrew
Canopy