Pharos Traveler GPS 505 User Manual
Safety Instructions for the Pocket PC Important safeguards All safety instructions must be read carefully and fully understood before attempting to use your Pharos Traveler GPS Pocket PC. This manual contains safety instructions that must be observed in order to avoid potential hazards that could result in personal injuries or damage to your Pocket PC.
Introduction Thank you for your purchase of the Pharos Traveler GPS 505 Pocket PC. Please be sure to read this manual before using the Pocket PC and ensure that you are aware of correct handling procedures. • Please be sure to read the “ Important Safety Information” section in this document to learn about safety information. • After reading this document, keep it in a convenient place for future reference. Copyright Information © 2005 All rights reserved.
Important Safety Information Read this information before using your Pocket PC. To reduce the risk of bodily injury, electric shock, fire, and damage to the equipment observe the following precautions. General Precautions Avoid hot areas: The product should be placed away from heat sources such as radiators, heat registers or other products (including amplifiers) that produce heat. Please keep this away from high-temperature locations, including vehiciles.
GPS Usage Precautions Please don’t use this product close to wireless machines; otherwise, the product will malfunction. This product is a delicate electronic machine; therefore, please do not put it in places with strong static and electric waves.
• Please check that you fully understand the definition of the following messages (signs and graphical symbols) before reading the text, and always follow the instructions provided.
Supplementary Information: Weitere Informationen: Informations complérnentaires: Información complementaria: Ulteriori informazioni: Ytterligare information: -8- “The product complies with the requirements of the Safety Directive IEC60950 3rd and the EMC Directive 89/336/EEC.” “Das Produkt entspricht den Anforderungen der Niederspannungsrichtlinie 73/23/EG und der EMC-Richtlinie 89/336/EG.
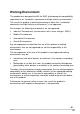
Working Environment This product was designed to fulfill the EMC (electromagnetic compatibility) requirements for “residential, commercial and light industry environments.” The use of this product in working environments other than “residential, commercial and light industry environments” is not approved.
CE Compliance This product and the original options are designed to observe the related EMC (electromagnetic compatibility) and safety standards. However, the manufacturer cannot guarantee that this product still observes these EMC standards if options or cables not produced by the manufacturer are connected or implemented.
FCC Notice “Declaration of Conformity” This equipment has been tested and found to comply with the limits for a Class B digital device pursuant to Part 15 of the FCC Rules. These limits are designed to provide reasonable protection against harmful interference in a residential installation. This equipment generates, uses, and can radiate radio frequency energy and, if not installed and used in accordance with the instructions, may cause harmful interference to radio communications.
Caring for the Environment by Recycling in the European Union This symbol on the product or on its packaging indicates that this product must not be disposed of with your other household waste. Instead, it is your responsibility to find a designated collection point for the recycling of electrical and electronic equipment waste.
Chapter 1: Getting Started ................................................. 15 Welcome...................................................... 15 Finding Information ....................................... 16 Chapter 2: Basic Skills....................................................... 17 System Overview.......................................... 17 Battery Switch .............................................. 18 Using the Navigation Button .......................... 20 Using the Battery ....................
Resetting ..................................................... 43 Clearing Memory .......................................... 44 Specifications ............................................... 44 Table of Contents Troubleshooting for GPS...............................
Chapter 1: Getting Started Chapter 1: Getting Started Welcome Congratulations on purchasing your Pocket PC. Due to its size and capabilities, you can keep your most important business and personal information up-to-date and close at hand. Microsoft® ActiveSync® increases the power of your Pocket PC by allowing you to synchronize the information on your PC with your Pocket PC.
Chapter 1: Getting Started Finding Information This manual describes features, provides program overviews, and describes how to connect your Pocket PC to your PC, a network, or the Internet. For instructions on setting and installing ActiveSync, consult the documentation that came with ActiveSync. For information on Programs on your Pocket PC See this source The User’s Guide and online help. To view Help, tap and then Help.
Chapter 2: Basic Skills Chapter 2: Basic Skills This chapter identifies the system components and describes the use and customization of your Pocket PC. System Overview Main Unit (Front View) Earphone connector Rotate button Hold Switch.
Chapter 2: Basic Skills Main Unit (End View) Main Unit (Back View) Mini USB Client Port SD Card Battery Switch Supply Stop Battery Pack Stylus Power Button The power button performs the functions described in the table below. Power button When the power is off When the power is on Press and hold. The power turns on. The screen light alternately turns on/off. Press it quickly. The power turns on. The power turns off.
Chapter 2: Basic Skills CAUTION Switching the battery switch to the “stop” position at any time leads to loss of data. Setting the Battery Lock 1. Use the stylus to slide the battery lock to the up position (the “lock” side) See “To install the battery” later in this chapter. . Lock Battery Lock Unlock Battery/Alarm LED Descriptions Flashing orange Orange When the preset alarm time (set through Calendar or Tasks) goes off, the indicator starts flashing. Indicates charging of the battery.
Chapter 2: Basic Skills CAUTION When you operate the touch screen of your Pocket PC, use the supplied stylus. Please use touch panel carefully and don’t place it on or under the sharp objects. If the tip of the stylus is damaged, do not use it. If you operate the touch screen with a damaged stylus or a ballpoint pen, the touch screen may be damaged. When the stylus is damaged, please purchase a new one. Using the Navigation Button The navigation pad consists of five buttons.
Chapter 2: Basic Skills 2. Insert the left side of the battery into the battery slot at on angle, and press down the right side into the slot until it clicks. 3. Insert the tip of the stylus into the battery lock. 4. Slide the lock to the lock position. To remove the battery: 1. Insert the tip of the stylus into the battery lock. 2. Slide the lock to the unlock position. 3. Take the battery out of the slot.
Chapter 2: Basic Skills Charging the Battery Charge the pocket PC by using the AC adaptor: Connect one end of AC adaptor (Mini USB u) into the mini USB Client port w and connect the other end v to an electrical outlet to charge the pocket PC. Maintain an ambient temperature from approximately 32°F to 104°F (0°C to 45°C) while charging the battery. When the battery is being charged, the battery/alarm LED is orange; when the battery is fully charged, the battery/alarm LED changes to green.
Chapter 2: Basic Skills • n Use your Pocket PC with an ambient temperature between 59°F and 77°F (15°C and 25°C). This temperature range is the most effective for the battery. n When you use your Pocket PC in high or low temperature environments, the operable time is shortened due to the decrease of the battery capacity. The removable battery has a limited life. Repeated charging/discharging of the battery gradually decreases the operable time.
Chapter 2: Basic Skills Initial Setup and Touch Screen Correction When using your Pocket PC for the first time, follow the initial setup procedures below, after the battery has been charged. When you slide the battery switch to the “supply” position and install the battery, your Pocket PC powers on automatically and the Welcome screen appears. Tap the screen to start the following setup. 1. Complete the touch screen correction.
Chapter 2: Basic Skills Inserting a SD Card 1. Remove the dummy card from the SD card slot. 2. Insert the card with its metal contact surface facing the top of your Pocket PC. 3. Press down the card until it clicks in place. Removing a SD Card 1. Lightly press down the card until a click is heard. The card pops out slightly from the slot. 2. Pull out the card straight. Connecting to a PC Before connecting your Pocket PC to a PC, check the following: • ActiveSync has been installed on your PC.
Chapter 2: Basic Skills Connect your Pocket PC directly to your PC using the supplied mini USB cable: 1. Connect the serial connector of the mini USB cable to the mini USB Client port of your Pocket PC. 2. Connect the USB connector of the mini USB cable to the mini USB port of your PC. Today Screen When you turn on your Pocket PC for the fi rst time each day (or after 4 hours of inactivity), the Today screen displays. You can also display it by tapping and then Today.
Chapter 2: Basic Skills Status Icon Meaning Connection is inactive. Notification that one or more e-mail messages were received. Notification that one or more instant messages were received. NOTE If more notification icons need to be displayed than there is room to display them, the Notification icon displays. Tap the icon to view all notification icons. Using the Programs You can switch from one program to another by selecting it from the menu. (You can customize which programs you see on the menu.
Chapter 2: Basic Skills The following table contains a partial list of programs that are included. (Look for additional programs in your Pocket PC Companion CD.) Icon Program ActiveSync Calendar - 28 - Description Synchronize information between your Pocket PC and PC. Keep track of your appointments and create meeting requests. Contacts Keep track of your friends and colleagues. Pocket Internet Explorer Browse Web and WAP sites and download new programs and files from the Internet.
Chapter 2: Basic Skills Checking System Information The system information program displays the system information such as CPU clock, CPU stepping, OS version, PIC version, and UUID. The information is displayed in the Identity, Memory, Driver and System items. To check system information, tap > Settings > System > SysInfo. Tools Menu The Tools menu displays the system information and allows the text to be exported. • Export exports all system information parameters to a text (*.txt) file.
Chapter 2: Basic Skills You might want to adjust the following: • Clock & Alarms to change the time or to set the alarms • Menus to customize what appears on the pop-up menu from New • Owner Information to enter your contact information • Password to limit access to your Pocket PC • Power to maximize the battery life • Today to customize the look and the information that is displayed on the Today screen • Screen to change the display mode to Landscape or to align the screen menu, and to enab
Chapter 2: Basic Skills 1. Determine your Pocket PC processor type so that you know which version of the software to install. Tap > Settings. On the System tab, tap About. In the Version tab, make a note of the information in Processor. 2. Download the program to your PC (or insert the CD or disk that contains the program into your PC). You may see a single *.xip, *.exe, or *.zip file, a Setup.exe file, or several versions of files for different device types and processors.
Chapter 2: Basic Skills Adding Programs Directly from the Internet 1. Determine your Pocket PC processor type so that you know which version of the software to install. Tap > Settings. On the System tab, tap About. In the Version tab, make a note of the information in Processor. 2. Download the program to your Pocket PC straight from the Internet using Pocket Internet Explorer. You may see a single *.xip, *.exe, or *.zip file, a Setup.
Chapter 2: Basic Skills • Using ActiveSync on your PC—Use the Explorer in ActiveSync to explore your device files and locate the program. Right-click the program, and then click Create Shortcut. Move the shortcut to the Start Menu folder in the Windows folder. The shortcut now appears on the menu. For more information, see ActiveSync Help on your PC. Removing Programs Tap > Settings. On the System tab, tap Remove Programs.
Chapter 3: Microsoft ActiveSync Chapter 3: Microsoft ActiveSync Using ActiveSync, you can synchronize information between your Pocket PC and your PC or server. Synchronization compares the data on your Pocket PC with the data residing on your PC and updates both with the most recent information. For example: • Keep Pocket Outlook data up-to-date by synchronizing your Pocket PC with Microsoft Outlook data on your PC.
Chapter 3: Microsoft ActiveSync Once you have set up ActiveSync and completed the first synchronization process, you can initiate synchronization from your Pocket PC. To switch to ActiveSync, tap > Programs > ActiveSync. For information about using ActiveSync on your PC, start ActiveSync on your PC and then see ActiveSync Help. For more information about ActiveSync on your Pocket PC, switch to ActiveSync, tap > Help. View connection status. Tap to connect and synchronize. Tap to stop synchronization.
Chapter 3: Microsoft ActiveSync In ActiveSync on your Pocket PC, tap Tools > Options > the Mobile Schedule tab. 1. To synchronize periodically during peak times, select the frequency of synchronization in the Peak times list. 2. To synchronize periodically during off-peak times, select the frequency of synchronization in the Off-peak times list. 3. To set the days and hours for peak times, tap Peak Times.
Chapter 4: GPS Function Chapter 4: GPS Function Your Pocket PC is also a global positioning system (GPS) device. It is a very convenient tool for navigation on the road. Note: Please set your GPS before getting on the road. Setting the device while driving is strongly discouraged. The actual procedures will depend on the map source which the end users Install. Enabling the GPS Function To enable the GPS function of your Pocket PC, tap GPS icon to activate GPS function and then GPS LED turns blue.
Chapter 4: GPS Function Viewing the GPS Settings Your Pocket PC is pre-installed with a GPS-related programs: GPS Power Control. GPS Power Control To view the GPS function settings, tap Power Control. > Settings > System > GPS You can use it to directly control GPS function on/off and reset. Zoom in and Zoom out When turn on map program, the program will automatically enter the main screen. Then the buttons of Zoom-in and Zoom-out can work to the map.
Chapter 4: GPS Function 2. memory. Do not turn off the Pocket PC. Otherwise, the GPS function will be disabled automatically and the GPS status LED will be off. Using GPS Power Control GPS Power Control is used to configure the GPS settings. Below are the main screen and setting items of GPS Power Control. • POWER This item indicates that GPS is enabled (the button appears highlighted) or disabled.
Chapter 4: GPS Function Using Navigation Control Navigation Control is used to configure the Navigation button. Below is the main screen and setting items of Navigation Control. • 4-direction control mode When choosing 4-direction control mode, there will be 4 directions available to move. • 8-direction control mode When choosing 8-direction control mode, there will be 8 directions available to move.
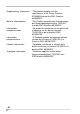
Chapter 5: Additional Information Chapter 5: Additional Information Troubleshooting Check the following table for the possible cause of the problem and how to correct it. Symptom Even if the power button is pressed, the power does not turn on. The power was suddenly cut off. Cause The battery power is exhausted. Charge the battery. The main battery is not installed. Install the main battery. The battery power is exhausted. Charge the battery. Automatic suspend is active.
Chapter 5: Additional Information Symptom Cause The screen was tapped, but there is no response. The operation button does not work, either. Some malfunction The screen is dark. The screen light is off. Correction Reset the device. If no action is observed after resetting the device, initialize the device. (However, the data will be deleted.) Press and hold the power button until the screen light is turned on. The screen is hard to see. The brightness setting is incorrect.
Chapter 5: Additional Information Clearing Memory When you initialize your Pocket PC, it returns to the status when it was purchased. CAUTION When you initialize your Pocket PC, all data stored in the memory is deleted. Your Pocket PC’s initially installed programs are not deleted. Before the initialization, remove the SD card. 1. Turn off your Pocket PC. 2.
Chapter 5: Additional Information Item Description Temperature 32°F ~ 104°F (0°C ~ 40°C) Relative humidity 10% ~ 85% Storage conditions Temperature -4°F ~ 140°F (-20°C ~ 60°C) Relative humidity 10% ~ 85% Battery type 1320mAh, removable, rechargeable Lithium-Ion battery Processor Intel® bulverde PXA270 416 MHz Memory 64 MB Flash ROM 64 MB Display 3.5” diagonal, TFT color LCD screen, 240 x 320 pixels, up to 64K colors,0.244 mm dot pitch,6 LED Backlight.
Chapter 5: Additional Information Infrared port Based on IrDA ver. 1.3 Maximum data transmission speed: 115 kbps Audio AC 97 codec Mono record Stereo playback, 8.0 KHz, 11.025 KHz, 22.05 KHz, and 44.1 KHz sample rate Full duplex for simultaneous record and playback On-board microphone On-board speaker Stereo earphone/microphone jack Software volume control Hardware (volume button) & Software volume control.
Chapter 5: Additional Information Troubleshooting for GPS Why does the Pocket PC keep accessing the map? 1. The CPU speed is related to the accessing speed of the storage card. You are advised to use storage cards with better accessing speed. 2. Make sure that the RAM of the P ocket PC has free space over 20 MB for the map program to work properly. (You are advised to stop all other programs and run the map program only.
Chapter 5: Additional Information How often does the GPS satellite update the signals? How many satellites are required for a successful positioning? The GPS signals are transmitted every second. Based on the Pythagorean Theorem, it takes at least three satellites for the 2D positioning, and four satellites for the 3D positioning. In the mountain area, the 3D positioning is required for the accurate data. Why does the Pocket PC fail to find the COM port for GPS? 1. Check if the GPS power is turned on.
Chapter 5: Additional Information 2. Modify the voice files of the map program. 3. Connect to the AUX IN of the car stereo and broadcast the volume through the car speaker. 4. Purchase a FM transmitter. Use the car radio to receive signals and broadcast the volume through the car speaker. The GPS reception is not good. How do I fix it? 1. Use an external antenna and place it on the top of the car. 2. Check if there are coverings or windows films around the car. 3.
Chapter 5: Additional Information Will charging using the car charger in long periods damage the Pocket PC? Using other car chargers may damage the Pocket PC. Use the supplied car charger to power the Pocket PC using the 5V voltage and 1A current. Do not use greater voltage or current to charge the Pocket PC. During navigation, a warning of insufficient memory keeps displaying for the map program. Make sure that the RAM of the Pocket PC has free space over 20 MB for the map program to work properly.