PHAROS DRIVE GPS 250 User Manual
Warranty Conditions Manufacturer is not responsible for any product defects due to misuse, abuse, or usage of product in way that is not in compliance with the written product instructions. To use this product other than expressed in the instructions will void customer's product warranty. Precautions and Notices ¾ ¾ ¾ ¾ ¾ ¾ ¾ ¾ ¾ ¾ ¾ ¾ ¾ ¾ ¾ ¾ ¾ ¾ ¾ ¾ ¾ ¾ ¾ Please do not attempt to remove the memory card from your Pharos Drive GPS 250. Removing the card will break the seal and void the warranty.
Contents 1– Getting Started 1 Configuration Wizard .......................................................................................................................... 1 Map Screen......................................................................................................................................... 3 Map Views .......................................................................................................................................... 4 Route Summary...................
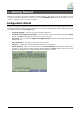
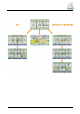
1 – Getting Started Welcome to the world of mobile navigation! Simple operation, clear maps in 2D or 3D mode as well as numerous innovative features and functions have made PHAROS GPS the essential guide for every traveler – whether in the car, on foot or by bike. Configuration Wizard This wizard, which automatically starts the first time you use the device, lets you easily configure the system settings by providing a step-by-step setup process.
2
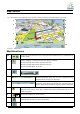
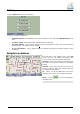
Map Screen You can use the icons displayed on this screen to view and receive information about your route. 1 6 2 7 8 3 9 4 5 10 Figure 2 – Map Screen Map Screen Icons 1, 6 Zoom in or out of the map to view a larger and less detailed area, or a smaller area in greater details. 2 Tap the compass to change the map view display as follows: 2D map view with the forward direction at the top. 3D map view with the forward direction at the top. 2D map view with North at the top.
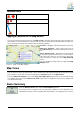
Location Icons Current location in Vehicle Mode or Walking Mode. Last known location when GPS signal is unreliable. Generated route Tapping a Location on the Map Screen You can tap a desired location directly on the Map Screen in both the 2D and 3D map views. This feature is useful when you want to navigate to a specific point on the map, rather than by the street address. When you tap on the map, the Popup menu appears with the following options: Go There – Navigate to the selected point on the map.
Cancel Route From the Manage Route menu tap the Cancel Route button. The current navigation stops and the GPS clears the route. You can only cancel a route after a destination has been set. 2 – Select Location and Generate Route Go to an Address From the Go menu, tap the New Address button. The Enter address screen appears, allowing you to choose how you want to enter address information.
Go to Another Country From the Enter address screen, you can tap In Other Countries to select another country that you can travel to by vehicle. First you will select the country, and then you will enter the address. The followings maps are available on your GPS device: • Map of USA. • Map of Canada. Toolbar Buttons The following toolbar buttons appear at the bottom of many of the navigation screens.
Actions Tap the Actions button to use an address: Figure 6 – Actions for Addresses • As Starting Point, which designates the selected address as the route origin (Map Browsing mode only). • To Show on Map, which displays the selected address on the map. • As saved address – Tap to add an address to your list of favorite locations. For more information about favorites, see Address book on page 13. • To see information – Tap to display additional address information and phone number (where available).
Points of Interest (POI) The Points of Interest (POI) list is a collection of thousands of interesting or useful places organized by easy-to-find categories. For example, you can use this device to guide you to a shopping center, hotel, restaurant, or gas station. Many categories have subcategories to provide for an even greater list of choices. For example, gas station may have many subcategories each representing a particular brand name. The same is also true for hotels.
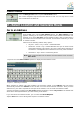
Search for a POI Category Tap the Browse button to display the most common POI groups. Many of these groups will include several POI categories, which in turn my contain subcategories. Tap the More button to go straight to the full list of POI categories. Figure 9 – Most Common POI Categories Show or Hide Symbol on Map You can show or hide the POI symbol on the Map Screen by checking or clearing the checkboxes next to a POI category or subcategory.
Actions Tap the Actions button to use a POI: Figure 11 – Actions for POIs • As Starting Point, which designates the selected address as the route origin (Map Browsing mode only). • To Show on Map, which displays the selected address on the map. • As saved address – Tap to add an address to your list of favorite locations. For more information about favorites, see Address Book on page 13. • Sort by ABC, which displays the category entries in alphabetical order.
Recent Place From the Go menu, tap this button to select an existing location from a list of locations that you have previously traveled to. Figure 13 – Traveling to a Recent Location This device automatically stores the last 64 locations in memory. After 64 locations have been saved, the older location entries are erased.
Address Book A Favorite is an address or POI that you have stored for easy retrieval. Save favorite addresses to your Address Book and later you can easily travel to these destinations. Favorites can be saved by using the Actions button within the New Address, Recent Places, and POI entry screens. By default your favorite will be placed into the Favorites group. You can also create your own custom groups; e.g. for a city or activity.
Figure 17 – Going to a Favorite Destination You can check or clear the checkmarks next to any group to show or hide the group symbol on the Map Screen. Setting an Alert for an Address Book Group Alerts let you know that you are within a certain distance of an item in an Address Book group. Figure 18 – Setting Your Favorite Alerts Use the right and left scroll arrows to set the distances for the 1st and 2nd Alerts.
Actions While highlighting a favorite address within a group, tap the Actions button to use the address: Figure 19 - Actions for Address Book • As Starting Point, which designates the selected address as the route origin (Map Browsing mode only). • To preview on map, which displays the selected address on the map. • Edit a Fav. Location, which changes the name, comment, or group location for the selected address. • Delete Fav. Location, which removes the selected address.
3 – Route Management Driving Directions From the Manage Route menu, tap this button to display a complete Turn-by-Turn list of directions from your current location to the selected destination. The device continuously updates the Turn-by-Turn screen to display the most current instructions as you navigate the route. You can also reach this screen by tapping the Directions Bar on the Map Screen (second bar from the bottom).
Avoid Roads You can specify that certain types of roads be permanently excluded from your route calculations, and you can create your own list of specific roads to avoid. Use this feature when you want to avoid congested roads, toll roads, or unsafe streets. From the Manage Route menu, tap the Avoid Roads button. The Avoid Roads screen appears, displaying predefined road groups.
Creating a Group Tap this button and select Add Group. From the Add Group screen, enter the group name and tap OK. Figure 22 – Add a Road Group The Actions screen also lets you edit or delete a selected group. Adding a Road to a Group When you tap My Roads to Avoid or a road group that you have created, the device displays the group screen, which lets you designate roads to avoid. From this screen, you can use the Allow or Avoid buttons to include or exclude individual roads when calculating a route.
Actions Tap the Actions button: • Add Road – Tap to add a new road to avoid to a group. • Edit Road – Tap to rename the road and/or select a different group. When you have made your changes, tap Save. • Delete Road – Select a road and tap this button to remove the road from your group. The GPS no longer avoids the removed road. • Show on Map – Tap to show the map with the displayed destination for you to review before creating a route.
Map Browsing You can browse the map without a GPS signal. From the Settings menu, tap Map Browsing button to disconnect from the GPS receiver. Figure 26 – Explore the Map The icon identifies your current position. You can use the arrow cursor to move the map. When you have located the street destination, you can tap that point on the map. On the popup menu tap Go There to navigate to the selected point. You can also set an address as an origin so that you can preview a route.
Map Selection This function should only be used if you want to browse the Canada map while in the US. All US regional maps switch automatically as you travel or as you set an address origin or destination. From the Setup 1 menu, tap the Select Map button to change the selected map to another map. Figure 27 – Select a Map You can also choose from the following Select Map commands: • Refresh – Tap to refresh the screen. • Delete – Tap to permanently remove a selected map.
4 – Settings Settings Menus From the Main Menu, tap the Settings button to configure the system settings. Map Display From the Settings menu, tap the Map Display button to select from the map interface options listed below. You can choose the following options for the Map Screen: Forward up Orients the map so that the direction you are traveling is always at the top of the screen. Use Larger Labels Increases the size of street names to make the map easier to read.
Prompts From the Settings menu, tap the Prompts button to select the voice and road notifications that you would like to use while navigating. Voice Prompts Speed Warning Warns you when your car exceeds the speed limit. Route Recalculation Notifies you when the GPS recalculates your route. For example, when you miss a turn. Unreliable GPS Signal Warns that the GPS signal is too low and unreliable for navigation. GPS Not Found Alerts you if the GPS signal is lost.
Look & Feel Settings From the Setup 1 menu, tap the Look & Feel button to select from a list of preinstalled skins. It is common that your unit may have only one skin supplied. A skin determines the visual effects such as colors and icons displayed. • Prefer QWERTY Keyboard – When this option is selected, the navigation keyboard is displayed as a computer keyboard (QWERTY style) on the screens. When unselected, the keyboard keys are arranged in ABCD format.
Units of Measure From the Setup 1 menu, tap this button to specify the measurement system you would like to use. You can select: • Miles, Yards (UK) • Miles, 10th of a Mile (US) • Kilometers, Meters Time Settings From the Setup 1 menu, tap this button to display time settings. Figure 29 – Time Zone You can select the Daylight Savings checkbox to automatically adjust for daylight savings. Brightness From the Setup 2 menu, tap this button to determine the brightness of the screen.
Index A Add to My Favorites • 13 Adding a Road to Avoid • 17 Alerts for a Favorite Group • 13 Avoid Roads • 16 B M Main Map • 3 Main Map Icons • 3 Map Browsing • 19 Map Selection • 20 Map Display • 21 Map Views • 4 N C Cancel Route • 4 Configuration Wizard • 2 Creating Group • 17 D Configurations • 21 Screen Buttons • 6 Detour • 18 Driving Directions • 15 F Navigate to an Address • 7 P Walking Mode • 19 POI category • 9 POI Name • 8 Points of Interest (POI) • 8 Prompts • 22 Q QuickNav • 10 Favorit
Warranty Conditions Manufacturer is not responsible for any product defects due to misuse, abuse, or usage of product in way that is not in compliance with the written product instructions. To use this product other than expressed in the instructions will void customer's product warranty. Pharos Website: www.pharosgps.com Pharos Customer Care Center: 1.888.742.