
- Pharos Drive 250n Automobile Navigator Manual

3
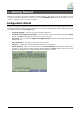
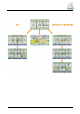
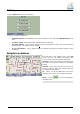
Map Screen
You can use the icons displayed on this screen to view and receive information about your route.
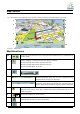
Figure 2 – Map Screen
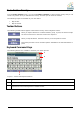
Map Screen Icons
1, 6
Zoom in or out of the map to view a larger and less detailed area, or a smaller area in
greater details.
2
Tap the compass to change the map view display as follows:
2D map view with the forward direction at the top.
3D map view with the forward direction at the top.
2D map view with North at the top.
3
Tap this icon to adjust or mute the volume.
4 When you have calculated a route, the Directions Bar
displays information about your next turn. Tap this bar for a
complete list of turn-by-turn directions.
5 The Information Bar is a toggle button that displays the
remaining travel distance and travel time, estimated time of
arrival, street name and address number, speed and altitude.
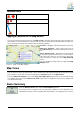
7
The red GPS receiver means that a reliable GPS signal is not yet located.
The green GPS receiver means that a reliable GPS signal is located and that you are
ready to navigate.
8
These icons display your power source.
9
Tap this icon to set your QuickNav location. When set, you can tap this button to
automatically calculate a route to this location.
10
Tap this icon to display the Main Menu.
3
1
2
4
5
7
6
8
9
10