PhatNoise Home Digital Media Player 1 Getting Started . . . . . . . . . . . . . . . . . . . . . 9 2 Using the Front Panel Display . . . . . . 13 3 Using the TV Display . . . . . . . . . . . . . . 29 4 Music Management . . . . . . . . . . . . . . . 61 5 Support . . . . . . . . . . . . . . . . . . . . . . . . . . .
PhatNoise 2
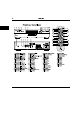
Contents 1 Getting Started 2 Using the Front Panel Display 3 9 13 2.1 Setting up for use without a TV . . . . . . . . . . . . . . . . . . . . . . . . . . . . . . . . . 13 2.2 Turning on the system . . . . . . . . . . . . . . . . . . . . . . . . . . . . . . . . . . . . . . . 15 2.3 How the Home Player is Organized . . . . . . . . . . . . . . . . . . . . . . . . . . . . . . . 16 2.4 Browsing the Main Menu . . . . . . . . . . . . . . . . . . . . . . . . . . . . . . . . . . . . . 18 2.
CONTENTS 4 5 4 Music Management 61 4.1 Installing the PhatNoise Music Manager software . . . . . . . . . . . . . . . . . . . . . . . 61 4.2 Installing the USB Cradle and DMS Cartridge . . . . . . . . . . . . . . . . . . . . . . . . . 62 4.3 PhatNoise CD Manager . . . . . . . . . . . . . . . . . . . . . . . . . . . . . . . . . . . . . . 66 4.4 PhatNoise Music Manager 4.5 Downloading cover art for your music . . . . . . . . . . . . . . . . . . . . . . . . . . . . . 85 4.
CONTENTS FCC WARNING This equipment may generate or use radio frequency energy. Changes or modi cations to this equipment may cause harmful interference unless the modi cations are expressly approved in the instruction manual. The user could use the authority to operate this equipment if an unauthorized change or modi cation is made. NOTE This equipment has been tested and found to comply with the limits for a Class B digital device, pursuant to Part 15 of the FCC Rules.
CONTENTS • Do not drop the DMS Cartridge or subject it to a violent shock. • Do not spill liquid on the DMS Cartridge or submerge the DMS Cartridge in liquid. • The only effective protection for data and other material stored on the DMS Cartridge is the regular backing up of that data by you, the consumer. PhatNoise Inc. shall not be responsible for the loss of any such data or other material. PhatNoise Player and USB Cradle Precautions • Never spill liquid of any kind on the Player.
CONTENTS Copyright and Patent Notices Copyright 2003, PhatNoise, Inc. - All Rights Reserved. All trademarks, service marks and tradenames, includ- ing without limitation, PHATNOISE, PHATNOISE CAR AUDIO SYSTEM, PHATNOISE MUSIC MANAGER, PHATBOX, SSA/VOICE, DPGT, PHATNOISE HOME DIGITAL MEDIA PLAYER, and DMS are proprietary to PhatNoise, Inc. ° Gracenote is CDDB, Inc. d/b/a "Gracenote." CD and music-related data from Gracenote CDDB c Music Recog- ° ° nition ServiceSM c 2000, 2001, 2002 Gracenote.
CONTENTS 8
Section 1 Getting Started Congratulations on your purchase of the PhatNoise Home Digital Media Player! This section will guide you through the main features and components that are in the Home Player package. Please read through this section to make sure you have each of the included pieces.
1 10 PhatNoise
Getting Started 1 What's Included Tip: The DMS cartridge is not a standard part of the Home Player package, but is required for Home Player to operate.
1 12 PhatNoise
Section 2 Using the Front Panel Display This section presents all the things you can do with the PhatNoise Home Digital Media Player using the front panel LCD display. If you'd like to use the TV interface instead, please see the section the TV Display 2.1 Using below on page 29. Setting up for use without a TV What you'll need: 1. An audio ampli er or powered speakers. You can connect the home player to standard home audio equipment just like a CD player.
2.1 PhatNoise Tip: You may want to avoid placing the home player on a slippery surface the unit may move when you insert or remove the DMS cartridge. 2. Connect the analog or digital audio jacks. For an analog audio connection, connect the Left and Right RCA jacks to a suitable audio input of your home stereo. Common audio inputs that work well may be labelled 'CD' or 'AUX'.
Turning on the system 2.2 home player, then plug the power cord into your wall outlet. 2.2 Turning on the system 1. The home player will initialize for a few moments as soon as it is plugged in. The controls will not operate while the system is initializing. 2. When the system is done initializing, all the lights and the LCD display will turn off. 3. To begin, simply insert a cartridge, and press the power button. The display will illuminate, and the power indicator will turn on.
2.3 PhatNoise When the home player turns on, you will see a set of different colored lights. This is what the colors mean: 2.3 • Red: The home player is doing a self check of hardware. • Amber: The home player is loading its system software. • Green: The home player is up and running. How the Home Player is Organized The PhatNoise Home Digital Media player is organized for fast and easy access to the most common features.
2.3 How the Home Player is Organized • From the remote control The select screen. • up and down buttons browse through the items available. The button chooses an item and moves to the next screen. The - button goes to the previous (Note: the + and select buttons currently perform the same function) From the front panel The knob allows you to browse through the items available. The button chooses an item and moves to the next screen. The back select button goes to the previous screen.
2.5 2.4 PhatNoise Browsing the Main Menu The rst screen to appear is the main menu: The top line indicates that you are viewing the main menu, and the bottom line shows the current item. Pressing the up or down buttons on the remote, or turning the knob on the front panel will change the current item. Pressing the select button will choose the item displayed. This menu has the following default menu items: • Music Library.
Choosing music to play from the Main Menu 2.5 2. Next, choose how you would like to browse your music library. The home player features four browse modes for your music: Mode Playlists Meaning Display all the playlists available in your system. These playlists are made with the PhatNoise Music Manager. Albums Display all the albums available in your system. The albums are sorted rst by artist, then alphabetically by album name.
2.5 PhatNoise Tip: Press and hold the up or down buttons to scroll quickly through the list! 4. Press play to immediately begin playing, or 5. Press select instead. The system will show you the tracks from the Playlist, Album, Artist, or Genre that you selected. Press on the screen.
Navigating the Playback screen 2.6 You may notice the messages that appear on the top line of the display. These are built in help messages to assist you in using the system. To turn these messages on or off, please see Settings Menu below on page 25 2.6 Navigating the Playback screen The playback screen is what you see when a song is playing. Here's how it is laid out: • Track Number. This shows you the current track number, as well as the total number of tracks queued. • Current time.
2.
2.7 Playing music using SSA The Menu and Play • Menu button: • Play buttons Press this to go directly to the main menu. button: Press the play button at any time to begin playback of the current selected set of songs. If no songs are selected, the home player will begin playing all the songs available. Turning off the home player Press either the Power or Eject buttons to turn the home player off.
2.7 PhatNoise 2. You can press one of these buttons at any time to display a list of content for that button. It is like a shortcut to the four browse modes mentioned above. Furthermore, when you press one of these buttons, the corresponding light will glow, indicating the selected browse style. 3. Press play to immediately begin playing, or 4. Press select instead. The system will show you the tracks from the Playlist, Album, Artist, or Genre that you selected.
2.8 Settings Menu 2. If we press the Album button just once, the system will change the queue of songs to just those that are from the current album "The Best of Beth Jones". Wait a few moments for the player to return to the song playback screen. Browsing categories within categories Press and hold any of the Playlist, Album, Artist, or Genre buttons that are not lit. The home player will only display the items that match both the existing selection and the button you just pressed. Example: 1.
2.8 PhatNoise You can get to the settings menu from the main menu. Use the knob to browse through each of the items. Press the the - or back select up or down buttons, or turn the button to choose the selected item, press buttons to leave the menu. Each of the settings are explained below. Random Settings This menu allows you to turn the random function on or off. This menu is equivalent to pressing the random button on the remote control to toggle the random mode on or off.
Future Features 2.9 Video Settings This menu allows you to change the video mode of the TV display. It has no affect if the home player is not connected to a TV. Setting Meaning Composite Video Switch the video output to the composite video mode. S-Video Switch the video output to the 'Super VHS' video mode. Help Settings This menu allows you to turn help messages on or off. Setting On Meaning Display help messages on the home player.
2.9 PhatNoise These buttons currently have no function. In addition, the USB port on the back of the home player is presently disabled. Future software updates will include support for this port.
Section 3 Using the TV Display This section presents all the things you can do with the PhatNoise Home Digital Media Player using your TV's display and the remote control. If you'd like to use the home player without a TV, or if you would like to use the front panel buttons instead, please see the section Using the Front Panel Display on page 13. 3.1 Setting up for use with a TV What you'll need: 1. An audio ampli er or powered speakers.
3.1 PhatNoise Tip: You may want to avoid placing the home player on a slippery surface the unit may move when you insert or remove the DMS cartridge. 2. Connect the analog or digital audio jacks. For an analog audio connection, connect the Left and Right RCA jacks to a suitable audio input of your home stereo. Common audio inputs that work well may be labelled 'CD' or 'AUX'.
Setting up for use with a TV 3.1 the S-Video output of the home player, and to the S-Video input of your TV or video system. If your TV does not feature S-Video, connect the composite video cable (included) from the composite video output of the home player, and to the composite video input of your TV or video system. 4. Connect the power supply. Insert the small power supply plug into the power input jack of the home player, then plug the power cord into your wall outlet.
3.2 PhatNoise 5. The home player will initialize for a few moments as soon as it is plugged in. The controls will not operate while the system is initializing. 6. When the system is done initializing, all the lights and the LCD display will turn off. 3.2 Turning on the system 1. To begin, insert your DMS cartridge, and press the power button. The display will illuminate, and the power indicator will turn on.
Setting up the Graphical Interface Software 3.3 When the home player turns on, you will see a set of different colored lights. This is what the colors mean: 3.3 • Red: The home player is doing a self check of hardware. • Amber: The home player is loading its system software. • Green: The home player is up and running.
3.3 PhatNoise To do this, run the PhatNoise Music Manager and download a new Plug-In for your DMS cartridge named 'hugui'. This will copy the necessary software onto your DMS for the graphical display to appear. Tip: If the DMS cartridge you are using shipped with your home player, you can skip this section the Graphical Interface software is already installed. Step-by-step 1. Run the PhatNoise Music Manager. 2. Insert a DMS cartridge into the USB cradle.
Setting up the Graphical Interface Software 3.3 3. Display the Device view by clicking the "Device" button.
3.3 PhatNoise 4. Activate the PhatNoise DMS cartridge by clicking PhatNoise DMS in the panel.
Setting up the Graphical Interface Software 5. Click on the 3.3 Hardware Options button.
3.3 6. Click on 38 PhatNoise Properties.
Setting up the Graphical Interface Software 7. Click on 3.3 Install Plugin. The window you see may not have these options listed. These options are for Kenwoodcompatible systems, and may not be present for other systems. Just proceed with the rest of these steps.
3.3 PhatNoise 8. In the registration code box, type "hugui" (without quotes), and click Ok. 9. The drop down box will list each of the PhatNoise products the DMS cartridge has been used in.
Setting up the Graphical Interface Software You can select any one of these and click 3.3 Ok. 10. Wait for the Graphical Interface software to download size, and may take some time to download. the software is approximately 10 MB in Once done, click Ok. 11. Choose the item "Home Player Graphical Interface" you should see a display similar to the one above.
3.3 PhatNoise If your window does not display like this, go ahead and click Cancel. The software has still been downloaded and installed correctly. 12. Click on 42 Save Changes.
Setting up the Graphical Interface Software 13. Click on 3.3 Ok. 14. Finally, click on Save/Eject to before removing the cartridge from your cradle.
3.4 PhatNoise Your DMS cartridge is now ready for use in the home player. Again, this step is only needed for the TV display to operate the front panel and music playback work with any DMS cartridge as-is. 3.4 Setting the Video Mode Before using the TV display, ensure that the home player is set to the correct video mode. 1. Press the Menu button. 2. Press the up and down buttons, or turn the knob until the front panel displays Settings. 3. Press select 4.
3.5 How the Home Player is Organized Please see 3.5 Setting up the Graphical Interface Software on page 33. How the Home Player is Organized The PhatNoise Home Digital Media player is organized for fast and easy access to the most common features. Most of the navigation is done by a small set of controls, with the remaining controls used as shortcuts. • From the remote control The select previous screen. • up and down buttons browse through the items available.
3.5 PhatNoise This section will focus primarily on using the remote control. If you would like to use the front panel controls, more detailed explanations can be found in the section on page 13.
3.6 Browsing the Main Menu 3.6 Browsing the Main Menu The rst screen to appear is the main menu: Pressing the up or down buttons on the remote, or turning the knob on the front panel will change the current item. Pressing the select button will choose the item displayed. This menu has the following default menu items: • Music Library. Selecting this item will show different ways of browsing the music library in your system. • Settings.
3.7 • 3.7 PhatNoise Now Playing. If a song is currently playing, this item will take you right to it. Choosing music to play from the Main Menu 1. From the main menu, scroll to the rst item, Music Library, and press select. 2. Next, choose how you would like to browse your music library. The home player features four browse modes for your music: Mode Playlists Meaning Display all the playlists available in your system. These playlists are made with the PhatNoise Music Manager.
Choosing music to play from the Main Menu Press the 3.7 up and down buttons on the remote to display each of the browse modes listed above.
3.7 PhatNoise 3. Make your selection by pressing the select matching the browse mode you chose. button. The home player will display a list of items In the image below, for example, a list of artists is displayed alphabetically.
Choosing music to play from the Main Menu 4. Press play 3.7 to immediately begin playing, or 5. Press select instead. The system will show you the tracks from the Playlist, Album, Artist, or Genre that you selected. Press select one last time when the track you would like to play is displayed on the screen.
3.8 3.8 PhatNoise Navigating the Playback screen The playback screen is what you see when a song is playing. Here's how it is laid out: • • Current Song. The currently playing song is shown highlighted in the list of songs. List Name. This is on the top of the screen, and shows what type of song listing you have (for example, "Now Playing Blender" will be displayed when you are playing all the songs by the artist Blender ). • Album Art.
3.
3.8 PhatNoise Additional Song information Press select while in the playback screen to see additional information about the current song. After a period of time the display will return to the playback screen, or you can press - to go back at any time. The Menu and Play • Menu button: • Play buttons Press this to go directly to the main menu. button: Press the play button at any time to begin playback of the current selected set of songs.
Playing music using SSA 3.9 Tip: Make sure to turn off the home player before pulling out the cartridge! Otherwise, you may risk corrupting the contents of the DMS! 3.9 Playing music using SSA The PhatNoise Home Digital Media Player features the SSA music organization feature, that not only makes browsing and playing music easier, but also gives you many more options for nding what you want. This section describes how to browse and play music using SSA. 1.
3.9 PhatNoise 3. Press play to immediately begin playing, or 4. Press select instead. The system will show you the tracks from the Playlist, Album, Artist, or Genre that you selected. Press select one last time when the track you would like to play is displayed on the screen. More from this Playlist, Album, Artist, or Genre Whenever a song is shown playing on the display, you can press any of the buttons Artist, or Genre that are not lit to hear more songs that match that category.
3.10 Settings Menu Browsing categories within categories Press and hold any of the Playlist, Album, Artist, or Genre buttons that are not lit. The home player will only display the items that match both the existing selection and the button you just pressed. Example: rock 1. Let's say we are listening to all songs whose Genre is since the (we know we are browsing by Genre Genre button is lit). 2. Press and hold the Artist button.
3.10 PhatNoise Random Settings This menu allows you to turn the random function on or off. This menu is equivalent to pressing the random button on the remote control to toggle the random mode on or off. Setting Random Off Meaning Turn off the random mode, and play songs in a normal, sequential order. Randomize List Randomize the list of songs currently playing. For example, if one album is selected to play, the order of the songs within that album would be randomized.
Future commands Setting 3.11 Meaning Composite Video Switch the video output to the composite video mode. S-Video Switch the video output to the 'Super VHS' video mode. Help Settings This menu allows you to turn help messages on or off. Setting On Meaning Display help messages on the home player. These are displayed when you do not operate the controls of the player for a period of time. Off Turn off any help messages.
3.11 PhatNoise In addition, the USB port on the back of the home player is presently disabled. Future software updates will include support for this port.
Section 4 Music Management If you already have PhatNoise Music Manager software installed on your computer, please install the version on the CD included with your Home Player. 4.1 Installing the PhatNoise Music Manager software Tip: You must install the PhatNoise Music Manager software on your computer before you connect the USB cradle to your computer. Tip: The PhatNoise Music Manager requires the Windows Operating System (Windows 98 Second Edition, Windows Millennium, Windows 2000, or Windows XP).
4.2 PhatNoise 3. Insert the PhatNoise Music Manager software CD into your computer's CD-ROM drive. The PhatNoise Music Manager software installation program will launch automatically launch in a few moments. 4. If the PhatNoise Music Manager software installation program does not launch automatically, follow these steps to run the software manually: (a) Click the "Start" button in the lower left corner of your screen and select "Run...". The Run dialog box appears.
Installing the USB Cradle and DMS Cartridge 4.2 1. Once you have installed PhatNoise Music Manager and have restarted your computer, plug the power connector into the USB cradle. Make sure the other end of the power cable is plugged into a wall outlet before connecting the USB cradle to your computer. 2. Connect the USB cradle's USB cable to a USB port on your computer.
4.2 PhatNoise 3. Insert the DMS cartridge rmly into the USB cradle. Avoid 'slapping' the cartridge into place. The green and red indicator lights should illuminate. The DMS cartridge will then be detected by the operating system. (If your computer does not support USB 2.0, Windows may display a message indicating that you have plugged the cradle into a "non-HI-SPEED USB Hub". The cradle will still function properly. To take advantage of the faster transfer speed of USB 2.
Installing the USB Cradle and DMS Cartridge 4.2 4. After an initialization period, an "Autoplay" dialog box will appear. 5. Let the Autoplay feature nish.
4.3 PhatNoise 6. Next, dialog boxes will appear for two new drives, labelled PHTDTA and PHTSYS. 7. For each dialog box, select "Take No Action" and check "Always do the selected Action", then Click "OK". 8. Your USB Cradle has been successfully installed and your DMS cartridge is ready for use! 4.3 PhatNoise CD Manager The quickest and easiest way to transfer your CD collection to a DMS cartridge is with the PhatNoise CD Manager.
PhatNoise CD Manager 4.3 2. Insert a DMS cartridge into the USB cradle. PhatNoise CD Manager will detect the DMS cartridge and after reading its contents will display any music les in the right hand window pane. 3. Place an audio CD in your computer's CD-ROM drive.
4.4 PhatNoise Tip: You must Save/Eject your DMS before removing it from the cradle. 7. Insert the DMS cartridge into your Home Player and enjoy your entire music collection! PhatNoise CD Manager will store about 300 to 400 CDs on one 20GB DMS cartridge at its default setting of "Good" quality. (Speci cally, music is encoded at 128kbps in mp3 format.
PhatNoise Music Manager 4.4 1. Creating MP3 les from an Audio CD 2. Organizing music les and playlists 3. Transferring MP3s and playlists to the DMS cartridge Launching the Music Manager and Loading Music Files 1. Launch the PhatNoise Music Manager software. You can do this one of two ways: • Double-click the PhatNoise Music Manager icon on your desktop, or • Click "Start", select "Program Files", and select the PhatNoise Music Manager icon. 2.
4.
PhatNoise Music Manager 4.4 The Library View initially displays "All Songs" in a single list. At any time you can double click on a song title and it will start playing. The main ways of nding music with the PhatNoise Music Manager are: 1. The Browse View 2. The Media Explorer 3. The Search Box Browse View: Click the "Browse View" button while in the "Library" (or "Device") View and the window will display a list of all your Artists and a list of all your Albums just above the list of all your songs.
4.4 PhatNoise Media Explorer: The Media Explorer lets you view the les in your database as they are laid out in the le system. This is helpful if you who have already organized your music into Windows folders. To access the Media Explorer, click on its icon in the left side window pane of the Library View.. The Media Explorer looks and functions just like Windows Explorer. Note that the rst time you click it, there is a slight delay as the software builds the tree of folders dynamically.
PhatNoise Music Manager 4.4 Search Box: Type search terms into the search box and the matching songs will be automatically displayed below as you type. You may search the contents of any playlist, "All Songs", or the results of a browse view search using the search box. The search function displays all songs for which all or part of the artist, album, genre, path, or le name matches the search terms.
4.4 PhatNoise The Encode View Converting an Audio CD to computer les The CD Encoder View allows you to create computer les from your CDs. The easiest and fastest way to transfer CDs to your DMS cartridge is with PhatNoise CD Manager. The PhatNoise Music Manager CD Encoder View provides much more control over the encoding process including a wider range of encoding formats and data rates. 1.
PhatNoise Music Manager 4.4 4. If you are not connected to the Internet, the tracks will be listed "Track 01", "Track 02", etc. 5. Edit the "Artist", "Title", "Genre", and "Year" information if it is missing or incorrect. 6. Choose the tracks to encode using the checkboxes. 7. Choose the le format to encode in. 8. Choose the bitrate of the le to be created.
4.4 PhatNoise For example, if If Artist is selected, then a list of all Artists is displayed. File Path is selected, an input box appears at the bottom of the criteria window. Enter the path and press Add. If Most Recent Songs is selected, then an input box will appear at the bottom of the criteria window. Enter the number of most recent songs to add and press Add. Creating a Static Playlist and Adding Songs 1. Click the Create playlist button.
PhatNoise Music Manager 4.4 4. Drag the desired songs into your playlist.
4.4 PhatNoise The Device View Managing the DMS Cartridge 1. Display the Device view by clicking the "Device" button. The Device view is organized in two parts: • The PhatNoise Music Manager Playlist and Windows Explorer panels on the top • The All Supported Devices panels and the contents panel on the bottom 2. Insert the DMS cartridge into the USB cradle. The LED lights on the cradle will icker when the cartridge has been properly inserted. 3.
PhatNoise Music Manager 4.4 If a blue Reconnect button appears, click on it to activate your DMS cartridge. If the DMS cartridge has not been con gured properly, a con guration wizard will launch. For more information, refer to Appendix A: Updating the Firmware. Adding Music to the DMS Cartridge The DMS cartridge stores all music in "Playlists", also called "Discs" or "Virtual Discs". The Home Player and PhatBox can play these playlists directly, or sort all the music by Album, Artist, or Genre.
4.4 PhatNoise 1. Find the base folder where all your encoded CDs are located using the Media Explorer. In the example above, it is under 'My Music'.
4.4 PhatNoise Music Manager 2. Drag the Folder onto the bottom left space of the window to create a "virtual" Disc 1. On the bottom right you can see the music contained in this Disc. 3. No music les are actually transferred at this time. See the section Ejecting the DMS on page 90 for instructions on copying your music to the DMS cartridge.
4.4 PhatNoise Playlist Based: If you like to create custom mixes of music, follow these steps: 1. You can directly drag a playlist you created earlier, listed under 2. Or your can quickly create a static playlist as follows: Select would like to place on the DMS. 82 All Playlists, onto the DMS.
PhatNoise Music Manager 3. Drag the selected songs onto the bottom left space of the window to create a "virtual" 4.4 Disc (Playlist) of these songs.
4.4 PhatNoise 4. Give the Disc a name by selecting the disc twice - when you play this Playlist this disc name will be displayed by your Home Player (or read aloud to you by your PhatBox in the car). These Virtual Discs (with the same names and numbering) are available via the Player or PhatBox.
Downloading cover art for your music 4.5 4.5 Downloading cover art for your music The PhatNoise Music Manager features a utility to automatically search and download cover art images for the songs on your DMS cartridge. The album and artist names from every song will be used for this search, and the resulting downloaded images are stored on your DMS. These images can be viewed from compatible PhatNoise products, such as the PhatNoise Home Digital Media Player. Here's how to turn this feature on: 1.
4.5 2.
Downloading cover art for your music 4.5 3. If you would like to have the music manager download missing cover art every time you eject the cartridge, check the box titled Enable Cover Download during Eject.
4.5 PhatNoise 4. If you would like the music manager to update your cartridge with cover art now, press the Cover Art button. When the music manger downloads cover art, it may rst ask to regenerate the database on your DMS cartridge. This is usually a good idea, but may take a few moments to nish.
Downloading cover art for your music 4.5 5. When generating cover art, the music manager searches an Internet database for the pictures. Sometimes there can be more than one match for the album name. If this is the case, the music manager will prompt you to choose which album best describes the songs you have. Choose one of the album covers and press Accept Selected Item, or press Cancel to skip this song.
4.5 PhatNoise Ejecting the DMS (Save/Eject DMS) When you are nished preparing the contents you want to transfer to your DMS, click Save/Eject DMS. This step will copy all new songs, databases, and other system les to the cartridge. When done a message will be displayed (and the DMS cartridge drive letters will be removed from Windows) indicating that you can remove the DMS cartridge from the USB cradle.
Downloading cover art for your music 4.6 Syncing Dynamic Playlists The PhatNoise Music Manager has a one-click synchronization feature. This allows you to easily update the Dynamic Playlists on your DMS cartridge with new music you may have stored on your computer's hard drive. 1. In the Device view, a yellow star next to the Disc icon denotes a dynamic playlist. This playlist is set to nd songs that match certain criteria.
4.6 4.6 PhatNoise Information on MP3 Files and ID3 Tags The PhatNoise Music Manager software allows you to organize, play, and create digital music les. These music les come in many different formats, but the most popular is the MP3 format. While this manual usually refers to MP3 les, the same actions apply to any digital music le format. An MP3 le is a compressed audio le that can be listened to on the computer. An MP3 le is made of two parts, the audio data and the ID3 tag.
Section 5 Support Need help? What goes where, compatibility, and troubleshooting? First, check our Frequently Asked Questions: • http://www.phatnoise.com/support/faq If you can't nd the answer to your question there, please feel free to contact us at: • Web/Email: http://www.phatnoise.com/support • Phone: 310-954-3650 Our call center is available 10:00am to 6:00pm PST Monday through Friday.